background image

Configuring the Printer Driver Settings

66

Windows 2000/Windows XP/Windows Server 2003 (Administrator)

Pixel Diameter

Adjust the darkness of the print image. Move the slider to specify the pixel size. You can choose 
between specifying the real size in inches or specifying it as a percentage relative to the printer 
resolution.

Luminance (CIE Y)

Adjust the luminosity of the print image.

3.

 button

When your machine is connected onto the network (TCP/IP), click this button to set the Options 
Configuration automatically.

4.

Number of Paper Trays

Select the number of available paper trays if optional Paper Feed Module(s) are installed.

5.

 button

Edit the URL address that will be displayed when clicking the 

 button of the Paper 

Tab (see page 69).

NOTE

1.

Device Options  

Tab specifies device-specific settings and settings of optional devices.


Make sure that the 

Device Option Tab

 is set properly before printing a document, or printing  

problems may occur.

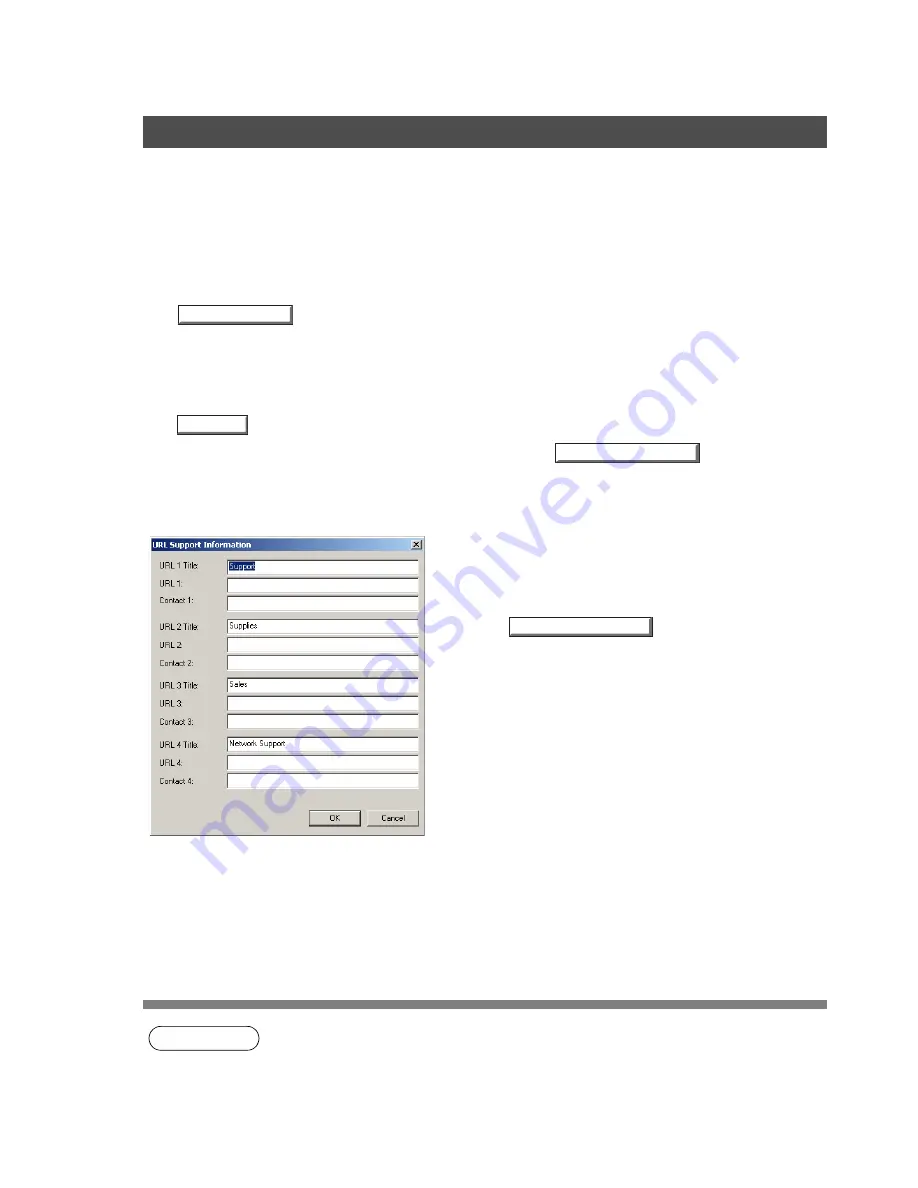
URL Title

Enter an applicable URL title.

URL

Enter the URL address to be associated to the 

  button of the Paper Tab. 

(See page 69)

Contact

Enter applicable contact information
(i.e.: The email address of the contact person)

Auto Configuration

Edit URL...

Support Contacts (W)...

Support Contacts (W)...

Содержание E-tudio190F

Страница 1: ...PLAIN PAPER FACSIMILE Operator s Manual for Document Management System and Printer ...

Страница 2: ... the USA and other countries i386 i486 and Pentium are trademarks of Intel Corporation The USB IF Logos are trademarks of Universal Serial Bus Implementers Forum Inc TrueType is a registered trademark of Apple Computer Inc Novell and NetWare are registered trademarks of Novell Inc in the USA and other countries All other trademarks identified herein are the property of their respective owners Copy...

Страница 3: ...ows NT 4 0 Administrator 49 Windows NT 4 0 User 57 Windows 2000 Windows XP Windows Server 2003 Administrator 58 Windows 2000 Windows XP Windows Server 2003 User 67 All Windows Common Settings 68 Print Operation 74 Printing from Windows Applications 74 Printing on Network 75 Mailbox and Secure Mailbox 77 General Description 77 Printing a File from the Mailbox 78 Deleting a File from the Mailbox 79 ...

Страница 4: ...dit Menu 124 Page Menu 125 View Menu 128 Annotation Menu 129 Window Menu 138 Network Scanner 139 Network Scanner Settings 139 Port Controller 142 Document Fax 143 General Description 143 Connection Configurations For the Network Connected Models 144 Installation and Setup For the Network Connected Models 146 Main Window and Toolbar 155 Sending Document 157 Receiving Document 161 Registering the Pe...

Страница 5: ...re 187 Create Shortcut Links 188 Main Window 189 Basic Operation 191 Advanced Operation 194 Troubleshooting 204 Printing Operation Failure 204 Document is Not Printed Correctly 205 Error Messages Displayed on the Computer 206 Appendix 207 Printing Area 207 Document Management System Section Troubleshooting Appendix ...

Страница 6: ...se an Universal Serial Bus USB Hi Speed Cable Consult with your service provider for further details Note The USB port is only available for printing USB Cable LAN Cable 10Base T 100Base TX Cable LAN cable is not included with the product Purchase a Category 5 CAT 5 Cable compliant with EIA TIA 568 A 5 standard Connect to your 10Base T 100Base TX Ethernet Network ...

Страница 7: ...to cancel the print job Note Make sure that the PRINT lamp is ON and printer is on line If not press button in advance to cancel the print job Mailbox See page 77 Secure Mailbox See page 80 Job Control 1 Printer Status Online Offline 2 Print Cancel Note Make sure that the PRINT lamp is ON and the printer is on line to cancel the print job Printer Settings See page 83 1 PRINT ...

Страница 8: ... from the CD ROM Interface 10Base T 100Base TX Ethernet port USB port 1 Microsoft Windows 98 operating system hereafter Windows 98 2 Microsoft Windows Millennium Edition operating system hereafter Windows Me 3 Microsoft Windows NT operating system Version 4 0 hereafter Windows NT 4 0 4 Microsoft Windows 2000 operating system hereafter Windows 2000 5 Microsoft Windows XP operating system hereafter ...

Страница 9: ...9 memo Before Starting ...

Страница 10: ...indows Server 2003 Follow the procedures on pages 27 to 28 Connecting with a USB Cable Windows 98 Follow the procedures on pages 11 to 16 Installing the Printer Driver and then pages 29 to 32 Installing the LPR Monitor Windows Me Follow the procedures on pages 11 to 16 Installing the Printer Driver and then pages 29 to 32 Installing the LPR Monitor Windows NT Follow the procedures on pages 11 to 1...

Страница 11: ... click the My Computer icon on the Desktop or on the Start menu then double click the CD ROM icon 3 Click the button 4 Click Printer Driver 5 Note for Windows 98 Windows Me users If your computer does not have the LPR Port Monitor installed please proceed to Installing the LPR Monitor on page 29 before continuing this installation Click Install Printer Driver Next Continued on the next page ...

Страница 12: ...will be used either as a Network Printer or as a USB Printer If Network Printer is selected click the button and continue with Step 9 If USB Printer is selected click the button and skip to Step 13 Note Make sure that the Power Switch of your machine is OFF and the USB cable is not connected to your computer 9 Check LPT1 and click the button Next Next Next Next Next ...

Страница 13: ...ndows Me When this message appears turn the Power Switch of your machine ON and connect your machine to an available USB Port on your computer Note For Windows 98 users If your PC does not detect the device and a dialog box does not appear confirming its detection after the USB cable is connected proceed as follows 1 Locate the DrvIns exe file under the D Tools DrvUnIns directory on the CD ROM and...

Страница 14: ...000 Click the button When this message appears turn the Power Switch of your machine ON and connect your machine to an available USB Port on your computer Click the button 13c USB Printer Only Windows XP Windows Server 2003 Click the button Yes Yes Continue Anyway ...

Страница 15: ...lable USB Port on your computer Windows XP Service Pack 2 Select No not this time and click the button Select Install the software automatically and click the button This message may appear if you have a previous version of the printer driver installed Select the latest version of the inf file and click the button Next Next Next Continued on the next page ...

Страница 16: ... are using after your computer has rebooted NOTE 1 When installing on Windows NT 4 0 Windows 2000 Windows XP or Windows Server 2003 logon to the computer network using an account with administrator rights 2 To remove the Printer Driver select TOSHIBA e STUDIO190F in Add Remove Programs Properties in the Control Panel and click the button 13c Click the button Click the button 14 When the setup proc...

Страница 17: ...ndows 98 1 Connect the printer to the PC with an USB cable Turn the Power Switch of your machine ON 2 The New Hardware Found dialog box appears for a brief moment followed by the Add New Hardware Wizard dialog box Click the button 3 Select Search for the best driver for your device Click the button 4 Insert the CD ROM included in your machine Rear View Next Next Continued on the next page ...

Страница 18: ...a location and type D English DMS Driver UsbDrv Win9x where D is your CD ROM drive Click the button 6 Click the button 7 Click the button 8 The New Hardware Found dialog box appears for a brief moment followed by the Add New Hardware Wizard dialog box Click the button Next Next Finish Next ...

Страница 19: ...elect Search for the best driver for your device Click the button 10 Select Specify a location and type D English DMS Driver Win9x where D is your CD ROM drive Click the button 11 Click the button 12 Enter the Printer name and click the button Next Next Next Finish Continued on the next page ...

Страница 20: ...Installing the Printer Driver 20 Connecting with a USB Cable Windows 98 13 Click the button END_USB_98 Finish ...

Страница 21: ... New Hardware Found dialog box appears for a brief moment followed by the Add New Hardware Wizard dialog box Select Specify the location of the driver Advanced Click the button 3 Insert the CD ROM included in your machine 4 Select Specify a location and type D English DMS Driver UsbDrv Win9x where D is your CD ROM drive Click the button Rear View Next Next Continued on the next page ...

Страница 22: ... The New Hardware Found dialog box appears for a brief moment followed by the Add New Hardware Wizard dialog box Select Specify the location of the driver Advanced Click the button 8 Select Specify a location and type D English DMS Driver Win9x where D is your CD ROM drive Click the button Next Finish Next Next ...

Страница 23: ...nstalling the Printer Driver 23 Connecting with a USB Cable Windows Me Printer Section 9 Click the button 10 Enter the Printer name and click the button 11 Click the button END_USB_me Next Finish Finish ...

Страница 24: ... Windows 2000 1 Connect the printer to the PC with an USB cable Turn the Power Switch of your machine ON 2 The Found New Hardware Wizard dialog box appears Click the button 3 Select Search for a suitable driver for my device Click the button Rear View Next Next ...

Страница 25: ...Printer Section 4 Insert the CD ROM included in your machine 5 Select Specify a location Click the button 6 Type D English DMS Driver WinXP 2K 2003 where D is your CD ROM drive Click the button 7 Click the button 8 Click the button Next OK Next Yes Continued on the next page ...

Страница 26: ...Installing the Printer Driver 26 Connecting with a USB Cable Windows 2000 9 Click the button END_USB_2000 Finish ...

Страница 27: ...P Service Pack 2 Select No not this time and click the button 3 The Found New Hardware Wizard dialog box appears Select Install from a list or specific location Advanced Click the button 4 Select Include this location in the search Type D English DMS Driver WinXP 2K 2003 where D is your CD ROM drive Insert the CD ROM included in your machine Click the button Rear View Next Next Next Continued on t...

Страница 28: ...indows XP Windows Server 2003 5 This message may appear if you have a previous version of the printer driver installed Select the latest version of the inf file and click the button 6 Click the button 7 Click the button END_USB_XP 2003 Next Continue Anyway Finish ...

Страница 29: ...Management System CD ROM 2 Click on the desired language Note If the CD ROM does not launch automatically double click the My Computer icon on the Desktop or on the Start menu then double click the CD ROM icon 3 Click the button 4 Click Printer Driver 5 Click Install LPR Monitor Next Continued on the next page ...

Страница 30: ...age is displayed prompting you to restart your computer It is recommended that you restart your computer now so that the LPR Monitor can be started Click the button 9 If you have not installed the printer driver yet please proceed to Installing the Printer Driver on page 10 After your computer has rebooted click the Start button select Settings and then click Printers The Printers folder appears R...

Страница 31: ... network printing Before proceeding ensure that the printer is installed connected to the network turned ON and is operating properly 11 Select the Details tab and click the button 12 The Add Port dialog box appears Click the Other radio button select M LPR Port Monitor from Click the type of port you want to add list and click the button Add Port OK Continued on the next page ...

Страница 32: ... New105 in the Queue name text box Click the button If an error occurs because the queue name had already been used for the same IP Address select a different unique name such as New106 14 The screen reverts to the Printer Properties Check that the Print to the following port has been changed as entered in step 13 and click the button first and then the button The printer properties dialog box clo...

Страница 33: ... the Network applet The Network dialog box appears 2 Click the Services tab Verify whether the LPR Service is already installed Indicated by Microsoft TCP IP Printing shown in the Network Services list If it is already installed skip to Step 7 Otherwise continue installing the LPR Service 3 Click the button to display the Select Network Service dialog box and select Microsoft TCP IP Printing Click...

Страница 34: ...twork Services list Click the button Note If the OK button does not change into a Close button remove and reinstall the Microsoft TCP IP Printing service 6 When Network Settings Change dialog box is displayed click the button to restart your computer now You have now completed the LPR Service installation 7 After your computer has rebooted logon with an account with Administrator Privileges click ...

Страница 35: ...operating properly Select the Ports Tab and click the button 9 The Printer Ports dialog box appears Select LPR Port and click the button 10 The Add LPR compatible printer dialog box appears Enter the IP Address of the printer in the upper field and lp for the print queue name in the lower field Click the button Please wait while the wizard verifies the IP Address and connectivity to the network Ad...

Страница 36: ...r 36 Windows NT 4 0 11 The Printer Ports dialog box appears Click the button 12 Select the printer port and click the button The printer properties dialog box closes and you have now configured the printer as a network printer END_LPR_NT Close OK ...

Страница 37: ...ows 2000 Windows XP Windows Server 2003 1 Open the Printers Windows XP Windows Sever 2003 Printers and Faxes folder Right click on the desired printer icon and select Properties from the pop up menu The printer properties dialog box appears 2 Select the Ports Tab and click the button Add Port Continued on the next page ...

Страница 38: ...dows Server 2003 3 Select Standard TCP IP Port and click the button 4 Click the button 5 Enter the IP Address and the Port Name and click the button Note The Port Name is automatically entered together with the IP Address You may need to change it as required New Port Next Next ...

Страница 39: ...erver 2003 Printer Section 6 Select Custom and click the button 7 1 In the Protocol section select LPR 2 In the LPR Settings section enter the Queue Name e g LPR1 and select the LPR Byte Counting Enabled 3 Click the button 8 Click the button Settings OK Next Continued on the next page ...

Страница 40: ...ndows 2000 Windows XP Windows Server 2003 9 Click the button 10 Click the button 11 Click the button Click the button The printer properties dialog box closes and you have now configured the printer as a network printer END_LPR_2000 Finish Close Apply OK ...

Страница 41: ...log box for the printer properties by performing the following steps Windows 98 Windows Me 1 Click the Start button select Settings and then click Printers 2 Right click on the desired printer icon in the Printers folder and select Properties in the pop up menu The printer properties dialog box appears ...

Страница 42: ...e printer the comment specified here will also appear on that computer However the comment displayed for an existing user will remain unchanged even if this comment is modified later 2 Separator page This feature does not function properly on your machine We recommend that you do not use it 3 button Prints a test page This allows the user to verify if the printer is installed properly Print Test P...

Страница 43: ...rinter or cancels a local port assigned to the network printer 4 Timeout settings Not selected Specify the amount of time in seconds allowed to elapse before the printer comes online If the printer is not online within this duration an error message will be displayed 5 Timeout settings Transmission retry Specify the amount of time in seconds allowed to elapse before the printer is ready for printi...

Страница 44: ... the Printer Driver Settings 44 Windows 98 Windows Me 8 button Specify the method of sending spooling documents from the program to the printer 9 button Modifies printer port settings Spool Settings Port Settings ...

Страница 45: ...when other users view information about the printer on the network 3 Comment You can enter comments regarding a shared printer such as the type of printer and the location where it is installed When other users view information about the printer on the network the comment specified here will be displayed 4 Password Specify the password required when other users will connect to this printer Leave t...

Страница 46: ...tton When your machine is connected onto the network TCP IP click this button to set the Options Configuration automatically 3 Number of Paper Trays Select the number of available paper trays if optional Paper Feed Module s are installed 4 button Edit the URL address that will be displayed when clicking the button of the Paper Tab see page 69 Auto Configuration Edit URL Support Contacts W ...

Страница 47: ...ptional devices Make sure that the Device Option Tab is set properly before printing a document or printing problems may occur URL Title Enter an applicable URL title URL Enter the URL address to be associated to the button of the Paper Tab See page 69 Contact Enter applicable contact information i e The email address of the contact person Support Contacts W ...

Страница 48: ...Configuring the Printer Driver Settings 48 Windows 98 Windows Me Paper Output Quality Secure Tab Refer to All Windows Common Settings see pages 68 73 ...

Страница 49: ...ies to be specified by the administrator system manager See Configuring the Printer Driver Settings User for details on user properties See page 57 Windows NT 4 0 Administrator 1 Logon to the computer network using an account with administrator rights See Note 1 2 Click the Start button select Settings and then click the Printers icon 3 Right click on the desired printer icon in the Printers folde...

Страница 50: ...sed or a printer model that can be emulated with the printer being used 4 button Updates or modifies the printer driver 5 button This feature does not function properly on your machine We recommend that you do not use it 6 button Specify the processor to be used for printing Print Processor and the data type Default Data type The processor and data type affect the manner in which the printer funct...

Страница 51: ...pport This setting enables reception of configuration data and status data from the printer 5 Enable printer pooling Printer pooling allows data sent to one logical printer to be received and printed by two or more printers With printer pooling enabled a transmitted printing job is output to the first printer that is ready for printing NOTE 1 Specify the waiting time seconds for the printer to be ...

Страница 52: ...irectly to the printer Specify how documents should be sent from an application to the printer 4 Hold mismatched documents This feature does not function properly on your machine We recommend that you do not use it 5 Print spooled documents first Always prints spooled documents first regardless of printing priority 6 Keep documents after they have printed Holds documents in the print queue even af...

Страница 53: ... view information about the printer on the network 3 Alternate Drivers See Note 1 Allows other operating systems printer drivers to be loaded When users of these operating systems connect to the printer the printer driver is automatically loaded NOTE 1 When sharing a printer on the network the print driver needs to be installed on the print server only and other computers will automatically copy a...

Страница 54: ...eges 2 button Displays the users who have used this printer and how they used it 3 button Set the ownership of the printer NOTE 1 In order to utilize these features first you need to select Audit from User Manager s Policies and enable File and Object Access in the Audit Policy dialog box Permissions Auditing Ownership ...

Страница 55: ...ter Select it according to the details of the data and your preference Halftone Pattern Select the pixel size to be used for halftones The greater the value the coarser the image would become However a larger value is suited for printing large areas The Enhanced pattern allows printing at a higher resolution using the same number of pixels However the pattern might generate unnatural lines pattern...

Страница 56: ...ation automatically 4 Number of Paper Trays Select the number of available paper trays if optional Paper Feed Module s are installed 5 button Edit the URL address that will be displayed when clicking the button of the Paper Tab see page 69 NOTE 1 Device Options Tab specifies device specific settings and settings of optional devices Make sure that the Device Option Tab is set properly before printi...

Страница 57: ...cified by a user upon executing a print operation in an application See Configuring the Printer Driver Settings Administrator for details on administrator properties See page 49 Windows NT 4 0 User 1 Select Print in the File menu of the application 2 Select the printer model in the name list box 3 Click the button in the Print dialog box 4 The printer properties dialog box appears Click the desire...

Страница 58: ...nistrator system manager See Configuring the Printer Driver Settings for details on user properties See page 67 Windows 2000 Windows XP Windows Server 2003 Administrator 1 Logon to the computer network using an account with administrator rights 2 Click the Start button select Settings and then click the Printers Windows XP Windows Server 2003 Printers and Faxes icon 3 Right click on the desired pr...

Страница 59: ...appear when another user sets up this printer on his her computer After completion of setup however changing this comment does not update the location and comment appearing on users PCs 3 Model Model name of the printer is displayed 4 Features Functions and settings of the printer are displayed 5 button Changes properties print settings specifiable for each user Refer to Configuring the Printer Dr...

Страница 60: ...OM in the locations shown below where D is your CD ROM drive NOTE 1 When sharing a printer on the network the print driver needs to be installed on the print server only and other computers will automatically copy and use that driver For this reason the print server must be ready with printer drivers for all the operating systems of all the computers that will be sharing the printer 2 If the Windo...

Страница 61: ...ional support This setting enables reception of configuration data and status data from the printer 5 Enable printer pooling Printer pooling allows data sent to one logical printer to be received and printed by two or more printers With printer pooling enabled a transmitted printing job is output to the first printer that is ready for printing NOTE 1 Specify the waiting time seconds for the printe...

Страница 62: ...es or modifies the printer driver 5 Spool print documents so program finishes printing faster Specify the method of sending a document from the program to the printer 6 Print directly to the printer Specify that the document should be sent directly to the printer device and not spooled Use this if you cannot print using either of the print spooling options 7 Hold mismatched documents This feature ...

Страница 63: ...print settings specifiable for each user If a local printer is shared the settings here are used as printing defaults for other users Refer to Configuring the Printer Driver Settings User for detailed settings See page 67 12 button Specify a print processor and data type to be used for printing The processor and data type define operations of printers under Windows 2000 Windows XP Windows Server 2...

Страница 64: ...s Gray checkbox indicates the permission inheritance 1 button Add or delete a user or group from the list 2 button Specify access to a printer audit and owner See Note 1 and 2 NOTE 1 Windows 2000 provides the capability of managing access to various objects e g printers by users 2 Refer the Windows 2000 documentation for details on access permission audit and owner 3 Windows XP Windows Server 2003...

Страница 65: ...rding to the details of the data and your preference Halftone Pattern Select the pixel size to be used for halftones The greater the value the coarser the image would become However a larger value is suited for printing large areas The Enhanced pattern allows printing at a higher resolution using the same number of pixels However the pattern might generate unnatural lines patterns moire effects an...

Страница 66: ...ly 4 Number of Paper Trays Select the number of available paper trays if optional Paper Feed Module s are installed 5 button Edit the URL address that will be displayed when clicking the button of the Paper Tab see page 69 NOTE 1 Device Options Tab specifies device specific settings and settings of optional devices Make sure that the Device Option Tab is set properly before printing a document or ...

Страница 67: ...a user upon executing a print operation in an application See Configuring the Printer Driver Settings Administrator for details on administrator system manager properties See page 58 Windows 2000 Windows XP Windows Server 2003 User 1 Select Print in the File menu of the application 2 Select the printer model in the name list box 3 Click the button in the Print dialog box 4 The printer properties d...

Страница 68: ...an enlargement or reduction percentage when printing documents If enlargement reduction can be set within the application indicate 100 here and specify the enlargement reduction percentage in the Print dialog box of the application 6 Paper Type Select the Paper Type you want to use 7 Paper Source Specify where the paper you want to use is located in the device If you choose Auto Tray Selection the...

Страница 69: ... Settings 69 All Windows Common Settings Printer Section 10 button Open the Support window The URL address es will be displayed if they were entered in the Device Options Tab Click the button to open the Web page Support Contacts W ...

Страница 70: ...dge 2 Sided Short Edge Margin Binding Position Select the binding side Long Edge Short Edge for duplex printing Binding Margin Select the binding margin upon duplex printing 2 N in 1 Specify the layout pattern for printing multiple documents on a single sheet of paper 3 Sort Select whether to Stack or Sort when printing multiple copies Note Sort settings made on the printer driver screen have prio...

Страница 71: ...t is printed as solid black Print Blank Pages Select whether the blank pages are printed Copies When printing a large amount of data with sort mode the machine might not be able to print due to lack of memory capacity In this case select Printer Driver Controlled as sorting is processed by the printer driver However this mode may take more time to print Advanced ...

Страница 72: ... order to print images with black and white reversed Input RGB Gamma Adjust the gamma of print images color intensities Red Green and Blue can also be adjusted individually Black Ref White Ref Adjust the difference between the darkest and lightest colors of an image Increasing the Black Ref value or decreasing the White Ref value will intensify the contrast of the image but reduces the range of co...

Страница 73: ...nto the Mailbox may cause all files in it to be lost 2 Secure Mailbox Available if an SD Memory Card 256MB or 512MB is installed Check this checkbox and enter the User ID up to 8 digits and the password 4 digits when storing the print data into the secure mailbox of the machine Note Turning the Power Switch OFF while a print file is being stored DATA indicator lamp flashing into the Secure Mailbox...

Страница 74: ...copies click the button to start printing While documents are being printed a printer icon appears in the System Tray near the clock in the bottom right hand corner of the screen The icon disappears when printing is completed You may double click on the printer indicator in the system tray to open and verify the details of the print queue in the spooler NOTE 1 Follow the steps below to set a defau...

Страница 75: ... the manual for the network card and Windows user s guide for connections among computers 2 On Windows 98 Windows Me a computer connected to a printer must be set up to allow printer sharing by performing the following operations a Double click on Network in control panel and then click button in the Configuration tab b Check I want to be able to allow others to print to my printer s in the File a...

Страница 76: ... to the printer server 1 Click the Start button select Settings and then click Printers 2 Double click Add Printer in the printers folder window The Add Printer Wizard appears 3 Select Network Printer Click the button 4 Specify the other computer s printer by entering the network path Then complete the installation following the instructions of the Add Printer Wizard Next ...

Страница 77: ... the mailbox or secure mailbox to accept print file storage see page 73 Note 1 Turning the Power Switch OFF while a print file is being stored DATA indicator lamp is flashing into the Mailbox or Secure Mailbox may cause all files to be lost 2 When using the Mailbox or Secure Mailbox feature there is a limitation of 20 mailboxes per User ID If more than 20 print jobs are sent to an User ID jobs wil...

Страница 78: ...ENTER USER ID 12345678 5 USE OR TO SCROLL TOTAL DOC nn 6 or repeatedly until the display shows the file you want to print TOSHIBATEC 10 11 abcd doc 7 1 PRINT 2 ALL PRINT 3 DELETE 4 ALL DEL 8 to print the displayed file to print all files for the User ID PRINTING PC DATA 9 Your machine will print the file The file is automatically deleted after printing PRINTER ON LINE Sample display Name of the fi...

Страница 79: ...ID 3 Enter the User ID up to 8 digits from the keypad i e 12345678 ENTER USER ID 12345678 4 USE OR TO SCROLL TOTAL DOC nn 5 or repeatedly until the display shows the file you want to print TOSHIBATEC 10 11 abcd doc 6 1 PRINT 2 ALL PRINT 3 DELETE 4 ALL DEL 7 to delete the displayed file to delete all files for the User ID DELETE DOCUMENT 1 YES 2 NO 8 PRINTER ON LINE 3 4 ...

Страница 80: ... ON LINE 3 ENTER USER ID 4 Enter the User ID up to 8 digits from the keypad i e 12345678 ENTER USER ID 12345678 5 USE OR TO SCROLL TOTAL DOC nn 6 or repeatedly until the display shows the file you want to print TOSHIBATEC 10 11 abcd doc 7 ENTER PASSWORD 8 Enter the Password 4 digits from the keypad i e 1234 ENTER PASSWORD 9 SECURE MAILBOX 1 PRINT 2 DELETE 10 PRINTING PC DATA 11 Your machine will p...

Страница 81: ...ER USER ID 3 Enter the User ID up to 8 digits from the keypad i e 12345678 ENTER USER ID 12345678 4 USE OR TO SCROLL TOTAL DOC nn 5 or repeatedly until the display shows the file you want to delete TOSHIBATEC 10 11 abcd doc 6 ENTER PASSWORD 7 Enter the Password 4 digits from the keypad i e 1234 ENTER PASSWORD 8 SECURE MAILBOX 1 PRINT 2 DELETE 9 DELETE DOCUMENT 1 YES 2 NO 10 PRINTER ON LINE ...

Страница 82: ...simile and Copy Functions Follow the procedures below if you need to set the parameters manually Network Parameters 1 Make sure that the and lamp is OFF 2 SET MODE 1 9 ENTER NO OR 3 1 USER PARAMETER PRESS SET TO SELECT 4 repeatedly until the display shows IP ADDRESS 5 Enter the IP Address Use the key to enter a period IP ADDRESS 164 1 1 10 6 SUBNET MSK 7 Enter the Subnet Mask Use the key to enter ...

Страница 83: ...f the print data PRESS SET TO PRINT 05 2 SIDED PRINT Selects whether the 2 Sided print setting is enabled 1 OFF 2 ON OFF 06 BIND POSITION Sets the bind position 1 LONG EDGE 2 SHORT EDGE LONG EDGE 07 RESOLUTION Sets the resolution setting 1 300dpi 2 600dpi 3 1200dpi 600dpi 08 FONT PCL 1 Sets the PCL font 0 99 0 09 SYMBOL TABLE PCL 1 Sets the PCL symbol table 0 35 11 10 PITCH PCL 1 Sets the PCL pitc...

Страница 84: ...s is accomplished by reducing resolution and or deleting pixels to fit the data onto the available page memory then print it out When the setting is in the OFF position upon exceeding the page memory capacity the print job is deleted and an Error message is displayed 1 OFF 2 ON 1 OFF 03 ERROR PAGE PRINT Selects whether to print the error page 1 OFF 2 ON 2 ON 05 TEXT PRINT Selects whether to print ...

Страница 85: ... Yes Yes Yes Yes A5 Yes Yes No No Thick Paper Letter No Yes No No Legal No Yes No No Invoice No Yes No No FLS1 No Yes No No FLS2 No Yes No No A4 No Yes No No B5 No Yes No No A5 No Yes No No Cotton Paper Letter Yes Yes No No Legal Yes Yes No No Invoice No Yes No No FLS1 No Yes No No FLS2 No Yes No No A4 Yes Yes No No B5 Yes Yes No No A5 Yes Yes No No Transparency Letter Yes Yes No No A4 Yes Yes No ...

Страница 86: ... Paper Tray Optional Paper Weights Plain Paper 16 28 lb 60 105 g m2 16 28 lb 60 105 g m2 16 28 lb 60 105 g m2 Thick Paper No 29 44 lb 106 165 g m2 No Envelope No 24 lb 90 g m2 No Paper Capacity Plain Paper 20 lb 75 g m2 250 sheets 1 sheet 550 sheets Transparency 20 sheets 1 sheet No Label No 1 sheet No Envelope No 1 sheet No ...

Страница 87: ...rencies made for Inkjet printers Do not use transparencies that have already been fed through the printer once Note The labels must completely cover the backing material as shown below Transparencies and Labels Paper Type Paper Size Recommended Type Transparency Letter A4 3M CG3300 Label Letter Avery 5160 5163 Avery 5660 5663 A4 Avery L7159 L7164 NO YES Labels cover the entire backing material The...

Страница 88: ...regularly shaped envelopes Envelopes with curls wrinkles nicks twists dog ears or other damage Envelopes with side seam construction Highly textured envelopes or with extremely shiny surfaces Envelopes that seal by removing a peel off strip Envelopes with more than one flap to be sealed Self adhesive envelopes Envelopes that are baggy or not sharply creased Embossed envelopes Envelopes that have p...

Страница 89: ... use encapsulated types of adhesive that do not require moistening but rely on pressure to seal them Always test a sample of the envelopes you are thinking of buying Confirm that the envelope performs acceptably For best printing results Avoid printing in high humidity High humidity may cause the envelope to curl and pick up excess toner High humidity may also cause the envelope to seal Envelope s...

Страница 90: ...Specification 90 Sheet Bypass only Loading the Envelopes Printing side up Flap International C5 opening on the shorter edge Printing side up Flap ...

Страница 91: ... printing 18 sheets minute A4 size plain paper simplex printing Resolution dots per inch 300 x 300 600 x 600 Interface USB 1 1 Ethernet 10Base T 100Base TX Applicable OS Windows 98 Windows Me Windows NT 4 0 With Service Pack 3 or later is required Windows 2000 Windows XP Windows Server 2003 Printer Working Memory 20 MB ...

Страница 92: ... System CD ROM See Note 1 on page 95 2 Select the language Note If the CD ROM does not launch automatically double click the My Computer icon on the Desktop or on the Start menu then double click the CD ROM icon 3 Click the button 4 Click Document Management System 5 Click Install Document Management System Next ...

Страница 93: ...e Custom Installation and check the Document Fax selection box 7 Verify the installation destination and click the button 8 Verify the data folder destination and click the button 9 Select General User and click the button Note If selecting Administrator the network configuration editor and network address book editor will also be installed on your PC See page 186 Next Next Next Continued on the n...

Страница 94: ... Controller to start with Windows 11 Select Document Viewer and click the button if you want to set the Document Viewer as the default application to view TIFF files 12 Windows XP Service Pack 2 Select Enable Communications Recommend and click the button 13 Enter the program folder name and click the button Next Next Next Next ...

Страница 95: ...ows Server 2003 logon to the computer using an account with administrator rights 14 The required files are copied 15 When the setup process is completed a message is displayed prompting you to restart your computer Click the button to restart your computer When installing Document Fax on Windows 98 Windows NT after rebooting your PC the Microsoft Data Access Components are automatically installed ...

Страница 96: ...he Document Manager 1 Title Bar Displays the title of the screen 2 Menu Bar Displays the menus of the Document Manager 3 Tool Bar Displays tool buttons of the Document Manager Tool buttons correspond to functions of the menus in the menu bar 4 Folder Window Displays the folders containing the documents in tree form 5 Link Icon Dropping a dragged document onto a link icon will activate the applicat...

Страница 97: ...ge number and and buttons are displayed at the bottom of a thumbnail image for grouped documents configured with two or more pages Image data files A thumbnail image of the document is displayed Application data files A thumbnail image of the document with its original application icon is displayed i e Word Excel and PowerPoint Clicking the and buttons turns the page on a multi page document ...

Страница 98: ...n of documents Dragging a mouse pointer on the screen or clicking with the Shift key held down allows selecting two or more documents at one time Editing Documents Double clicking thumbnail images in the document window activates the Document Viewer In addition see page 115 for details on opening and editing documents Creating Documents Drag and drop any application file into the Document Manager ...

Страница 99: ...ropping it onto another document in a document folder results in grouping the two documents together Dragging a document and dropping it on a link icon activates an application corresponding to the function of each icon Link icons are registered and deleted by selecting Launch To Another Application External Application Setup from the File menu Dragging a document and dropping it onto Shared Folde...

Страница 100: ...e file The link icons can be Added Removed by selecting Launch To Another Application External Application Setup in the File menu The following applications can be specified as destinations of the Document Manager Draw Graphics software applications such as MS Paint Photoshop etc OCR software application such as e Typist etc PC FAX Printer E Mail software MAPI compatible mail application such as M...

Страница 101: ...r can be shared through the network from different computers Note Set a different folder path for each shared folder if multiple shared folders are created on your PC Released Shared Folder Release the shared folder Documents in the shared folder will be released from a network Open A file saved in the computer can be imported into the folder as a document Save As A document is saved as an ordinar...

Страница 102: ...ties Displays the file properties Backup Creates a back up of the documents stored in the selected folder Acquire Image Select Source These menus are not available for your machine Print Prints the document selected in the document window ...

Страница 103: ... Print Size Select printing in original size or printing in accordance with the sheet size 3 N in 1 Select for printing reduced pages on one sheet 4 Multiple File Print Select whether to merge the files when printing if multiple files are selected on the Document Manager 5 Print Annotation Select to print with annotations 6 Print Label Select to print with labels 7 Print Page Frame Select to print...

Страница 104: ...g deleting applications See Note 1 Clicking the Add button displays the Add External Application dialog box 1 Name If an external application is specified the name in this field appears on the link icon 2 Application Type Specify the application type 3 Program File Specify the execution file and the path of the application 4 MAPI Compliant Check here if the e mail application is compatible with MA...

Страница 105: ...ternet Fax TIFF file format is selected 7 Resolution Set the data resolution when launching with an application 8 Paper Size Set the paper size when the Internet Fax TIFF file format is selected 9 Correct Select Eliminate Noise or Correct Skew 10 Original Document Select whether to update the attached original file if the file is edited within the application 11 Parameter Set the parameter when op...

Страница 106: ...C has access to the Shared Directory before restoring the files onto the shared folder by using the button otherwise the files will be restored into the Network Scanner Image folder Click the button to delete the selected document Empty Trash Can Deletes the files in the Trash Can If the documents are emptied from the Trash Can they are permanently deleted They are Not stored in the Recycle Bin Un...

Страница 107: ...rse of action when importing a file Dropout Set the file format when moving copying the file on the Document Manager to another directory 1 Use same format as Document Manager The file is saved in the same format PNG BMP TIFF JPG 2 File Format Compression Format Annotation Select the file format and select whether the annotations are saved 3 Save the attached file Set to save the attached file ...

Страница 108: ...ocument from the clipboard into the selected folder Delete Deletes a selected document from a folder to the Trash Can A confirmation message for deletion appears Select All Selects all documents in the folder Find Searches for documents by specifying a document name creation date character string or DD Code in the document Note The DD Code Tab is available when the Options Menu is set to enable th...

Страница 109: ...nail display in the document window Show Annotation Switches between displaying and hiding annotation Arrange Folders Sorts the document folders by name or date Arrange Document Sorts the documents in the current folder in the specified order Name Type Size or Date Auto Arrange Lines up the Documents automatically in Thumbnail Format Line Up Documents Line up the documents in the document window R...

Страница 110: ...ate Rotates the selected document Rotate Left Rotate 180 Degrees Rotate Right Group Makes a group of two or more selected documents The grouped documents are indicated by page number and and buttons at the bottom of a thumbnail image Every Document The selected documents are grouped Every Page Alternately Groups pages alternately Every Page Reverse Alternately Groups pages alternately by reversing...

Страница 111: ...correct it Enhance Edge Enhances edges borders of images Eliminate Noise Removes noise on the document Reverse Gradation Displays images in reverse Page Selects pages to be displayed in thumbnail among grouped documents Selecting Rearrange Page displays the Rearrange Pages dialog box The order of the pages are changed by selecting dragging and dropping the pages Click the Reverse Order button to r...

Страница 112: ...ngs and then click Printers 2 Right click on TOSHIBA Document Manager and select Properties from the popup menu The Properties dialog box appears 3 Click the button to save the settings and close the Properties dialog box General Description Windows 98 Windows Me Paper Layout Tab Paper Size Sets the document paper size Orientation Sets the document orientation Resolution Sets the document resoluti...

Страница 113: ...Click the button to return to the Printers folder Windows NT 4 0 Page Setup Tab Paper Size Sets the document paper size Orientation Sets the document orientation Color Appearance Sets the document to color or grayscale Advanced Tab Paper Size Sets the document paper size Orientation Sets the document orientation Resolution Sets the document resolution Color Appearance Sets the document to color or...

Страница 114: ...ng Preferences from the pop up menu The Printing Defaults dialog box appears 3 Click the button to return to the Printers folder Windows 2000 Windows XP Windows Server 2003 Layout Tab Sets the document orientation Paper Quality Tab Sets the document to color or grayscale Advanced button Sets the paper size resolution and spooling properties OK ...

Страница 115: ... provides various editing capabilities for documents with a wide selection of annotation functions Double clicking on the document thumbnail in the Document Manager screen or selecting Open in the Document menu displays the main window of the Document Viewer See Note 1 NOTE 1 The program can be also activated by selecting TOSHIBA TOSHIBA Document Management System Document Viewer from Programs in ...

Страница 116: ...es of the documents as thumbnails reduced image 5 Size Bar Adjusts the scaling of the display on the image window 6 Link Icon Dragging and dropping a document on a link icon activates the application corresponding to each icon 7 Status Bar Displays information such as image file name image type and size 8 Image Window Displays the image and annotations of the pages being selected 9 Ruler Displays ...

Страница 117: ... order of the pages Image Editing The image displayed in the image window can be edited with the menu below Edit menu Editing operations such as cutting copying pasting and adding annotations Page Adjust Page menu Image correction and color balance adjustment of the whole page Selecting Area Dragging the mouse on the image window allows to select a specific area in an image This function is used t...

Страница 118: ...ys graphics and text on the image Annotations and the original image are displayed as one image Annotations are managed separately from image data Therefore the Document Viewer can switch between displaying and hiding annotations If an image is edited with the Document Viewer and is exported sent to another image editing application it can be sent with without the annotation to the image Annotatio...

Страница 119: ...Saves only the portion specified in the image window Document Viewer saves a file in the following formats Multi page TIFF Multipages Tagged Image File Format TIFF TIFF Tagged Image File Format TIFF BMP Windows standard bitmap format Internet Fax TIFF Tagged Image File Format TIFF with Internet Fax format Note This format is available for monochrome image files only When saving the file that is cr...

Страница 120: ... containing two or more pages pages from to can be specified for printing Print Setup Specifies the layout printing size and printing of annotations for a document to be printed 1 Horizontal Position and Vertical Position Adjusts the printing position on the sheet 2 Print Size Select printing in original size or printing in accordance with the sheet size 3 N in 1 Select for printing two or more re...

Страница 121: ...ng applications Clicking the Add button displays the Add External Application dialog box 1 Name If an external application is specified the name in this field appears on the link icon 2 Application Type Specify the application type 3 Program File Specify the execution file and the path of the application 4 MAPI Compliant Check here if the e mail application is compatible with MAPI 5 Printer Specif...

Страница 122: ...e mode when the Internet Fax TIFF file format is selected 7 Resolution Set the data resolution when launching with an application 8 Paper Size Set the paper size when the Internet Fax TIFF file format is selected 9 Correct Select Eliminate Noise or Correct Skew 10 Original Document Select whether to update the attached original file if the file is edited within the application 11 Parameter Set the...

Страница 123: ...ny page in it Selecting page and clicking the button restores page that has been discarded Note Once you exit the Document Viewer the pages in the Trash Can are deleted Empty Trash Can Deletes the pages in the Trash Can If a page is emptied from the Trash Can it is permanently deleted it is Not stored in the Recycle Bin Undo ...

Страница 124: ...Cut Deletes a selected annotation and copies it to the clipboard Copy Copies a selected annotation on the clipboard Paste Pastes an annotation from the clipboard into the selected page Clear Clears a selected annotation Select All Selects all annotations on the selected page ...

Страница 125: ...through pages forwards Move Backward Automatically steps through pages backwards Stop Stops automatic paging Setup Sets automatic paging Move Page Moves pages to the desired position Next Page Moves the current page to the next page Previous Page Moves the current page to the previous page Top Page Moves the current page to be the top page Last Page Moves the current page to be the last page Selec...

Страница 126: ...rom TWAIN scanner to the current position The TWAIN Mode is not available in this model Replace Page Replaces the current page from file with a new page Replaces the current page from TWAIN scanner with a new page The TWAIN Mode is not available in this model Rotate Page Rotate Left Rotates the page 90 degrees counterclockwise Rotate 180 Degrees Rotates the page 180 degrees Rotate Right Rotates th...

Страница 127: ...iewer 127 Page Menu Document Management System Section Copy Page to Clipboard Copies the entire page selected onto the clipboard Copy Select Area Copies select area to clipboard Select All Pages Selects all pages ...

Страница 128: ...in on an image Zoom Out Zooms out on an image Fits to Page Width Fits the display to the page width Fits to Page Height Fits the display to the page height Full Page Fits the display to the full size page 25 200 Shows the display at 25 200 Detailed Settings Sets detailed settings such as thumbnail or page image settings View Menu ...

Страница 129: ...age Line Creates a line annotation and pastes it to a page Rectangle Creates a rectangular annotation and pastes it to a page Ellipse Creates an ellipse annotation and pastes it to a page White block Creates a white rectangular solid white fill color annotation and pastes it to a page Black block Creates a black rectangular solid black fill color annotation and pastes it to a page Marker Create a ...

Страница 130: ...iewer 130 Annotation Menu Header Edits a header common to each page Footer Edits a footer common to each page Edit Text Sets a format of the text in a selected annotation Properties Displays annotation properties ...

Страница 131: ...ar Annotation select the desired icon depiction then select Properties in the Annotation The color can also be specified by right clicking on the desired icon marker to display the Properties menu and making a selection in the Graphic Format Setup Dialog box Text Creates a text annotation Select text annotation in the annotation menu or tool button and drag the mouse in the image window to specify...

Страница 132: ...the Annotation menu The color can also be specified by right clicking on the desired icon marker to display the Properties menu and making the selection in the Graphic Format Setup Dialog box Ellipse Creates an ellipse annotation Select ellipse annotation in the annotation menu or tool button see Note 1 and drag the mouse in the image window to draw an ellipse ...

Страница 133: ...lay the Properties menu and making a selection in the Graphic Format Setup Dialog box White block Creates a white rectangle solid white fill color annotation Select white annotation in the annotation menu or tool button see Note 1 and drag the mouse in the image window to draw a white rectangle Black block Creates a black rectangle solid black fill color annotation Select black annotation in the a...

Страница 134: ...erties menu and making a selection in the Graphic Format Setup Dialog box Marker Creates a marker annotation Select marker annotation in the annotation menu or tool button see Note 1 and drag the mouse in the image window to draw a marker Label Creates a label annotation Select label annotation in the annotation menu or tool buttons see Note 1 and drag the mouse in the image window to draw label d...

Страница 135: ...tation The stamp annotation pastes another image file like a stamp Select stamp annotation in the annotation menu or tool button and click the button Then drag the mouse in the image window to specify the area displaying the stamp Click the button to select image files to be used as a stamp OK Add ...

Страница 136: ...Dialog box Date Creates a date annotation Select date annotation in the annotation menu or tool button and drag the mouse in the image window to specify the area Specify the format color and font of the date to be displayed See Note 1 1 Font Name Specify the font here 2 Style Specify the font style 3 Size Specify the font size 4 Text Color Select the text color here 5 Date Specify the date here Se...

Страница 137: ...be displayed 1 Font Name Specify the font here 2 Style Specify the font style 3 Size Specify the font size 4 Text Color Select the text color here 5 Text Align Specify the text alignment Click on the drawn figure and select Properties to change the thickness and colors of the lines 1 Line Width Specify the thickness of the lines here 2 Line Style Specify the types of lines here 3 Line Color Specif...

Страница 138: ...oolbar Page Tool Bar Show hide page toolbar Annotation Tool Bar Show hide annotation toolbar Image Tool Bar Show hide image toolbar Status Bar Show hide status bar Page list Show hide page list Ruler Show hide ruler Plugin Show hide plug in Window Menu ...

Страница 139: ...the Port Controller icon to the Scanner Reception Notification either Pop up Display or Icon Display Pop up Display Displays the following message when the scanned image is received Icon Display Changes the Port Controller icon when the scanned image is received No Notice No notification message is shown on your PC even when the scanned image is received Scanner Configuration Right click on the ic...

Страница 140: ... the path to save the scanned image Scanner reception notice Select the viewing mode for the scanner reception notice Address Information Select one of the following Auto Registration Your PC s Address Information will be automatically registered into the Address Book of the device s Manual registration at scanner Manually register your PC s Address Information into the Address Book of the device ...

Страница 141: ...Information to the device s on your network The Group ID will be compared with the General Settings on the device s when connecting to your PC When a match is found the Address Information will be registered to the device s Scanner Setting Key Operator Mode Set the Parameter No 01 ABBR Group ID number 0 99 to match the Group ID programmed in the Scanner Configuration Address Renewal Interval Set t...

Страница 142: ...tivate program when double clicking the Port Controller Icon Scanner Configuration Open the Scanner Configuration Window Fax Recv log When the Document Fax is installed Open the Fax Receive Log Window Exit Port Controller The Port Controller is terminated Other Click the button to set the application program Port Controller Browse ...

Страница 143: ...ry overflows during the transfer of the fax data The maximum number of multi station transmissions is 999 The total number of direct dialing stations of the device limits the total number of stations that a fax message can be transmitted to The transmission is canceled when it exceeds that number during the data transfer to the device from the PC For Simple Send Only System or Send and Receive Sys...

Страница 144: ...odels Device Setting PC Fax Setting Simple Send Only System Peer To Peer Connection Email Server Not Required IP Address settings Relay XMT Password setting Relay XMT Report Off setting Relay XMT Password setting Send Receive Network Shared Network Connection Email Server and RX Email Account Required IP Address settings Relay XMT Password setting Relay XMT Report Always setting Internet Fax setti...

Страница 145: ...Connection Diagram aaa ccc bbb ddd aaa ddd bbb ddd Transfer Fax Data Transfer Fax Data View Shared Folders POP Receive Transmit Receive Send FAX Document Fax Client PC Document Fax Client PC Document Fax Client PC Document Fax Server PC Document Fax Client PC Document Fax Server PC Receive FAX Fax Forward LAN LAN ccc ddd Email Server Email Server ...

Страница 146: ...port Off Fax Parameter No 143 See the Operator s Manual for Facsimile and Internet Fax Email Send Receive System settings Connection to the network Set Internet parameters IP Address Subnet Mask Default Gateway IP Address Email Address Email Server Name IP Address Relay XMT Password Set Fax Parameters Set the Relay XMT Report Always Fax Parameter No 143 See the Operator s Manual for Facsimile and ...

Страница 147: ...cument Fax is shown on your PC Select PC Fax Device Locator from the Tools menu to open the Device Search Ranges window 2 Device Search Ranges appears Click the button to start searching for the Network Connected Devices Note It searches for all the devices within the default Subnet Refine the search range when there are many devices connected in the Subnet or you want to connect to devices outsid...

Страница 148: ...e Network Connected Models 3 Starts searching for the PC Fax devices on the network 4 The Network connected PC Fax device s are listed in the PC Fax Device Locator Select the desired Device and double click or select Properties from the Device menu ...

Страница 149: ... not be indicated properly 3 When the Relay Domain is set in the User Parameters of the device it is required to be the within the same domain The right part of of the Email address for the Result Report Email Address If it doesn t correspond transmission from the Document Fax is rejected Transmission Reception Tab Transmission Setting Transmission Priority If there are multiple devices available ...

Страница 150: ...ocator Click the or select Device Exit from the menu to close the PC Fax Device Locator For the Send Only System the setup is completed For the Send Receive System continue to the Receive Setup on the next section 1 Click the icon on the Windows Desktop The Document Fax appears Select Tools PC Fax Device Locator from the main menu 2 The PC Fax Device Locator appears Select Device Detail Settings f...

Страница 151: ...ivided into more than one transmission When it is divided into several transmissions and there are other devices available it will transmit a request to multiple devices Click the button when you finish inputting the settings Note 1 If your PC is running Windows NT Windows 2000 Windows XP Windows Server 2003 and the client PC is running Windows 98 Windows Me it is necessary to use the Guest Accoun...

Страница 152: ... appears Click Transmission Reception tab and check the Makes Reception Effective box Click the button 6 Confirm that the Reception status displays Yes It takes a moment Click the or select Device Exit from the menu to close the PC Fax Device Locator The Send Receive System setup is completed OK x ...

Страница 153: ...Note Searching sometimes may take a long time when there are many PCs connected to your network In this case we recommend to click Add button and specify the Domain or Workgroup or specify the Computer Name directory to reduce the searching time Look in Specified Domain or Workgroup Input device s Domain or Workgroup Specified Computer Name Input the Server Computer Name Shared Name Input the Serv...

Страница 154: ...select Device Exit from the menu to close the PC Fax Device Locator Note The reception function is shown as Yes if the shared device s reception function is effective If you do not wish to receive faxes select the Device and double click or Click Device Properties from the menu The PC Fax Shared Device Properties appears Click Transmission Reception tab and checkout the box for Makes Reception Eff...

Страница 155: ...ected on the cover sheet 4 Company When this is entered reflected on the cover sheet 5 recipient s Indicates a number of entered station s 6 Destination s Indicates entered destination station s 7 Subject When this is entered reflected on the cover sheet 8 Memo field When this is entered reflected on the cover sheet 9 Cover Sheet Select various cover sheet or no cover sheet 10 Attachment Indicates...

Страница 156: ...o start the transmission Used to view the cover sheet or transmission file Used to select the file to be sent Used to show the Send Receive Log Manager Used to open your personal Phone Book Used to create or edit a Cover Sheet Used to show the On line help ...

Страница 157: ... from the File menu 2 The Print dialog box appears Select Document Fax from the Printer Name menu Click the button to convert the document into a Fax image 3 Enter the recipient s Fax No Name and Company or select your Personal Phone Book Note To input a pause use the comma Click the button to enter the recipient to the recipient list Enter select another recipient if you desire Type the Subject i...

Страница 158: ...Document Fax 158 Sending Document 4 Click the button to start the transmission OK ...

Страница 159: ... window appears Click the icon to select a file for the transmission 2 Select the file and click the button to convert the document into a Fax image 3 From the Document Fax window enter the recipient s Fax No Name and Company or select from your Personal Phone Book Note To input a pause use the comma Click the button to enter the recipient to the recipient list Enter select another recipient if yo...

Страница 160: ... s Fax No Name and Company or select from your Personal Phone Book Note To input a pause use the comma Click the button to enter the recipient to the recipient list Enter select another recipient if you desire Type the Subject in the Subject field and a brief message to be included in the Cover Sheet If you wish click Cover Sheet to change the Cover Sheet Type Click the icon when ready to send the...

Страница 161: ...C Fax Reception Notification Popup Display Icon Display No Notice When a fax is received on the machine it will proceed as follows 1 A receiving notice appears on the connected PC Click the button or The Port Controller icon is changed Double click the icon 2 The Receive Log appears Select a transaction from the log then click the icon to view the received fax 3 The received fax is displayed on th...

Страница 162: ... 3 In case of a setup as a Client PC only the Phone Book data can be acquired from the device by the Server PC 4 Click the button to edit the address 5 Click the button to delete the address 3 Contact Tab Name Enter the recipient s name Fax No Enter the fax number Call Type Select how the call should be dialed The code preset with the Tools Configuration Dialing Settings is dialed ahead of the fax...

Страница 163: ...on to save the entry The maximum number of entries are 2000 To add another entry repeat procedure from the step 2 1 Click the icon 2 The Phone Book dialog box appears Click the button 3 The Group registration dialog box appears Click the button 4 The Add New Group Name dialog box appears Enter the group name and click the button OK OK Continued on the next page ...

Страница 164: ...ecipients 6 Click the button to add the recipient s to the Member List The maximum number of recipients are 999 for each group To add another group repeat the procedure from step 3 The maximum number of group s are 100 If finished click the button to exit Group registration OK ...

Страница 165: ...t File Import from the menu 2 Select the file to be imported and click the button 3 Confirm the contents of the Data Field and Addressbook Field match Select the Data Field you want to import to Select the item and click the button to change the field setting if the Data Field and Addressbook Field do not mach Click the button if you completed Note 1 Name and Fax No of the Address book field are e...

Страница 166: ...4 The telephone data of the CSV file is imported into your Phone Book Exporting to the CSV file 1 On the Phone Book dialog box Select File Export from the menu 2 Enter the file name and click the button to save the CSV file Importing from the CSV file OK ...

Страница 167: ...me date title etc Creating Cover Sheet Cover Sheet 1 Click the icon 2 The Cover Sheet Editor window appears Edit the Cover Sheet Select Save As from the File menu 3 The Save As dialog box appears Select the Folder you wish to save to or you wish to save it into a the New Folder click the button enter the New Folder Name and then click the button OK Continued on the next page ...

Страница 168: ...Document Fax 168 Cover Sheet 4 Enter the New Folder Name into the Cover Sheet File Name box Enter any comments into the Comment box if you wish Click the button to save the New Cover Sheet ...

Страница 169: ... Inserts the information set in the and tabs in the Personal Address Book Sender Details Inserts the information set in the tab in the Tools menu Comments Inserts a comment field for typing a brief message when sending a fax Subject Inserts a subject field when sending a fax View menu Show Grid Displays a grid Preview Displays the preview of the cover sheet Show Status Bar Displays the status bar ...

Страница 170: ...ion The selectable resolutions are dependent on the machine s capability connected to your PC Setup Quality Set the quality to be used for the transmission Use these as the default settings If checked the settings selected are used each time a fax is sent Cover Sheet Tab Setting the usage of the Cover Sheet Cover Sheet with specified fields The address information is inserted into the TO field of ...

Страница 171: ...e Cover Sheet when sending a fax PIN Code Tab Specify the PIN Code settings when required by your telephone system Some countries do not support this function Various Settings Tab Device Phone Book When this box is checked the phone book data is acquired from the device at the time of startup and it is added into the Personal Phone Book When this is used on the client server this function is effec...

Страница 172: ...e fax transmission is incomplete from the device Note 1 For Network Device Version of the Simple Send Only System the Receiving Log is not available 2 For the Network Device Version of the Simple Send Receive System and Local Device Version of Network Shared System there is an Administrator Send Log that can check all the client s sending transactions Select General User to see the Own Send Log an...

Страница 173: ...hat you wish to save and click the Save Log icon 2 Select the Folder that you want to save into and click the button You can make a new folder by clicking the button Note The button is not available on Windows NT Windows 98 3 Select whether you wish to Delete the Logs after saving them 4 The tiff file data tif and the transmission file log information file xml are saved as a set The log list files...

Страница 174: ...Document Fax 174 Send Log Receive Log Automatically Saving the Log 1 In the Log window select Tools Options from the menu 2 Option window appears Set the Save Log settings accordingly ...

Страница 175: ...s Book Editor Activates the Address Book Editor see page 186 4 Delete Removes the device from the list 5 Rename Changes the name of the device 6 Search Device Search Search the devices manually Device Search Ranges Set the conditions to search the devices see page 176 7 Create Shortcut Creates a Shortcut of the program for the selected device 8 Delete Shortcut Deletes the selected Shortcut Network...

Страница 176: ...h Ranges from the Device Menu 1 Add Add a new search range of IP addresses Click the button and enter the Start IP Address and End IP Address 2 Edit Edit the selected IP address range 3 Delete Delete the selected IP Address range 4 Detail Enter the SNMP community name of the devices to be searched Add ...

Страница 177: ...or up to 10 different printers appear on the System Tray next to the system clock The Status Monitor indicates the device status by the icon lamp color as listed below Task Display Lamp Status Green Device is operational in standby printing scanning or copying mode Yellow Device attention is required check paper supply etc Red Toner needs replacement cover is open paper jam or device failure Gray ...

Страница 178: ...r See page 186 4 Auto Start Sets the Status Monitor for the device to start automatically when the PC is rebooted 5 Job Completion Notice Sets the Job Completion Notification mode See page 184 6 Message Display Displays the contents file name etc of the Job Completion Notice when it is set to Icon No Notice 7 Pops up When Error Occurs Selects whether a pop up error message box appears when an erro...

Страница 179: ...nnected device 2 Status Displays the current status of the device If two or more items have been detected clicking the buttons allows viewing of other items 3 Control Panel Displays information as it appears on the panel of the device If two or more items have been detected clicking the buttons allows viewing of other items 4 Message Displays the device details of the current status If two or more...

Страница 180: ...b 1 Model Displays the name and model number of the connected device 2 Configuration Displays a list with the current device configuration optional devices etc 3 Status Displays the communication status between the Status Monitor and the device ...

Страница 181: ...Network Status Monitor 181 Document Management System Section Paper Tab The Paper tab displays the type size and paper status of each paper tray A user comment can be entered in the Paper Type field ...

Страница 182: ...Status Monitor 182 Network Tab 1 Model Displays the name and model number of the connected device 2 Network Information Displays a list of the current network status Number of packets for Sending Receiving etc ...

Страница 183: ...Network Status Monitor 183 Document Management System Section Job List Tab 1 Model Displays the name and model number of the connected device 2 Job List Displays the current print jobs ...

Страница 184: ...lay Displays the following message when the print or PC fax job is completed Job Completion Notice Pop up Display Notifies with the Pop up message Icon Notice Notifies with the Icon appearance on the desktop and change the Status Monitor icon Icon No Notice Notifies with the Status Monitor icon None Does not notify ...

Страница 185: ...tice Document Management System Section Icon Notice and Icon No Notice Displays the Notification Icon on your desktop if Icon Notice is selected and changes the Status Monitor icon Select the Message Display to show a message Status Monitor icon ...

Страница 186: ...k using the FTP protocol The desired device is first selected from the device list of the Network Device Locator and then the Network Configuration Editor or Network Address Book Editor can be started Note 1 Both utilities are installed when the Administrator mode is selected during the Document Management System installation see page 93 General Description ...

Страница 187: ...ge 175 2 The Network Device Locator appears From the Toolbar Select the device from the list and click the or icon From the Tools menu Select the device in the list and select Configuration Editor or Address Book Editor from the Tools menu 3 The Network Configuration Editor or Network Address Book Editor appears and retrieves the data from the device ...

Страница 188: ...itor or Address Book Editor from the Tools menu 3 The Shortcut Preparation window appears Select a Preparation Place and click the button Note As the shortcut or menu icon includes the IP Address the shortcut or menu icon has to be recreated each time if the IP Address of the device is obtained using a DHCP server on the network 4 The shortcut link is created at the selected place Create ...

Страница 189: ...Save Saves the settings to a file with its current name Save As Saves the settings to a file with a new name File Information Displays or changes the addresses of the device Font Selects the font which is printed on reports Print Prints the active folder content Delete Deletes the file Export Exports the active folder contents to a text file Import Imports the active contents from a text file Exit...

Страница 190: ...nt Selects the display font Transfer Retrieve Retrieves the current settings from the device Write Writes the settings to the device Selects either All Data or Department Codes only Display Log Displays the transfer log Tools Device Address List Opens the Device Address List dialog Device Group List Opens the Device Group List dialog Options General Opens the General setting dialog Options FTP Con...

Страница 191: ...ight side of the window Note If the device password is changed Key Operator Code from the default value 000 it is not possible to retrieve the data In this case enter the password in advance of the Default Password in the Tools Options FTP Configuration 2 If you want to retrieve the latest data from the device again click the icon or select Retrieve from the Transfer menu Note If the device is in ...

Страница 192: ... Fields on the left show what items have been changed An item which is different from default setting An item that has been changed 2 Network Address Book Editor Modify add or delete Address Book entries using Network Address Book Editor The type of Address Book to view or work with is chosen in the left pane of the window Note The LOWER group of One Touch Keys is designated with an asterisk after...

Страница 193: ...k the icon or select Write from the Transfer menu 2 Select the button to start writing to the device 3 Process status is indicated in the bottom right side of the window Note If the device is in an operating condition copying printing etc it is not possible to write the data Writing error Try again later after the device enters the standby condition Yes Status Indication ...

Страница 194: ...or enter a new file name 2 Click the button The data is saved to a file 1 To open a saved file click the icon or select Open from the File menu Note To start Network Configuration Editor or Network Address Book Editor click Configuration Editor or Address Book Editor without selecting the device in the Network Device Locator The editor will open without retrieving data from the device 2 To open a ...

Страница 195: ...ck Configuration Editor or Address Book Editor without selecting the device in the Network Device Locator The editor will open without retrieving data from the device 2 The File Information window appears Click to select the model number Enter the device name location and IP Address of the device optional Enter the login password Key Operator Code of the device optional Click the button 3 The Save...

Страница 196: ...e Locator button To enter a new address setting into the dialog boxes button To select the address that you want to edit and edit the current settings button To select the address that you want to delete button To connect the address that you want to retrieve and display the data button To make the changes effective and to close the window button To discard all changes and close the window Acquire...

Страница 197: ...ck the button button To change the name of the selected group Enter a new name and click the button button To delete the selected group The Device Address List lists the addresses of registered devices Click the button To acquire your network address list that is detected by Network Device Locator detected The Group Member section lists registered addresses for the selected group Use the buttons t...

Страница 198: ... addresses currently chosen Note Multiple destinations can be entered when only the Dept Code is selected in the Transfer Write menu Options is indicated when a writing option is available 3 Manual Input tab Enter the address and click the button to add the address to the destination 4 Device Address List tab The addresses registered in the Address List and Group List are shown Select an address a...

Страница 199: ...t Code Counter Data to the device 1 A confirmation window appears before retrieving or writing data Click the button 2 Click the button Note Click the button and select Dept Codes and Counter Data to write the Department Code Counter Data to the device 3 Select Dept Codes and Counter Data and click the button 4 Click the button to return to the confirmation window Change Dest Options Options OK OK...

Страница 200: ...ore retrieving or writing data Click the button 2 Timer section Click Enable and select the time to start the communication Click the button to create the job and hold it in the spooler until the specified start time 1 Click the Spooler in the taskbar to open it 2 If you need to cancel a job select the job and choose Delete from the Spooler menu Change Dest OK ...

Страница 201: ...n saved file Select Window Tile Horizontal 2 Select the range that you want to copy Click on the first number that you want to copy from and then click on the last number that you want to copy to while pressing Shift key or Click on the first number that you want to copy from and drag the mouse to the last number you want to copy to 3 Right click on the selection and select Copy or select Copy fro...

Страница 202: ...ed Operation 4 Click on the number where to paste the data 5 Right click and select Paste or select Paste from the Edit menu 6 The data is pasted at the designated location Note The data that exceeds the maximum number of allowable address entries will be lost ...

Страница 203: ...ns such as Microsoft Excel can be imported 1 Copy the Address Book data from the other application The data format must be an Address IP Address Fax number Email Address and Destination Name 2 Click on the number where to paste the data Right click and select Paste or select Paste from the Edit menu 3 Data is pasted at the designated location Note The data that exceeds the maximum number of allowa...

Страница 204: ...r message is not displayed on the device See Note 1 The above points can be verified by printing a test page Refer to the following pages for the procedures on test page printing NOTE 1 The status of the devices can be verified by the status monitor see page 175 and 179 Printing Operation Failure Windows 98 Windows Me General Tab See page 42 Windows NT 4 0 General Tab See page 50 Windows 2000 Wind...

Страница 205: ...cessive time The wait time for printing operations depends on the spool settings Reference Windows 98 Windows Me Details Tab See page 43 Windows NT 4 0 Scheduling Tab See page 52 Windows 2000 Windows XP Windows Server 2003 Advanced Tab See page 62 Although print data is transferred to the device it is not printed Make sure the printer is on line Make sure the device is not in the Shutdown Mode Pre...

Страница 206: ... turned On Excessive data volume or number of pages may overflow the device s memory disabling data reception Increase the timeout setting value in properties for transmission retry Reference Windows 98 Windows Me Details Tab See page 43 Windows NT 4 0 Ports Tab See page 51 Windows 2000 Windows XP Windows Server 2003 Ports Tab See page 61 Printing is disabled due to an error in the current printer...

Страница 207: ...207 Appendix Appendix Appendix When printing to the device there is a 0 2 inches 5 0 mm non printable margin on all 4 sides Printing Area Top 0 2 5 0 0 2 5 0 0 2 5 0 0 2 5 0 Bottom Unit inches mm ...

Страница 208: ...NDA SHINAGAWA KU TOKYO 141 8664 JAPAN 2006 TOSHIBA TEC CORPORATION All rights reserved PLAIN PAPER FACSIMILE Operator s Manual for Document Management System and Printer PJQMC0758ZB R060520B7101 TTEC OME060075A0 2006 09 ...

Отзывы: