338
11.MAINTENANCE
2.Simple Troubleshooting (Cont.)
11
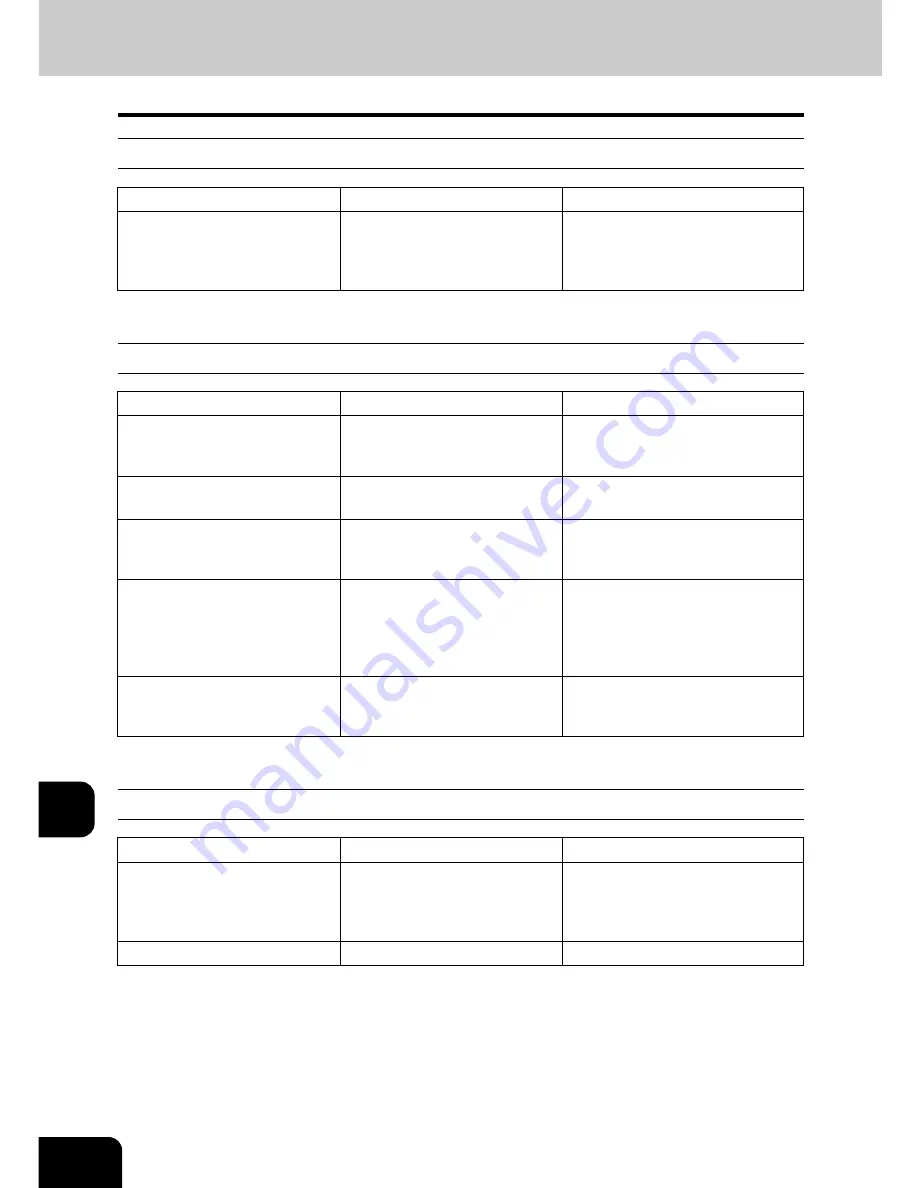
Image density is too high
Images are stained
Images are blurred
Item to be checked
Countermeasure
Reference page
Is the level of the image density
set suitably?
Use the manual density buttons
or the background adjustment
function to adjust the image
density properly.
P.123 “6.Copy Density Adjust-
ment”,
P.126 “1.Background
Adjustment”
Item to be checked
Countermeasure
Reference page
Is the Reversing Automatic Doc-
ument Feeder (optional)
securely closed?
Close the cover or feeder prop-
erly to shut out any outer light.
P.60 “1.Setting Originals”
Are the platen sheet, Original
Cover and scanning area dirty?
Clean them up.
P.334 “1.Daily Inspection”
Is the image density set prop-
erly?
Adjust the image density prop-
erly with the [AUTO] button or
manual density buttons.
P.123 “6.Copy Density Adjust-
ment”
Are 2-sided originals used?
As the other side of the originals
can be seen, adjust the image
density properly (lighter) with
the background adjustment
function.
P.126 “1.Background Adjust-
ment”
Are originals with high transpar-
ency used?
Place a blank sheet of paper
with originals of the same size
or larger over the original.
P.62 “Sheet originals”
Item to be checked
Countermeasure
Reference page
Does the entire original lie prop-
erly on the surface of the glass?
Place the original on the glass,
and then close the Reversing
Automatic Document Feeder
(optional) firmly.
-
Is the paper moist?
Replace it with new paper.
-
Содержание e-STUDIO 352
Страница 1: ...MULTIFUNCTIONAL DIGITAL SYSTEMS Operator s Manual for Basic Function ...
Страница 2: ......
Страница 6: ...4 CONTENTS Cont ...
Страница 10: ...8 Toshiba Quality is Second to None Cont For e STUDIO353 453 ...
Страница 24: ...22 Environmental Information Cont ...
Страница 88: ...86 2 HOW TO MAKE COPIES 4 Proof Copy Cont 2 ...
Страница 103: ...101 3 Name of each Inner Finisher optional MJ 5004 MJ 5005 1 2 1 ...
Страница 105: ...103 3 4 Press the SORT or GROUP button Set other copy modes as required 5 Press the START button ...
Страница 127: ...125 4 4 IMAGE ADJUSTMENT 1 Background Adjustment 126 2 Sharpness 127 ...
Страница 130: ...128 4 IMAGE ADJUSTMENT 2 Sharpness Cont 4 ...
Страница 135: ...133 5 6 Press the ENTER button Select other copy modes as required 7 Press the START button ...
Страница 137: ...135 5 4 Press the ENTER button Set Book type original 2 sided copy P 118 in duplex copying as well ...
Страница 182: ...180 6 e FILING 3 Changing Data of User Boxes Cont 6 7 Press the ENTER button The box settings are updated ...
Страница 200: ...198 6 e FILING 8 Appendix Cont 6 ...
Страница 270: ...268 8 JOB STATUS 6 Error Code Cont 8 ...
Страница 335: ...333 11 11 MAINTENANCE 1 Daily Inspection 334 2 Simple Troubleshooting 336 ...
Страница 342: ...340 11 MAINTENANCE 2 Simple Troubleshooting Cont 11 ...
Страница 358: ...356 12 SPECIFICATIONS OPTIONS 4 Copying Function Combination Matrix Cont 12 ...
Страница 362: ...360 INDEX Cont Z Zoom buttons 97 ...
Страница 363: ...DP 3540 4540 OME050098E0 ...


