background image

49

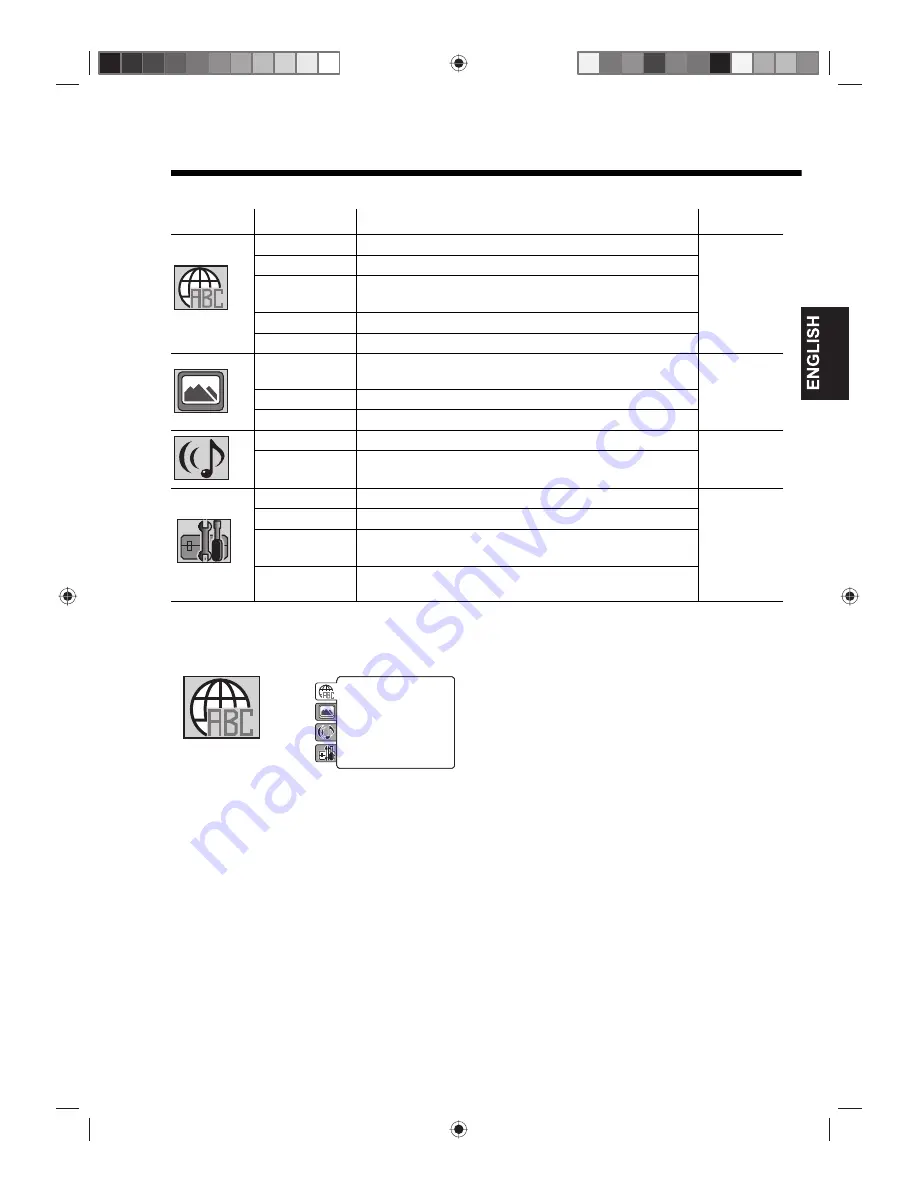
Disc Setup menu

Setup overview 

Tab

Option

Description

Go to page

Menu

Select the language for the DVD menu display. 

49

Subtitle

Select the subtitle language for disc playback.

DivX subtitle

Select the subtitle encoding format to use during DivX

®


content 

playback.

Audio

Select the audio language for disc playback.

OSD

Select the language for the Setup screen display. 

Display

Choose whether to show a status display whenever a button is 
pressed.

50

Picture Mode

Select the DVD source content. 

JPEG Interval

Select the interval time between images in a slide show.

Night Mode

Toggle the night mode on or off. 

50

Digital Out

Select the format for the digital audio output corresponding to 
your audio connection.

Parental

Set the restriction level for allowable disc content.

51

Password

Change the access password for the parental control setting.

DivX (R) VOD

Display the 10-character registration code for viewing DivX

®


VOD content.

DivX 
Deregistration

Display the 8-character deregistration code.

Note:

 These settings are retained in the unit’s memory. It remains active even if the power is turned off. 

Setup details

Menu and OSD

Select the language for the DVD and Setup menu 
display. Options include: English, Spanish, German, 
Italian, and 

Russian

Note: 

If you want to change the OSD language, you 

can perform it using the TV Menu. Go to page 18.

Subtitle and Audio

Select the language for the subtitle display and audio 
track output during disc playback.

Note: 

If the selected language is not available, the 

default disc language will be used.

DivX subtitle

Select the subtitle encoding format to use during DivX

®


content playback. Options include: ASCII, Unicode, 
Turkish, Hebrew, Arabic, and KOI8_R.

Parental

: Off

             Set Password

Output

: Interlace

              DivX(R) VOD

DRC

: Off

QSound

: On

E.B.L.

: Off

TV Screen

: 4:3 

Display

: On

Picture Mode

: Auto

JPEG Interval

: 5 Seconds

Screen Saver

: On

Menu

:Russian

Subtitle

:Russian

DivX subtitle

:ASCII

Audio

:Russian

OSD

:English

English, Spanish, 
Italian, German, 
and Russian

The selected language will be 
heard or seen.

Auto (Subtitle) 

The unit will display the subtitle 
in the disc’s default language.

Off (Subtitle) 

There will be no subtitle display.

Содержание 15DV703R

Страница 1: ... s Record The model and serial numbers are on the back of your TV DVD Record these numbers in the spaces below Refer to these numbers whenever you communicate with your Toshiba dealer about this TV DVD Model number _________________ Serial number _________________ OWNER S MANUAL 15DV703R 19DV703R 19DV704R 22DV703R 22DV704R 26DV703R 32DV703R ...

Страница 2: ... PRODUCT THIS UNIT USES A VISIBLE LASER BEAM WHICH COULD CAUSE HAZARDOUS RADIATION EXPOSURE IF DIRECTED BE SURE TO OPERATE THE PLAYER CORRECTLY AS INSTRUCTED THE FOLLOWING CAUTION LABEL IS LOCATED ON THE REAR PANEL OF THE UNIT WHEN THIS UNIT IS PLUGGED INTO THE WALL OUTLET DO NOT PLACE YOUR EYES CLOSE TO THE OPENINGS TO LOOK INTO THE INSIDE OF THIS UNIT USE OF CONTROLS OR ADJUSTMENTS OR PERFORMANC...

Страница 3: ... in direct sunshine Do not use this unit near heat sources The casing and power cord could be damaged by the intensity of the heat Never place hot objects or open flame sources such as lighted candles or night lights on or close to the unit High temperatures can melt plastic and lead to fires If you intend to wall mount the unit contact the shop where you purchased the unit for advice and leave th...

Страница 4: ...for extended listening periods EXCLUSION CLAUSE PLEASE TAKE NOTE TECHNICAL LIMITATIONS If stationary images generated by text services channel identification logos computer displays video games on screen menus etc are left on the TV screen for any length of time they could leave an afterimage It is always advisable to reduce both the brightness and contrast settings The LCD panel contained in this...

Страница 5: ... and transfer of the TV is carried out by two or more people 2 Put the LCD TV on a large level area that can support the weight of the TV 3 Grab the pedestal stand and lift the display up Confirm the pivot is locked 4 Place the TV on a sturdy level surface that can support the weight of the TV To fold the pedestal stand Applicable to 19 and 22 inch models 1 Slide the lever on the back side of the ...

Страница 6: ...lding the pedestal stand in place remove the pedestal stand from the TV by sliding the pedestal stand away from the TV Note 22 inch model is used here for illustration of 19 22 inch models VENTILATION The TV emits heat when in operation Do not place any covers or blankets on the TV this may cause overheating Do not block ventilation holes or set up near radiators Do not place in direct sunshine Wh...

Страница 7: ...n DVD menu Soundtrack language Audio channel Subtitle Playback information VCD playback control PBC MP3 JPEG DivX and Audio CD information About the file browser Audio file playback JPEG file operation DivX and DivX VOD operation MP3 JPEG DivX and Audio CD playback modes Function setup Customizing disc playback Disc Setup menu Additional information Troubleshooting Specifications 35 36 36 37 37 38...

Страница 8: ... sensor Remote sensor embedded On Standby indicator Speaker Auto brightness sensor Remote sensor On Standby indicator Speaker 19 22 26 32 inch models 15 inch model EJECT button VOLUME buttons MENU button INPUT ENTER button POWER button HDMI2 jack USB jack Headphone jack Disc slot STOP CHANNEL button PLAY CHANNEL button 26 32 inch models ...

Страница 9: ...U button POWER button HDMI2 jack USB jack Headphone jack Disc slot STOP CHANNEL button PLAY CHANNEL button INPUT ENTER button 19 22 inch models HDMI2 jack USB jack Headphone jack Disc slot 15 inch model Applicable to the following models only 19DV703R 19DV704R 22DV703R 22DV704R You can adjust the angle of the TV screen 3 forward or 15 backward from a vertical angle Hold the base of the TV while ad...

Страница 10: ... POWER button INPUT ENTER button STOP CHANNEL button PLAY CHANNEL button 15 inch model AC input jack COMPONENT VIDEO IN jacks AUDIO IN L R jacks VIDEO IN jack OPTICAL DIGITAL AUDIO OUT jack PC IN jack HDMI1 jack Antenna jack HDMI1 PC AUDIO IN jack 15 19 22 26 32 inch models ...

Страница 11: ...esume disc playback 32 19 MENU SETUP In TV mode display the TV Main menu In DVD mode display the DVD Setup menu 18 48 20 RETURN When viewing a sub directory in a file browser screen go back to the previous file directory In DVD mode when viewing the Setup menu close the menu screen 27 28 42 48 21 EXIT CANCEL Close a menu screen In menu setting mode disregard the last change made 18 22 STOP Cancel ...

Страница 12: ...UM 4 penlight size supplied batteries paying attention to the polarity indicated in the battery compartment 3 Close the battery compartment Use two R03 AAA UM 4 size penlight batteries for the remote control If the remote control does not operate correctly or if the operating range becomes reduced i e you need to get closer to the TV to use the remote control replace batteries with new ones Do not...

Страница 13: ... and possible sources of interference in your area If you do not have an antenna and you are uncertain of what type to buy you should seek the advice of a local antenna contractor Satellite receiver connection When a satellite receiver is connected use the remote control that came with the receiver to switch channels RF cable not supplied Antenna jack Component video cable not supplied To Componen...

Страница 14: ...ct it to the TV as shown Select AV as the input source However if your game console is using another cable connection identify the cable type and proceed to the related section in the succeeding pages Connecting a camcorder If your camcorder requires an AV connection connect it to the TV as shown Select AV as the input source However if your camcorder is using another cable connection identify the...

Страница 15: ... The HDMI1 input receives uncompressed digital video from a DVI device When you connect the HDMI1 terminal to a DVI device with an HDMI to DVI adapter cable it only transfers video signal so it is necessary to use a separate audio cable to transfer the audio signal Notes When you connect the DVI device to HDMI1 terminal on the TV set the HDMI1 Audio to DVI See HDMI1 Audio on page 29 If you connect...

Страница 16: ...ay or if the display appears distorted or misaligned adjust the PC settings See PC Setting on page 29 When the TV is in PC mode and there is no video signal from the computer the No signal message appears on screen Mode Resolution Vertical Frequency Horizontal Frequency Pixel Clock Frequency VGA 640 480 60 000 Hz 31 500 kHz 25 200 MHz 640 480 72 809 Hz 37 861 kHz 31 500 MHz 640 480 75 000 Hz 37 50...

Страница 17: ... external audio output device is set to a reasonable listening level 19 and 32 inch models have indicators printed on other sides of buttons or jacks different from the illustrated 22 and 26 inch models Connecting a USB device Connect the USB device to the TV as shown Note For details on how to access the files stored in the USB device see Media Player on page 27 and 28 19 and 32 inch models have ...

Страница 18: ...t back in The TV should return to normal operation If the AC cord plug is plugged in for the first time wait for approximately five 5 seconds before pressing on the TV or on the remote control Power Return If the power is cut off while you are using the TV and the power is resupplied the Power Return feature will turn the TV on automatically If the power is going to be off for a long time or you a...

Страница 19: ...reen 2 On the Auto Installation menu the Language option is automatically highlighted Press to select the preferred language 3 Press to select Auto Tuning then press ENTER 4 The confirmation message will appear Check your aerial connection then press ENTER The TV will now automatically detect all available channels in your area and store them in the TV s memory Note Please be patient The Auto Tuni...

Страница 20: ...play There are 15 language options English Français Español Deutsch Italiano Nederlands Svenska Ελληνικά Polski Norsk Suomi Dansk Türkçe Русский and Português 1 In the Main menu screen press to select Setup then press ENTER Press to select Language then press ENTER Press to select your preferred language 2 Press EXIT to return to the normal screen When you press on the remote control the On Standb...

Страница 21: ...ure that the antenna and power connections are made then press on the TV or on the remote control 1 Press TV DVD to switch to TV mode then press MENU 2 Press to select Channel then press ENTER 3 Press to select Auto Tuning then press ENTER 4 Press ENTER to start the Auto Tuning process The sound will be muted during this process When the Auto Tuning is completed the TV will automatically switch to...

Страница 22: ...ft side of the list Press to select the position that you want to move the channel to then press to confirm the move Erase Program Press to select the channel that you want to erase then press ENTER Skip Press to select the channel that you want to skip then press ENTER The mark appears next to the skipped channel Ch Label Press to select channel that you want to rename then press to select Ch Lab...

Страница 23: ...elected there will be no sound output If this happens select an option other than Auto 5 Press to select Search then press to search for channels in the lower frequency or to search for channels in the higher frequency The search will begin It will stop at each station that has a good reception If you want to stop the search press ENTER 6 Press to select Fine then press to fine tune until the stat...

Страница 24: ...witch back to the channel you were watching Volume adjustment Press VOL to adjust the volume The volume level indicator disappears after three seconds Mute Press MUTE to turn off the sound Mute will appear on screen Press MUTE again or VOL to turn the volume back on Information display Press DISPLAY to view the information screen This panel shows the current channel number and label as well as the...

Страница 25: ...wn without any text information the current channel does not support teletext You can not change channels when there is a teletext display Turn off the teletext if you want to switch to another channel Select page Press P until the page you want appears You can also view a specific page by pressing the number buttons 0 9 to input the page number If you input the wrong page number just enter three ...

Страница 26: ...al is received NICAM M1 M2 appears when a NICAM MONO A and MONO B broadcast signal is received NICAM Off appears when a NICAM signal is received and the NICAM option is set to Off 4 Press EXIT to return to the normal screen Two channel sound reception When a two channel sound reception is available press AUDIO SELECT to select your preferred audio channel Each time you press AUDIO SELECT the sound...

Страница 27: ... 4 3 picture horizontally to fill the screen DVDs often stores a 16 9 image anamorphically meaning a 16 9 image is stored as a horizontally compressed 4 3 image Select the 16 9 format to restore the image to its proper 16 9 proportions Cinema This mode is used to zoom in or expand a 4 3 letter box picture with black bars at the top and bottom so that it fills more of the screen Note Using this for...

Страница 28: ... include PAL SECAM NTSC4 43 NTSC3 58 and PAL60 If you re not certain of the system used in your area or if the setting you ve selected results to horizontal stripes in the picture display select the Auto setting 6 Press EXIT to return to the normal screen Note DVD players that play NTSC DVDs i e multi region region code free can produce different signals based on the player model Possible signals ...

Страница 29: ...c list appears Press to select a file or folder then press ENTER or PLAY to begin playing the selected music file or to open the selected folder Auto Start If the Auto Start is set to On a confirmation prompt will appear when a USB device is inserted into the USB jack Basic Operation In photo view mode Press to view the previous or next file Press ENTER to switch between Single View or Slide Show ...

Страница 30: ...quick menu and press ENTER to display the music list Press STOP to stop the music Sleep Timer 2 Sets the sleep timer to turn off the Media Player and the TV up to 120 minutes in 10 minute increments Music Quick Menu Sort 3 Sets the file sorting preference in music list Select Title to sort the files by file name select New or Old to sort the files by file date from new to old or old to new Repeat ...

Страница 31: ...2 2 This option can only be accessed when the input source is set to PC mode Hor Position Adjust the image position horizontally Ver Position Adjust the image position vertically Clock Minimize any vertical bars or stripes visible on the screen background Phase Adjust this option if the computer s display frequency has been set to 60 Hz This will optimize picture quality by eliminating flickering ...

Страница 32: ...e input connectors to make it easier to identify the device connected to them These labels are displayed on the Source Selection and information display screens Vertical Position When the picture format is set to Cinema see page 25 you can adjust the vertical position of the display to view the top and bottom sections that have been cut off due to the image expansion Press to adjust the vertical p...

Страница 33: ... The titles can be subdivided into many sections Each section is called a Chapter Video CD Audio CD A video CD or audio CD can contain several items Each item is called a Track Disc maintenance On handling discs Do not touch the playback side of the disc Do not stick a label or adhesive tape on the disc Do not scratch the disc Do not get dirt on the surface of the disc Do not drop or bend the disc...

Страница 34: ...int appears on screen Press PLAY to resume playback on the previous stop point If you press STOP twice in quick succession or unload the disc the unit will clear the stop point To remove the disc press EJECT Wait for the disc to be ejected and then remove the disc from the slot Notes In some instances the unit may take a minute or so to start disc playback Do not move the unit during playback Doin...

Страница 35: ...g of the selected chapter or track Press SKIP to start playback from the beginning of the current chapter or track When you press SKIP twice in quick succession playback will start from the beginning of the preceding chapter or track Disc playback reminders If an incompatible disc is loaded one of the following error messages appears on screen Incorrect Disc Disc region incorrect or Enter password...

Страница 36: ...to locate the start point for playback Audio and video CDs use the record time or track number To view the disc s title track or chapter track list press DISPLAY 1 Press JUMP during playback resume or stop mode 2 Press to select a navigation option 3 Use the number buttons 0 9 to key in a value for the navigation option you selected If you input a wrong number press CANCEL Refer to the disc packag...

Страница 37: ...king a scene may not apply to some discs Viewing a bookmark DVD VCD Audio CD The saved scene bookmarks are only accessible during the current session Once you eject the disc or turn off the unit all bookmarks will be cleared 1 Press MARKER during playback mode 2 Press to select the saved marker 3 Press ENTER to start playback on the scene saved in the selected bookmark Note In some cases subtitles...

Страница 38: ...ssed Repeat playback is not applicable to PBC enabled VCDs The repeat playback function may not apply to some discs Enabling A B repeat playback DVD VCD Audio CD In A B repeat playback a specific section between two set points will be played repeatedly until you turn off the A B repeat mode 1 During playback press REPEAT A B at the point where you would like the playback loop to begin This sets yo...

Страница 39: ...k from the program list press to select the playback position you want to remove a track from then press CANCEL To clear the program list press to select Clear Program then press ENTER Enabling random playback VCD You can set the unit to play VCD tracks at random 1 Press PLAY MODE during stop mode 2 Press to select Mode then press ENTER repeatedly to select Shuffle 3 Press PLAY to start random pla...

Страница 40: ...ER or PLAY to start playback Notes Title selection may not apply to some DVDs The title menu may simply be referred to a menu or title in the instructions supplied with the DVD Using the DVD menu DVD Some DVDs have an encoded menu that allows users to select a specific disc content enable a particular DVD feature e g subtitle or soundtrack language or choose a particular title for multi title DVDs...

Страница 41: ...kers You need to connect an amplifier equipped with a DTS decoder to the optical digital audio out jack Selecting the audio channel VCD During playback press AUDIO SELECT repeatedly until the preferred audio channel is heard Options include Stereo Left Right and Mix Viewing subtitles DVD When playing back a disc recorded with subtitles you can select the subtitle language or turn the subtitle off ...

Страница 42: ...ess ENTER repeatedly until PBC appear When enabled PBC allows interactive VCD playback using the remote control DVD Video Time TT 00 01 52 00 09 11 CH 00 01 41 00 00 01 Title 1 2 Chapter 2 5 Elapsed remaining time for current title Title no Chapter no Elapsed remaining time for current chapter 2 205Mbps Bitrate 1 5 2 Ch Eng off 1 1 Bit rate Scene angle status Audio type Subtitle status if on will ...

Страница 43: ...Refrain from making too many sub folders It may take more than one minute for this unit to read MP3 JPEG and DivX files depending on the disc structure Music recorded based on the Joliet Recording Specification can be played back This unit does not support data disc burned using the Apple Mac OS Hierarchical File System HFS format MP3 JPEG DivX CDs cannot be used for recording purpose Filename dis...

Страница 44: ...browser 5 Press twice to move the selection highlight back to the file list Viewing image files in thumbnail mode You can change the browser s view mode from list mode to thumbnail mode This is convenient when browsing for JPEG files 1 Press DVD MENU 2 Press to select an image file To return the browser to list mode press TOP MENU Notes If the current directory has more than eight files press to s...

Страница 45: ...rarily stop audio playback press PAUSE Press PLAY to resume playback To stop audio playback press STOP The unit records the stop point appears on screen Press PLAY to resume playback on the previous stop point If you press STOP twice in quick succession or unload the disc the unit will clear the stop point Select files Folder 2 MP3 1 MP3 2 MP3 3 MP3 4 MP3 5 MP3 6 JPEG Preview Folder 1 Select files...

Страница 46: ...the slide show press PAUSE appears briefly on screen Press PLAY or SKIP to resume the slide show To stop the slide show press STOP The file browser appears Fullscreen mode Slide show options To view the previous or next image in the current folder slide show press SKIP or SKIP To rotate an image press ANGLE repeatedly until the preferred angle is obtained The image angle is adjusted in 90 incremen...

Страница 47: ...T DIVX VIDEO ON DEMAND This DivX Certified device must be registered in order to play DivX Video on Demand VOD content To generate the registration code locate the DivX VOD section in the device setup menu Go to vod divx com with this code to complete the registration process and learn more about DivX VOD Go to page 51 for instructions If an incorrect DRM file is loaded the message Authorization E...

Страница 48: ...mal in step 2 above Enabling the Music Intro mode When the Music Intro mode is enabled the first 10 seconds of an audio track is played This is useful if you are simply looking for a particular track in a list 1 During stop mode in the Option panel of the file browser press to select Mode 2 Press ENTER repeatedly to set the mode to Music Intro 3 Press PLAY The unit starts to play the first 10 seco...

Страница 49: ... list press to select a file then press PLAY to start playback Removing a file from the program list 1 During stop mode switch to Program view press to select Edit Mode on the Option panel then press ENTER to enable it 2 Press to go to the program list 3 Press to select the file you want to remove then press ENTER Repeat this step 3 to mark any other files you want to remove from the list 4 Press ...

Страница 50: ...n use the keys to select a setup tab Repeat steps 3 5 to configure the preferred option 7 Press SETUP or RETURN to close the Setup screen Parental Off Set Password Output Interlace DivX R VOD DRC Off QSound On E B L Off TV Screen 4 3 Display On Picture Mode Auto JPEG Interval 5 Seconds Screen Saver On Menu Russian Subtitle Russian DivX subtitle ASCII Audio Russian OSD English Set Password Output I...

Страница 51: ...ter deregistration code Note These settings are retained in the unit s memory It remains active even if the power is turned off Setup details Menu and OSD Select the language for the DVD and Setup menu display Options include English Spanish German Italian and Russian Note If you want to change the OSD language you can perform it using the TV Menu Go to page 18 Subtitle and Audio Select the langua...

Страница 52: ...efault Auto The DVD player automatically detects the type of source content and converts that signal in an appropriate method based on the TV s current aspect ratio This option will normally suit most DVDs Film Suitable for playback of DVDs recorded in a film format Video Suitable for playback of DVDs recorded in a video format Off Slide show option is disabled 5 10 or 15 seconds Images will be di...

Страница 53: ...mpt use the number buttons 0 9 to input the new password then press ENTER You will be prompted to confirm the new password 4 Use the number buttons 0 9 to input the new password again then press ENTER The system password is now set Note this new password for future reference If you forget the system password 1 Make sure there is no disc in the disc slot 2 Press and hold down 4 on the remote contro...

Страница 54: ...oblems Try another station The station signal may be weak reorient the antenna Check for sources of possible interference 22 11 54 Poor colour or no colour The station or cable TV may have problems Try another station Make sure channels are saved in the TV s memory Check the Picture settings Check the antenna connections if necessary reorient the antenna Check for sources of possible interference ...

Страница 55: ...sc has no multi language option encoded on it 39 No subtitle The disc has no subtitle encoded on it Subtitles are disabled Press SUBTITLE 39 Scene angle cannot be changed The disc has no multi angle scenes 38 X appears on the screen The function is not applicable to the disc or to the current mode 33 Remote control operation The remote control does not function Aim the remote control at the remote...

Страница 56: ...volatile compounds such as insecticide on the cabinet Such products may damage or discolour the cabinet Ignition Black spots or horizontal streaks may appear the picture may flutter or drift Usually caused by interference from automobile ignition systems neon lamps or AC powered tools and appliances such as drills or hair dryers Snow If the unit is located far from the TV station in a fringe recep...

Страница 57: ...colour LCD Number of pixels H V 1366 768 Television Television system SECAM D K Russia PAL B G D K I L L AV input receivable PAL SECAM NTSC 3 58 NTSC 4 43 PAL 60 Preset channels 99 channels Frequency range IreE2 E4 X Z 2 S1 S10 E5 E12 S11 S41 E21 E69 Antenna input VHF UHF 75 unbalanced Speaker 30 x 96 mm 8 x 2 30 x 96 mm 8 x 2 30 x 96 mm 8 x 2 45 x 167 mm 6 x 2 45 x 167 mm 6 x 2 Audio output power...

Страница 58: ... or translated into another language Hereinafter translation is included without limitation in the term modification Each licensee is addressed as you Activities other than copying distribution and modification are not covered by this License they are outside its scope The act of running the Program is not restricted and the output from the Program is covered only if its contents constitute a work...

Страница 59: ...n has the sole purpose of protecting the integrity of the free software distribution system which is implemented by public license practices Many people have made generous contributions to the wide range of software distributed through that system in reliance on consistent application of that system it is up to the author donor to decide if he or she is willing to distribute software through any o...

Страница 60: ...s is what you want to do use the GNU Library General Public License instead of this License Malloc License Notices This is a version aka dlmalloc of malloc free realloc written by Doug Lea and released to the public domain as explained at http creativecommons org licenses publicdomain Copyright Only Dedication based on United States law or Public Domain Certification The person or persons who have...

Страница 61: ... сбору отходов или в магазин где вы приобрели данное устройство The use of the symbol indicates that this product may not be treated as household waste By ensuring this product is disposed of correctly you will help prevent potential negative consequences for the environment and human health which could otherwise be caused by inappropriate waste handling of this product For more detailed informati...

Отзывы: