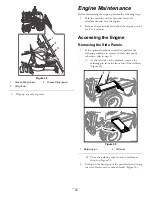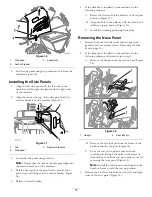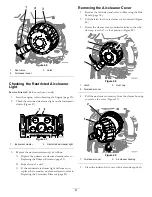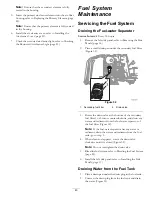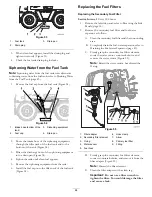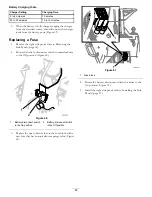
Figure 53
1.
Fuel tank
3.
Drain pan
2.
Drain plug
3.
When clean fuel appears, install the drain plug and
tighten it securely (Figure 53).
4.
Check the fuel tank drain plug for leaks.
Siphoning Water from the Fuel Tank
Note:
Siphoning water from the fuel tank is an alternative
to draining water from the fuel tank; refer to Draining Water
from the Fuel Tank (page 43).
1.
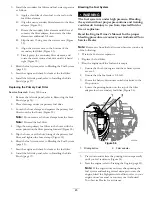
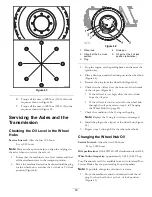
Remove the fuel cap from the fuel tank (Figure 54).
Figure 54
1.
Intake hose (bottom of the
tank)
3.
Siphoning equipment
2.
Fuel cap
4.
Drain pan
2.
Route the intake hose of the siphoning equipment
through the filler neck of the fuel tank and to the
bottom of the tank (Figure 54).
3.
Direct the discharge hose of the siphoning equipment
into a drain pan (Figure 54).
4.
Siphon the tank until clean fuel appears.
5.
Remove the siphoning equipment from the tank.
6.
Install the fuel cap onto the filler neck of the fuel tank
(Figure 54).
Replacing the Fuel Filters
Replacing the Secondary Fuel Filter
Service Interval:
Every 500 hours
1.
Remove the left side panel; refer to Removing the Side
Panels (page 36).
2.
Remove the secondary fuel filter and fuel-water
separator as follows:
A.
Clean the secondary fuel filter and the surrounding
area.
B.
Completely drain the fuel-water separator; refer to
Draining the Fuel-water Separator (page 43).
C.
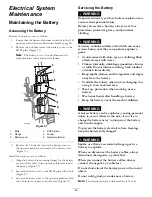
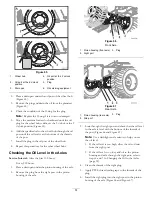
Firmly grasp the secondary fuel-filter element,
rotate the water sensor counterclockwise, and
remove the water sensor (Figure 55).
Note:
Retain the water sensor, but discard the
O-ring.
Figure 55
1.
Filter adapter
6.
Hose clamp
2.
Secondary filter element
7.
Arrow
3.
O-ring
8.
Primary fuel filter
4.
Water sensor
9.
Fitting
5.
Fuel hose
D.
Firmly grasp the secondary fuel-filter element,
rotate it counterclockwise, and remove it from the
filter adapter (Figure 55).
Note:
Discard the filter element.
E.
Clean the filter adapter with a clean rag.
Important:
Do not use a filter wrench to
tighten the filter. You could damage the filter
and cause a leak.
44
Содержание RT600
Страница 71: ...Notes 71...


