Adjust the lower links inboard until they contact the
aerator mounting plates. This will reduce the stress
on the pins. If the tractor has sway chains instead of
sway links, it is recommended that washers be installed
between the lower link arm and lynch pin to reduce the
over hung load on the lift pins.
Note:
Refer to the tractor Operator's Manual for
additional installation and adjustment procedures.
11
Leveling the Aerator
Side-to-Side
Parts needed for this procedure:
1
Level (not supplied)
Procedure
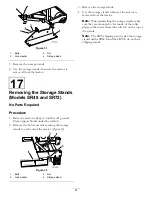
1. Park the tractor and aerator on a level, firm surface.
2. Place a level on top of the aerator frame to check for
level side-to-side (Figure 25).
Figure 25
1.
Level
3. Turn the adjustable link body (if provided) to raise
or lower the link arm until the aerator is leveled
side-to-side.
Note:
Refer to tractor Operator's Manual for
additional adjustment procedures.
12
Installing the Tines
Parts needed for this procedure:
A/R
Tines
Procedure
A wide selection of tines are available for the aerator.
Choose the tine type, size and spacings required for the
job. Refer to the Parts Catalog for the list of accessories.
1. Make certain the aerator is fully supported on the
stands or support blocks.
2. Turn off the tractor engine and remove the key.
3. Loosen the clamping bolts and remove the previously
used tines (Figure 26).
Figure 26
1.
Tine
2.
Clamping bolt
4. Slide the new tines into the holes sized to fit the tines
selected. Never use small diameter tines in the large
diameter holes - the tines should fit closely in the
hole. Be sure to slide the tine up into the head until
it bottoms out.
Note:
Hollow coring tines should be positioned
with the ejection slot to the rear while the solid tines
should have the tine tip angle facing the machine
(Figure 26).
5. Tighten the clamping bolts firmly to secure the tines.
6. Set the tine angle for the new tines. Refer to
Adjusting the Tine Angle in the Operation section.
7. Before aerating formal turf for the first time after
installing tines, test the aerator on a less important
area so that you can try alternative tractor gears and
fine tune the adjustment to achieve the hole spacing
and turf appearance desired.
18

