Checking the Springs
Service Interval:
Before each use or daily
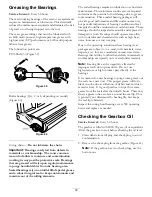
Check the springs for crossed or broken wires
(Figure 46). Crossed or broken spring wires will cause
an erratic hole pattern in the turf.
Figure 46
1.
Correct spring wires
2.
Crossed spring wires
Note:
Replacement wires are included with the aerator.
The wires are considered a consumable item.
Adjusting the Hole Spacing
The forward hole spacing is determined by the tractor's
gear ratio (or the hydrostatic traction pedal). Changing
the engine RPM does not change the forward hole
spacing.
The lateral hole spacing is determined by the number
of tines in the tine heads.
Removing the Aerator from
the Tractor
1. Stop the aerator on a level surface, not on a slope.
2. Disengage the PTO and engage the parking brake.
3. Raise the aerator roller(s) 3-6 inches off ground.
Place support blocks under the roller(s).
4. Stop the engine and remove the key from ignition
switch.
5. Before leaving the Operator's seat on tractor, wait
for engine and all moving parts to stop.
6. Remove the tines.
7. Install the storage stand.
8. Slowly lower aerator until storage stands contact
ground.
9. Remove the pin securing the top link to the aerator
bracket. Retain pin with aerator. Also, on models
with a hydraulic top link, disconnect the hydraulic
hoses and the connecting link from the tractor. Cap
the hydraulic hoses. Store these components with
the aerator.
10. Disconnect the safety shield chains from PTO shaft.
11. Pull back on the lock collar to disconnect the power
shaft from the tractor PTO shaft.
12. Slide the PTO shaft back and remove from tractor.
13. Connect the PTO safety chain to the aerator to
prevent the PTO shaft from contacting the ground.
14. Remove the pins securing the lower link arms to the
aerator brackets. Retain pins with aerator.
33


