background image

3-39

$

&KCI

+&0Q

5GZ/CNG

/C[

2CVKGPV61/';

2J[UKEKCP57<7-+

$CEM

#TGC

2KZ

59

OO

%NGCT

+PUKFG

%NGCT

#..

%CNEWNCVKQP

4CPIGQH)TC[.GXGN

2#)'8OU
6)F$UVGRU
%6F$UVGRU
0)F$
()F$

(TCOG4CVG*KIJ
(QEWU4GIKQP/KFFNG
5EQRG0QTOCN

R

1

&

1&

85GV

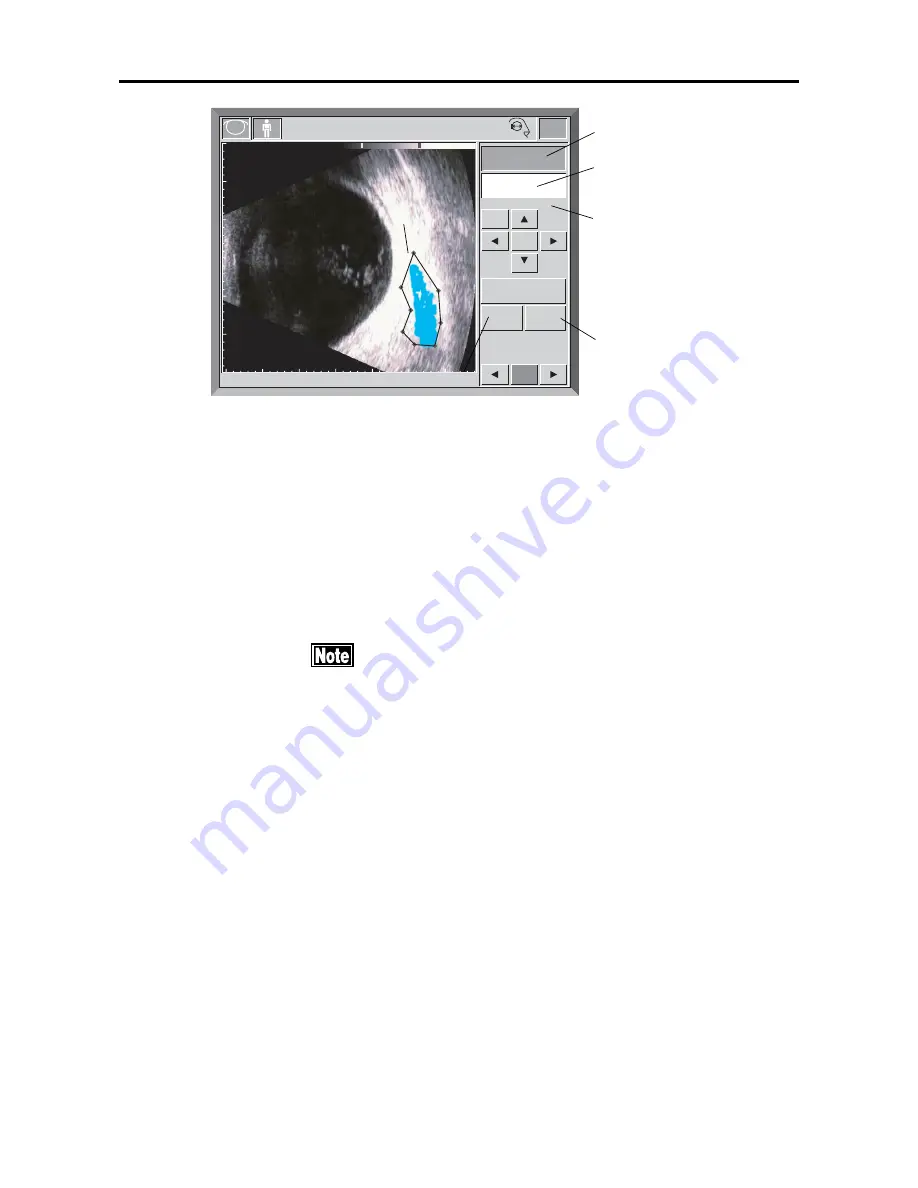
10) Press the Calculation key 

L

, so the beginning point and

the ending point are connected to start area calculation.  The
letters of "Now Processing" are shown in the results dis-
play panel 

M

 in process of calculation.  When the calcula-

tion is finished, the calculation results will be displayed.
And the pixels corresponding to the gradation range in the
enclosure is colored with a light blue.  The pixel count 

P

will be displayed below the calculation results.  (Fig. 4)

11) Then press the Clear Inside key 

Q

, so the calculation results

will b deleted leaving lines.

„

„

„

„

„

If any cursor position is once deleted, such position will
not be restored.  Therefore, sufficient confirmation shall
be given before deleting the cursor position.

12) Press the Clear All key 

R

 to delete all calculation results

and lines.

13) Press the Area key 

S

 to return to the main screen. (Fig. 2)

All the areas which have been set are deleted at the same
time.

(Fig. 4)

S

N

P

R

Q

O

3.3 B-scan diagnosis

Содержание UD-600

Страница 1: ...operation If you come up any unclear things while in your operation please ask Tomey or your local representative Do not use this instrument in an operation procedure other than specified in this Man...

Страница 2: ......

Страница 3: ...it may be subjected to any visible damage on its tip Such use may not only causes an incor rect image but also damages the cornea Always remove the power cable from the instrument during mainte nance...

Страница 4: ...e caution marks indicated on the instrument There are one on the front and six on the back In case the caution marks get broken and unclear contact the place of purchase or TOMEY CORPORATION IMPORTANT...

Страница 5: ...CEDURE Necessary information for installing and using this instrument 4 TECHNICAL INFORMATION Technical information of this instrument which is convenient for the operation 5 MAINTENANCE AND INSPECTIO...

Страница 6: ...ion is observed Possibility of serious injury or death unless the instruc tion is observed Possibility of minor injury intermediate handicap or physi cal loss or damage unless the instruction is obser...

Страница 7: ...d left side views 2 4 3 OPERATION PROCEDURE 3 1 3 1 Safety precautions 3 1 3 2 Preparation before operation 3 2 3 2 1 How to connect the accessories 3 2 a B scan probe 3 2 b Biometry probe 3 2 c Power...

Страница 8: ...MEY Link 3 21 c Setting of the eye to be observed 3 23 d Display of the probe applying angle 3 23 3 3 5 Inputting of ID number from the external connection ID input device barcode reader etc 3 25 3 3...

Страница 9: ...functions at freeze 3 66 a Moving images playback 3 66 b Frame page by page forward backward display function 3 66 c Skip display 3 66 d Movement of the cursor line and each cursor 3 66 e Echo data sa...

Страница 10: ...etting of the eye type to be measured and the sound velocity for conversion 3 93 c Setting of gains 3 96 d ID number patient s name patient s gender physician s name 3 97 e Setting of the measuring me...

Страница 11: ...patient data 3 121 a Inputting of the model name of implanted IOL Implanted IOL Model 3 121 b Inputting of implanted IOL power IOL Power 3 122 c Saving of patient data 3 123 3 8 Operating of the inpu...

Страница 12: ...aying and editing of patient data saved in the memory card 3 151 j Statistical processing of patient data 3 154 k Setting of printout modes 3 155 l Switching of contact mode immersion mode 3 157 m Swi...

Страница 13: ...ring of the instrument 5 6 5 6 Precautions for packing materials 5 6 6 TROUBLESHOOTING 6 1 7 SPARE PARTS AND OPTION PARTS 7 1 7 1 Option parts 7 1 7 2 Spare parts 7 2 8 SPECIFICATIONS 8 1 8 1 Specific...

Страница 14: ...xii This page is intentionally blank...

Страница 15: ...e used for IOL selection surgery may have to be done again Apply the result of IOL Power Calculation to IOL selection after overall evaluation including IOL formula and the result of other tests The v...

Страница 16: ...impact or test result may not be accurate Also a fire or an accident resulting injury or death may result from falling or dropping Set up in a place far enough from other equipments to avoid malfuncti...

Страница 17: ...ils to work properly discontinue immediately and contact the place of purchase for checks repairs putting a sign Out of Order on the instrument Do not modify this instrument or an electric shock or a...

Страница 18: ...strument or the instrument may fail or break z z z z z Main unit of the Ultrasound A B Scanner UD 6000 1 z z z z z B mode probe with case 1 z z z z z Biometry probe with protective cap and case 1 z z...

Страница 19: ...source switch c c c c c OFF side of the power source switch FOOT SWITCH Footswitch terminal FIX LIGHT Chin Rest AL 1100 fixation lamp power source plugged to terminal VIDEO OUT Video signal output te...

Страница 20: ...display its structure in the cross sectional image y The ultrasound beam focus image is controlled with six annular arrayed oscillators arranged concentrically which ensure a wide range of ultrasound...

Страница 21: ...time y This instrument provides the automatic measuring function and the sound monitoring function for the purpose of biometry measure ment therefore accurate measurement can be obtained regardless o...

Страница 22: ...1 8 This page is intentionally blank...

Страница 23: ...ms and various data are displayed and used for operation B Probe Holder The probe is kept in this holder C B scan probe terminal The B scan probe is connected D A scan probe terminal The biometry prob...

Страница 24: ...e diagnosis function Biometry assistant function A scan diagnosis function Alternately changes over the freeze condition and the real time condition Biometry function Measured data is taken in the man...

Страница 25: ...ss of the image diagnosis function as being set Bio indicator Lights while in process of the biometry function as being set Built in printer Biometry probe Used for biometry measurement Memory card 2...

Страница 26: ...inter mode terminal REMOTE The remote cable of the Video Printer is connected C Chin rest AL 1100 fixation lamp power source plug terminal FIX LIGHT The power source cord for AL 1100 is connected D LA...

Страница 27: ...can be turned ON OFF H 3P plug power source cord This cord should be connected to AC 3P power source receptacle I Video output color mono chrome select switch PRINTER M C The video output signal is se...

Страница 28: ...2 6 This page is intentionally blank...

Страница 29: ...st also be sterilized before it is used Do not use the probe with eye contacting part damaged such use not only affects the images but also harms the cornea or the eyelids This instrument is especiall...

Страница 30: ...6 59 6 The insertion direction of the connector for the biometry probe is specified Securely insert the connector into the terminal until it makes a click sound Make sure that the label applied to the...

Страница 31: ...specified direction by connecting all the 3 pins C d Footswitch 0 4 4 4 KQ 241 241 116 59 6 The inserting direction of the connector is specified Se curely insert the connector in specified direction...

Страница 32: ...the bottom of the rightsideof themainbodyoftheinstrumenttosecurelyfixthe block B with these two bolts Fig 1 Since the probe cable guide rotates freely care must be taken for the end of the guide 0 4...

Страница 33: ...sert and remove the Memory Card Since the memory card is ejected out when removed press the removing button by holding the end of the card Placing the PC card Mount the memory card A in the PC card ad...

Страница 34: ...rises to the same level as the card Fig 1 When the memory card is inserted in posi tion a sound of beep is given In five seconds after this sound a sound of beep is made to confirm that the memory ca...

Страница 35: ...ied to the A scan probe cable is blue A color other than blue if used for the A scan probe cable does not correspond to that used for the A scan probe The wrong probe if used for this instrument may n...

Страница 36: ...ected since they are not used In case of the color printer Connect the red green and blue colored BNC connectors to the video signal terminals for video printer No other cables are required to be conn...

Страница 37: ...insertion direction of the connector is specified Align the connector to the inserting direction and insert it securely Insert the connector A of the external connection ID inputting device barcode r...

Страница 38: ...Care must be taken not to damage the eye contacting part of the probe 2 Bundle the probe cord double and hold it with the cord hook B of the Chin Rest Twenty centimeters from the probe to the cord hoo...

Страница 39: ...ent Fig 1 3 Insert the biometry probe C into the attachment from the examiner ssideandfastentheprobewiththeplasticscrewsD by using the screw driver to secure the biometry probe to the attachment Fig 2...

Страница 40: ...computer doesn t work properly Be sure to get a permission from your network adminis trator when performing network setting Confirm the version number of this instrument before use Version M3 0 G 10...

Страница 41: ...ument in the correct direction 0 8 1 176 24 06 4 25 6 4 16 0 LINK lamp C turns on when physical LAN connection is com pleted at the power on Whentheconnectionspeedissetat100MHz 100MlampD turns on and...

Страница 42: ...power switch Aprovided on the left side of the instrument bywhichitsmainunitandtheB probeareadjusted automatically Ifanerrorisindicatedafterthisadjustment take appropriate countermeasures by referrin...

Страница 43: ...d care fully adjust the display angle Adjusting for the vertical direction only can be given but not for the horizontal di rection b Changing the mode to the B mode function After switching over the m...

Страница 44: ...GIKQP KFFNG 5EQRG 0QTOCN R 1 0 9 0 9 2CVKGPV 2CVKGPV 2146 2 If the B probe is properly calibrated the diagnosis screen the initial screen will be displayed Fig 2 5VCTVKPI 7 XGT FLWUVKPI 2TQDG 5ECP 2TQ...

Страница 45: ...city is displayed Index ID number name gender of the Patient and name of the Physician probe applying angle and date are displayed Memory number of image The memory number of the image s is displayed...

Страница 46: ...ctor A Move position setting screen is turned ON OFF Vector A Vector A waveform is displayed ON OFF Setting of L R eye to be measured L R eye to be measured is set Save Echo Image and patient s data w...

Страница 47: ...6 F 0 F F TCOG 4CVG KIJ QEWU 4GIKQP KFFNG 5EQRG 0QTOCN TCOG 4CVG KIJ QY QEWU 4GIKQP KFFNG CT 5EQRG 0QTOCN 9KFG R 1 1 Focus Region Select Focus Regions Frame Rate Changes the frame rate between 11 and...

Страница 48: ...ion and the measured data will not be correlated KCI 0Q 5GZ CNG C 5CXG EJQ 4GECNN OCIG QQO QXG QQO GCUWTG GPIVJ TGC 8GEVQT 18 8GEVQT 5OQQVJKPI 10 3WCF 9KPFQYU 7VKNKV 2CVKGPV 61 2J UKEKCP 2 8 O U 6 F U...

Страница 49: ...Z CNG C 5CXG EJQ 4GECNN OCIG QQO QXG QQO GCUWTG GPIVJ TGC 8GEVQT 18 8GEVQT 5OQQVJKPI 3WCF 9KPFQYU 7VKNKV 2CVKGPV 61 2J UKEKCP 2 8 O U 6 F UVGRU 6 F UVGRU 0 F F TCOG 4CVG KIJ QEWU 4GIKQP KFFNG 5EQRG 0Q...

Страница 50: ...arious data again press the Index Key A to theoriginalscreen Fig 1 b Inquiry for patient information TOMEY Link In order to use the patient inquiry function the network available system TOMEY Link opt...

Страница 51: ...former screen 4 Pressing the Inquiry key E restarts inquiry to the TOMEY LinkanddisplaysthePatientInformationInterimScreen Fig 2 5 Pressing the Cancel key Freturns to the starting screen with outproc...

Страница 52: ...ting or saving measured data in the memory card or data communicating with the TOMEY Link or DATA Transfer make sure that the display of the eye in subject is correct d Display of the probe applying a...

Страница 53: ...ise turns the probe applying angle mark by each 45 degrees Fig 3 Relationship of display image and probe application The B scan probe is marked with the scanning direction mark E which indicates the d...

Страница 54: ...ice such as barcode reader etc is acceptable only while the following screens are displayed 1 PSWKT CPEGN ZVGTPCN PRWV 0COG 5GZ CVG QH KTVJ PUYGT HQTO 61 KPM 0QY QPPGEVKPI 1 When the ID number has bee...

Страница 55: ...G EWTTGPV FCVC CPF TGRNCEG KV KPVQ PGY YJKEJ KU KORQTVGF HTQO GZVGTPCN FGXKEG 2 If ID input is made from the external connection device with the patient information and measurement data as hav ing alr...

Страница 56: ...return the screen to the former screen display 6 Pressing of the Inquiry key Brestarts inquiry to theTOMEY Link to display the Patient Information On inquiry Screen 7 Pressing of the Cancel key C ret...

Страница 57: ...the clearer and more delicate changes of the organization b TOTAL volume B B B B B The echo sensitivity of the total image is set Adjustable range 1 to 60dB The higher sensitivity not only makes the d...

Страница 58: ...to release the freeze condition deletes all the moving images which have been acquired sufficient care must be taken before pressing the FREEZE button 24 06 616 1064 56 4 KQ 4 0 4 4 5 8 24 06 1 Press...

Страница 59: ...KQP KFFNG 5EQRG 0QTOCN R 1 1 0 9 0 9 2CVKGPV 2CVKGPV 2146 KCI 0Q 5GZ CNG C 5CXG EJQ 4GECNN OCIG QQO QXG QQO GCUWTG GPIVJ TGC 8GEVQT 18 8GEVQT 5OQQVJKPI 3WCF 9KPFQYU 7VKNKV 2CVKGPV 61 2J UKEKCP 2 8 O U...

Страница 60: ...d returning key B shows the images by page by page in the backward direction Continuously pressing of either of these keys consecutively feeds the saved images in respected direction c SKIP display Th...

Страница 61: ...4CVG KIJ QEWU 4GIKQP KFFNG 5EQRG 0QTOCN R 1 1 0 9 0 9 2CVKGPV 2CVKGPV 2146 Display of the Vector A waveform 1 Pressing of the Vector A key A changes the A scan wave to the display vs no display On th...

Страница 62: ...ressed for short time the cursor line moves by gradation 3 When touching the image the cursor line position will be moved to the position where the cursor position is touched 4 Press the Horizontal ke...

Страница 63: ...QQVJKPI 3WCF 9KPFQYU 7VKNKV 2CVKGPV 61 2J UKEKCP 2 X O U 6 F UVGRU 6 F UVGRU 0 F F TCOG 4CVG KIJ QEWU 4GIKQP KFFNG 5EQRG 0QTOCN R 1 1 0 9 0 9 2CVKGPV 2CVKGPV 2146 1 Press the Measure Length key A to c...

Страница 64: ...5GZ CNG C 2CVKGPV 61 2J UKEKCP 57 7 59 GCUWTG GPIVJ OO 2 8 O U 6 F UVGRU 6 F UVGRU 0 F F TCOG 4CVG KIJ QEWU 4GIKQP KFFNG 5EQRG 0QTOCN R 1 1 8 5GV 5 Press the Move key F to move the active caliper 6 To...

Страница 65: ...he critical area corresponding to the gradation range in the enclosure for the purpose of area calculation KCI 0Q 5GZ CNG C 5CXG EJQ 4GECNN OCIG QQO QXG QQO GCUWTG GPIVJ TGC 8GEVQT 18 8GEVQT 5OQQVJKPI...

Страница 66: ...ious screen Fig 2 5 Touching the image in the screen displays the active point E in the touching position 6 Use the point moving key F to micro adjust the position of active points 7 Press the Back ke...

Страница 67: ...will be displayed And the pixels corresponding to the gradation range in the enclosure is colored with a light blue The pixel count P will be displayed below the calculation results Fig 4 11 Then pre...

Страница 68: ...G GPIVJ TGC 8GEVQT 18 8GEVQT 5OQQVJKPI 3WCF 9KPFQYU 7VKNKV 2CVKGPV 61 2J UKEKCP 2 8 O U 6 F UVGRU 6 F UVGRU 0 F F TCOG 4CVG KIJ QEWU 4GIKQP KFFNG 5EQRG 0QTOCN R 1 1 0 9 0 9 2CVKGPV 2CVKGPV 2146 Switch...

Страница 69: ...a will be moved to the center of the body 4 Press the Zoom key F to return the mode to the main dis play with the magnification display as being left h Smoothing Smoothening is used to smoothen the co...

Страница 70: ...main unit properly Patient ID and OD OS must be properly selected before storing the data into Memory Card DO NOT remove Memory Card while the data is stored or loaded Otherwise all the data on Memor...

Страница 71: ...the data on Memory Card will be damaged DO NOT remove Memory Card while the displayed im age is loaded on screen from the same Card Otherwise the displayed image will be closed and the screen changes...

Страница 72: ...n search patient by Patient ID Click on the blank E for ID type in and type ID for the patient you want to search Click on the blank again or press Enter F to complete input Then press Search to list...

Страница 73: ...COG 4CVG KIJ QEWU 4GIKQP KFFNG 5EQRG 0QTOCN R 1 1 2146 5CXG EJQ 8 Press Up Down M to page up down the images on the list for selected patient The image number and total amount of images are shown on s...

Страница 74: ...Refer to f Area for Area 16 Refer to g Zoom for Zoom 5CXG 2 KCI 0Q 5GZ CNG C 2CVKGPV 61 2J UKEKCP 57 7 5 6 7 8 9 5RCEG NGCT 0 1 2 3 4 9 R 1 1 ZKV GNGVG 5CXG 2 2 KNG 0COG VGUV 0COG 61 CVG 4 0QVG KNG0CO...

Страница 75: ...delete necessary infor mation KCI 0Q 5GZ C 5CXG EJQ 4GECNN OCIG QQO QXG QQO GCUWTG GPIVJ TGC 8GEVQT 18 8GEVQT 5OQQVJKPI 3WCF 9KPFQYU 7VKNKV 2CVKGPV 2J UKEKCP 2 8 O U 6 F UVGRU 6 F UVGRU 0 F F TCOG 4CV...

Страница 76: ...Delete All G and keep holding for one second to delete all Once the Memory Card is formatted all the data on the card will be lost Lost data cannot be restored 5 Press Memory Card Format H to go to t...

Страница 77: ...QXG QQO GCUWTG GPIVJ TGC 8GEVQT 18 8GEVQT 5OQQVJKPI 3WCF 9KPFQYU 7VKNKV 2CVKGPV 2J UKEKCP 2 8 O U 6 F UVGRU 6 F UVGRU 0 F F TCOG 4CVG KIJ QEWU 4GIKQP KFFNG 5EQRG 0QTOCN R 1 0 9 0 9 2CVKGPV 2CVKGPV 214...

Страница 78: ...can search patient by Patient ID Click on the blank F for ID type in and type ID for the patient you want to search Click on the blank again or press Enter G to complete input Then press Search H to...

Страница 79: ...N 9 6 6 0 KUV 2D 0ON 9 6 6 0 KCI 0Q 5GZ CNG C 2CVKGPV 61 2J UKEKCP 9 9 9 9 R 1 1 3WCF 9KPFQYU 10 Press Up Down N to page up down the images on the list for selected patient 11 Whenoneoutoffourimagesis...

Страница 80: ...transferred without ID number but patient identification may not be possible in the test data output with DATA Transfer When sending the data without ID number confirm the data immediately after data...

Страница 81: ...47 47 25 5 0COG 5GZ CVG QH KTVJ 5 47 47 25 5 57 9 19 8 15 8 GOCNG G 1 4KIJV WI 0QY ZRQTVKPI 2146 4 Themessageof NowExporting isdisplayedwhileincom munications Fig 3 When discontinuing communications...

Страница 82: ...pedalFforsendand PREEZE pedalGforcancel Thescreenwillgobacktothepreviousoneautomaticallyafter sendingthedata m Total gain vs contrast change after freeze 24 06 616 1064 56 4 KQ 4 0 4 This function ch...

Страница 83: ...NG 5EQRG 0QTOCN R 1 1 This function sets the frame rate in two steps High 22 frames sec allows smoothandnaturalmovingimagesevenincaseoffastmovingtestingeyeand still short playback time for one travel...

Страница 84: ...KQP KFFNG 5EQRG 0QTOCN R 1 1 Press the Focus Region key A for this setting Each pres of this key changes over three stages of Near Middle and Far Focus regions The following shows three focus regions...

Страница 85: ...VKGPV 61 2J UKEKCP 57 7 8 O U 6 F 6 F 0 F F TCOG 4CVG KIJ QEWU 4GIKQP KFFNG 5EQRG 0QTOCN R 1 1 Press the Scope key A for this setting Each press of this key sets the scope for Normal and Wide alternat...

Страница 86: ...the standard val ues High Contrast B B B B B The images are displayed with clear definitions provided that due to its low gradation it is not convenient for observation of delicate changes in the orga...

Страница 87: ...to set total gain contrast near gain and far gain at the values to suit the selected keys Each set value is displayed at the left upper part D of the image 24 06 616 1064 56 4 KQ 4 0 4 2 Turn the vol...

Страница 88: ...n the line displayed in the ultrasound image in an approximate position of the anterior of the crys talline lens and that of the retina to display the cursors in the detecting position on the line x m...

Страница 89: ...unction Next press the B Diag key A in the Freeze screen Fig 1 for approximately one second so the instru ment will automatically adjust the B scan probe as well as itself Z 0Q 5GZ CNG 5GR 59 5CXG EJQ...

Страница 90: ...d value used for measurement and IOL thickness are displayed INDEX ID number patient s name gender physician s name probe applying angle and date and time are displayed TG CT NG FG Set values of total...

Страница 91: ...r of right or left Recall Image The screen is changed to the Saved Image Display screen Save Main The image being displayed and the patient data are saved in the Echo format into the memory card Curso...

Страница 92: ...UKEKCP 57 7 0QTOCN R 1 1 6 F 6 F 0 F F OO OO 05 OO OR KPGCTN QI The type of eye to be measured The type of eye to be measured the ultrasound velocity and the IOL thickness are set Amp The amp type is...

Страница 93: ...Q 4GECNN OCIG 7VKNKV 2CVKGPV 61 2J UKEKCP 57 7 R 1 1 2 0QTOCN 8CXI O U 6 F UVGRU 6 F UVGRU 0 F F OR KPGCT OO OO 05 OO 0 9 0 9 2CVKGPV 2CVKGPV 2146 5EQRG 0QTOCN Pressing of the NEW Patient key A for ap...

Страница 94: ...lume D D D D D The reflective echo sensitivity in the area near the retina and the anterior chamber is set Adjustable range 1 to 40dB 3 4 5 Entering of Index data See 3 3 4 Entering of Index data 3 4...

Страница 95: ...obtained in their optimum condition 6 For taking the images in press the FREEZE button A or press the footswitch to make the freeze condition 3 4 7 Various functions at freeze a Moving images playbac...

Страница 96: ...t over the cursor line 4 The screen then shows the distance H between the cornea front cursor and the retinal cursor and that I between the cornea front cursor and the crystalline lens front cursor As...

Страница 97: ...he eye type setting key A the screen mode will be changed to the Eye Type Setting screen Fig 2 Z 0Q 5GZ CNG 5GR 2CVKGPV 61 2J UKEKCP 57 7 0QTOCN G 6 RG 0QTOCN RJCMKE GPUG 2UGWFQ 8CXI O U 6 F 6 F 0 F F...

Страница 98: ...items are set press the Enter key E to change to the following input items Input ranges Normal Biometryaverageultrasoundvelocity 1 500m s to 1 600m s Dense Biometry average ultrasound velocity 1 500m...

Страница 99: ...the Freeze screen Fig 1 of the B scan image diagnosis function to change the screen mode to the Utility screen Fig 2 Then press the Utility key A in the Freeze screen Fig 1 for B scan image diagnosis...

Страница 100: ...can diagnosis function to the B scan diag nosis function or the biometry measuring sub function press the Utility key C to select the Utility screen Fig 4 and next press the B Diag select key D for ap...

Страница 101: ...mory number of A scan waveform Memory number of A scan waveform is displayed Conversion sound velocity Conversion sound velocity is displayed INDEX ID number patient s name gender physician s name and...

Страница 102: ...displayed Setting of eye Left right eye is set Save Echo Waveforms and patient data which are being displayed are saved in the Echo format into the memory card Line cursor moving key The line cursor...

Страница 103: ...KCI 0Q 5GZ CNG 5GR CKP OR GCO KTGEVKQP F 2CVKGPV 61 2J UKEKCP 57 7 QI 2 KPG R 1 8 O U 5EQRG 0QTOCN 9KFG 5EQRG 0QTOCN Amp The type of amplifier is selected Scope The display range of A scan waveform is...

Страница 104: ...KNKV 2CVKGPV 61 2J UKEKCP 57 7 QI 2 KPG R 1 2 8 O U 0 9 0 9 2CVKGPV 2CVKGPV 2146 5EQRG 0QTOCN By pressing the NEW Patient key A for approximately on sec ond until the beep sound is made patient inform...

Страница 105: ...64 56 4 KQ 4 0 4 4 5 8 24 06 1 If the operation is in the freeze condition press the FREEZE button A or the FREEZE pedal B of the footswitch to release the freeze condition 2 Apply an appropriate amou...

Страница 106: ...ressing the Data Display Select key A b ON OFF and movement of the line cursor This line cursor can be used as the reference line of total gain KCI 0Q 5GZ CNG 5GR CKP OR GCO KTGEVKQP F 5CXG EJQ 4GECNN...

Страница 107: ...1 Nine positions are each displayed every time when press ing the probe applying position key A Fig 2 2 One to twelve directions are shown every time when press ing the beam direction key B which is u...

Страница 108: ...fore storing the data into Memory Card DO NOT remove Memory Card while the data is stored or loaded Otherwise all the data on Memory Card will be damaged 4 5 8 24 06 1 Waveforms to be saved are displa...

Страница 109: ...saved on Memory Card before using this function Please refer to d Data Storage KCI 0Q 5GZ CNG 5GR CKP OR GCO KTGEVKQP F 5CXG EJQ 4GECNN CVC 7VKNKV 2CVKGPV 61 2J UKEKCP 57 7 QI 2 KPG R 1 0 9 0 9 2CVKG...

Страница 110: ...n screen 3 Press Data List H to list the images of the selected patient Fig 3 KCI 0Q 5GZ C 2CVKGPV 2J UKEKCP 57 7 CVG 4 CKP 4 4 4 4 4 OR QI KPGCT QI KPGCT KPGCT KPGCT GCO KTGEVKQP 2 9 N 5GR RN WP GE W...

Страница 111: ...CVC RNGCUG RTGUU VJG 5CXG EJQ G QP VJG RTGXKQWU UETGGP 8 Press OK O to change from OD to OS or OS to OD and gobacktoformerscreen Fig 4 ThechangeonMemoryCard will NOT be saved until SAVE Echo Q is pres...

Страница 112: ...Image Ato go to Patient List Fig 2 2CVKGPV KUV KCI 0Q 5GZ C 2CVKGPV 2J UKEKCP 0COG 5 61 1 7 6 0 161 61 0 0 0 5 1 9 15 01 75 61 5 6 7 8 9 5RCEG NGCT 0 1 2 3 4 9 R 1 QTOCV GNGVG GNGVG ZKV 61 5GCTEJ CVC...

Страница 113: ...Card Format H to go to the Format screen Fig 3 QTOCV ZKV KCI QTOCV GOQT CTF 6 Press Format I to format the card While formatting Now Processing is displayed When it is gone format is completed 7 Pres...

Страница 114: ...og linear amp Linear and S curve amp S are alternately selected every time when pressing the Amp Select key A b ON OFF and movement of the line cursor See 3 5 7 b ON OFF and movements of line cursor c...

Страница 115: ...ed by B scan image diagnosis the assistant function of biometry and A scan diagnosis function are deleted Therefore sufficient care is to be given before switching the biometry function 24 06 616 1064...

Страница 116: ...to calibrate the biometry probe Fig 1 CKP XGTCIG 5 OO OO 8GNQEKV XI 8GNQEKV 05 8GNQEKV OO CPF 0QTOCN M V 0Q XI 05 0Q 5GZ CNG WI 2CVKGPV 61 2J UKEKCP O U O U O U 1 7VKNKV FKV 4CPIG R 1 4GVCMG 0 9 4GVK...

Страница 117: ...d the OK key B will be displayed Fig 3 If the OK key B is next pressed the Measurement screen the initial screen will be displayed Fig 2 If the error message is displayed see 6 TROUBLESHOOTING If this...

Страница 118: ...the right side of this cursor as the retinal waveform Utility key The Utility screen is displayed Retake key Deletes measured data being displayed and retakes data Edit key The screen mode is changes...

Страница 119: ...a The average of measured axial length data is displayed L The reading is the longest axial length is shown Measurement data Measurement data average of axial length anterior depth and crystalline len...

Страница 120: ...or level line In the auto mode data is taken when the wave rises higher than this cursor Display of selected measurement data Selected data is displayed as reversed black white AXIAL key The Measureme...

Страница 121: ...easurement for the new patient See 3 6 9 a Deleting of measurement data for both eyes Measuring preparation for the new patient If taking measurement without pressing the NEW key measured data may oth...

Страница 122: ...t is difficult with Normal due to the reflective echo caused at the rear side of the crystalline lens Aphakic Select Aphakic if the eye to be measured is an aphakic eye Pseudophakic Select Pseudophaki...

Страница 123: ...QRJCMKE 2UGWFQ W 2UGWFQ 2UGWFQ 2UGWFQRJCMKE 2UGWFQRJCMKE XGTCIG 5 OO OO 4CPIG OO M V 7VKNKV R 1 GCP 8GNQEKV 5GEVKQPCN 8GNQEKV M V S V 2 Press the setting key B of the eye type to be measured for setti...

Страница 124: ...s Lens ultrasound velocity LENS 1540 to 1740 m s Anterior chamber depth ultrasound velocity ACD 1430 to 1630 m s Normal Sectional ultrasound velocity Lens ultrasound velocity LENS 1540 to 1740 m s An...

Страница 125: ...or OS The setting for both eyes cannot be changed automatically The setting for each eye should be properly selected according to the conditions The height of the waveforms is adjusted with the gains...

Страница 126: ...patient as well as the measuring application Hand measurement Hand probe Select Hand measurement when taking measurement by holding the probe with hand Chin measurement Chin rest measurement Select Ch...

Страница 127: ...urement will start 3 6 5 Preparation for measurement Patient s cooperation is necessary for smooth measure ment Prior to measurement explain the measurement method and have him sufficiently relax hims...

Страница 128: ...obe and the cornea is 2 2 to 5 0mm In case of using the immersion attachment Care must be taken not to let an air void in the cornea protective media when using it in the end cup of the im mersion att...

Страница 129: ...f the Chin Rest AL 1100 2 Press the probe against the cornea until the slider ap proximately aligns to the slider moving face A and the fixed part B while measurement as shown in the figures If the pr...

Страница 130: ...a waveform located on the right side of the retinal waveform selecting cursor as a retinal waveform for measurement CKP XGTCIG 5 OO OO 8GNQEKV XI 8GNQEKV 05 8GNQEKV OO CPF 0QTOCN M V 0Q XI 05 0Q 5GZ C...

Страница 131: ...osterior lens spike Then the unit takes first spike on right of the cursor as posterior lens and shows measurement results accordingly Posterior Lens Cursor is activated only when Eye Type is se lecte...

Страница 132: ...y rising retinal waveform indicates that re lated ultrasound waves have vertical contact with the retina ii The highly rising lens front rear waveforms indicate that the ultrasound waves correctly cat...

Страница 133: ...ure ment data but used for checking if acquired waveforms are ideal or not Give this check together with the use of i to iii of the contact mode v No unnecessary waveform shall be between the initial...

Страница 134: ...nt function is a sub function which makes measurement easy but is not intended for clinical evaluation for practical application In case of measuring for a new patient always press the NEW key to dele...

Страница 135: ...ument it finishes measurement with a reporting sound of beep The waveforms being displayed in the monitor screen are those for measured data which are closest to the average of the data b Manual measu...

Страница 136: ...hange the screen mode to the Mea surement Data Confirmation screen Fig 2 CKP XGTCIG 5 OO OO 4CPIG 8GNQEKV XI 8GNQEKV 05 8GNQEKV OO CPF 0QTOCN 0Q 5 XI 05 0Q 5GZ CNG WI 2CVKGPV 61 2J UKEKCP O U O U O U...

Страница 137: ...reversely high lighted in the Measurement Data Confirmation screen 2 Press the Select key A to select data to be used for IOL power calculation The mark B is moved to the right side of the selected d...

Страница 138: ...al points can be measured This function allows four dotted caliper lines to be displayed to dis play the distance between these two optional points The cali per lines are displayed in red for one line...

Страница 139: ...2J UKEKCP M V OO OO 8KV OO 05 OO 2 Press the Move key C to move the active caliper 3 Each time when pressing the Switch key D the active cali per is changed 4 The distance between No 1 caliper line E...

Страница 140: ...h eyes measurement preparation for a new patient CKP XGTCIG 5 OO OO 4CPIG 8GNQEKV XI 8GNQEKV 05 8GNQEKV OO CPF 0QTOCN 0Q 5 XI 05 0Q 5GZ CNG WI 2CVKGPV 61 2J UKEKCP O U O U O U 1 5CXG FKV CNKR M V 7VKN...

Страница 141: ...O CPF 0QTOCN 0Q 5 XI 05 0Q 5GZ CNG WI 2CVKGPV 61 2J UKEKCP O U O U O U 1 5CXG FKV CNKR M V 7VKNKV R 1 4GVCMG 0 9 2146 The measurement data for single eye only is deleted This deletion is performed by...

Страница 142: ...del name selected Calculation results IOL power which satisfies Post operation refractive power IOL types and post surgery expected refractive power IOL types and post surgery expected refractive powe...

Страница 143: ...2QYGT QPUV 1 C C C C C C 1 59 GPU 54 6 R 1 Entered data display Shows calculation data entered and also which lens of A B C D is used IOL data Shows registered IOL maker name lens type and various le...

Страница 144: ...TGF 4GH 0Q 5GZ CNG 5GR GPU 59 NGCT GPU GPU QPUV QPUV QFGN CPWH GPU C C 5 QRV 2CVKGPV 61 2J UKEKCP 5GNGEVGF 1 QFGN 1 2QYGT QPUV 1 C C C C C C C 1 59 54 6 R 1 IOL data list page select key The screen mo...

Страница 145: ...arycon ditions necessary for IOL calculation which are referred to 3 7 3 Setting ofcalculationformulas and 3 7 4Inputtingofcalculationdata havebeen inputtedandcalculationresultswillbedisplayed 3 7 3 S...

Страница 146: ...ment has been finished theAXIAL data and theACD data have been inputted and no key input can be made See 3 6 8 b Select axial length data to be used for IOL power calculation If these data have not be...

Страница 147: ...play to the white black reverse highlighted mode 2 Input the data for calculation with the number key C Input range Corneal refractive power 30 00 to 60 00 D Corneal curvature 5 00 to 11 00 mm 3 Again...

Страница 148: ...is used for the lens A B and B C while the formula 2 D is used for the lens C E and the D F The inputting procedure is performed with two ways by directly using the number key or by choosing the data...

Страница 149: ...nput range A Const 100 00 to 130 00 SF 5 00 to 10 00 3 Again press the lens constant key A In case of imputting from the IOL data list In case IOL data has been registered in the IOL Data Entry select...

Страница 150: ...Fig 1 4 Then select the data with the IOL data select key E 5 Press the lens constant key A 3 7 5 Saving of patient data a Inputting of the model name of implanted IOL Implanted IOL Model The model na...

Страница 151: ...ker name B so the IOL model name C will be inputted Fig 2 b Inputting of implanted IOL power IOL Power The IOL power inputted here is saved in the memory card and will be used for statistical processi...

Страница 152: ...with the ID number When saving measured data in the memory card always input the ID number of the patient GUKTGF 4GH 0Q 5GZ CNG 5GR 59 NGCT GPU GPU QPUV QPUV 1 1 4GH 1 4GH 1 4GH 1 4GH 2QYGT KUV QFGN...

Страница 153: ...ack reverse highlighted items H Enter key Saves the white black reverse highlighted items and releases the display If there are any consecutive items to follow such items will be turned to its white b...

Страница 154: ...ion assistant function of biometry A scan diagnosis func tion Displayed information in the screen is printed out as displayed by the video printer which is externally connected but not by built in pri...

Страница 155: ...xial length average sound velocity K Lens sound velocity L ACD sound velocity M Gain setting N Average axial length O S D of axial length measurements P Difference between the shortest and long est ax...

Страница 156: ...name E Left right eye for calculation F Axial length G ACD H Corneal refractive power or corneal cur vature I Expected post surgery refractive power J Calculation formula name K IOL model name L Lens...

Страница 157: ...3 129 Simple mode 3 9 Printout...

Страница 158: ...locity M Gain settings N Average axial length O S D of axial length P Difference between shortest and longest axial length Q Average ACD R Average lens thickness S Memory number of display waveform T...

Страница 159: ...3 131 Simple mode 3 9 Printout...

Страница 160: ...e C ID number D Physician name E Right left eye to be measured for calcula tion F Post surgery refractive power G Implanted IOL power H Axial length I ACD Anterior Chamber Depth J Corneal refractive p...

Страница 161: ...8GNQEKV 05 8GNQEKV OO CPF 0QTOCN 0Q 5 XI 05 0Q 5GZ CNG WI 2CVKGPV 61 2J UKEKCP O U O U O U 1 5CXG FKV CNKR GNGVG 5GNGEV 4GECNN 0Q M V 7VKNKV R 1 2146 GUKTGF 4GH 0Q 5GZ CNG 5GR 59 NGCT GPU GPU QPUV QP...

Страница 162: ...sured H Axial length calculation method only in case of Normal I Average sound velocity J Lens sound velocity K ACD sound velocity L Vitreous body sound velocity M Lens thickness N Gain O Average axia...

Страница 163: ...culation method only in case of type of eye to be measured I Average sound velocity J Lens sound velocity K ACD sound velocity L Vitreousbodysoundvelocity M Lens thickness N Gain O Selected axial leng...

Страница 164: ...ACD 2 Q Average or selected lens thickness 1 R Waveform or selected waveform closest to that for average axial length 1 S K1 K2 values T Expected refractive power Surgery implanted IOL power Manufact...

Страница 165: ...implanted IOL H a0 value of implanted IOL I a1 value of implanted IOL J a2 value of implanted IOL K Post surgery refractive power Date for A to K are saved for both eyes This screen also displays dat...

Страница 166: ...eze screen Language Select the language to be displayed Link Setting Set the communication mode for the TOMEY Link or DATA Transfer Image color selection Select the display color of image Time and Dat...

Страница 167: ...ity The screen is returned to the biometry assistant function at freeze screen Language Select the language to be displayed Link Setting Set the communication mode for the TOMEY Link or DATA Transfer...

Страница 168: ...The screen is returned to the A scan diagnosis at freeze screen Language Select the language to be displayed Link Setting Set the communication mode for the TOMEY Link or DATA Transfer Time and Date...

Страница 169: ...Contact Immersion Select the Contact Immersion mode Physician Data Entry Physician s name is registered Language Select the language to be displayed Link Setting Set the communication mode for the TO...

Страница 170: ...istered KCI 7 V K N K V 2J UKEKCP CVC PVT 6KOG CPF CVG QNQT 5QWPF 5VCTV 5GVVKPIU 1 Q VQ KCI 1 CPIWCIG KPM 5GVVKPI 5GVVKPI QQV 5YKVJ 5 8 24 06 7 5GVVKPI 1 Press the Physician Data Entry key A to change...

Страница 171: ...the Time and Date key A to change the display screen to the Date and Time Setting screen Fig 2 KCI NGCT 5RCEG GCT QPVJU C QWT KPWVGU 6KOG CPF CVG PSWKT NGCT 2 Press the item B desired to change to th...

Страница 172: ...e information as being set by which the operation is started Favorite settings The details are displayed below this key In case of chang ing the figures return the display to the main menu at real tim...

Страница 173: ...screen will return to the utility mode Fig 1 e Languages KCI 7 V K N K V 2J UKEKCP CVC PVT 6KOG CPF CVG QNQT 5QWPF 5VCTV 5GVVKPIU 1 Q VQ KCI 1 CPIWCIG KPM 5GVVKPI 5GVVKPI QQV 5YKVJ 5 8 24 06 7 5GVVKP...

Страница 174: ...sent onlywiththeIDornot If Yes isselected thedatawithoutID cannot be sent If No is selected the data can be sent even withoutID If No isselectedinthisitemandthedatawithout IDissent NoID willbeputinthe...

Страница 175: ...f DHCP is selected set ting of Cto Fcannot be made DNS is also used with DHCP See the next item for the detail 2 The Login TOMEY Link is used to set the user ID I and the user s password Jin order to...

Страница 176: ...ntandTOMEYLinkserveroracomputer for receiving DATATransfer the setting can be made by fol lowingthebelow 1 Conformation of IP address of the computer Confirm and take a note of the IP address and sub...

Страница 177: ...2 CPWCN 5 48 4 1 05 05A1 1 In DHCP DNS key A appears If DNS key is pressed the host IP address Fig 3 F will change to the name of the host computer B to set the host computer with its computer name a...

Страница 178: ...e done at the same time SAVE Only saving the patient data into the card is done PRINT Onlyprintingisdone SEND Only sending the patient data is done SEND SAVE PRINT Sending the patient data saving the...

Страница 179: ...ng informa tion can be eliminated Up to ten items for IOL data can be registered Set the lens constant corresponding to each IOL power cal culation formula SRK II A SRK II SRK T A SRK T HOLLADAY SF Ho...

Страница 180: ...ge key I Fig 3 8 Enter the IOL data with the letter keys J Types of letters and range or number of letters which can be inputted Manufacture Up to 10 letters letters and numbers Model Up to 10 letters...

Страница 181: ...1 Press the Personal Corresponding Value key A to select the right eye or the left eye to change the screen to the Cal culation screen Fig 2 2 Press the Test Eye Select key B to choose the right or le...

Страница 182: ...ode of axial length utility Fig 1 There are the specified IOL power calculation formulas can be customized by changing the parameters for the formulas Setting of the parameters for calculation formula...

Страница 183: ...een will au tomatically be returned to the mode Fig 1 used before the then ongoing screen was changed Displayingofthepatientdatalist 1 Press the Patient Data key A to change to the List screen Fig 2 2...

Страница 184: ...em key P and next change to the white black reverse highlighted display and enter the information with number key Q Inpurt range IOL Power 10 00 to 80 00 D Post Ope Ref 10 00 to 10 00 D 4 Press the Li...

Страница 185: ...data thus deleted are patient data for both eyes 2 Pressing of the ALL Clear key for approximately one second until a sound of beep is made to delete all the patient data saved in the memory card All...

Страница 186: ...ing calculation formula 4 Press he Model key D to display the graph for each model 5 Press the MODE key E so Immersion Contact or both Immersion and Contact or Both will be selected to dis play the gr...

Страница 187: ...g 3 Graph3 Fig 4 Graph4 Fig 5 x axis y axis x axis y axis x axis y axis x axis y axis SRK II Axial length Personal A constant ACD Personal A constant IOL power Personal A constant Personal A constant...

Страница 188: ...ement Finish screen the Edit screen or the Patient Data Wave form Display screen is being displayed In the IOL Calcu lation frame E the printout mode used when the PRINT key is pressed while the IOL C...

Страница 189: ...anging the immersion mode to the Contact mode is per formed in a similar manner to the above m Switching the A scan probe fixation light ON OFF 1 7VKNKV 2J UKEKCP CVC PVT 7VKNKV 6KOG CPF CVG 2CVKGPV C...

Страница 190: ...Patient data and image data of the B scan image diagnosis function 1 ID number b 2 Approx 66K Byte BAXL_E Patient data and image data of the axial length measurement sub function 1 ID number x 2 Appr...

Страница 191: ...forremovingofthememorycard 3 12 2 Handling of the files in the memory card The file saved in the memory card is only intended for read When the file is copied to the personal computer to rewrite the d...

Страница 192: ...3 164 This page is intentionally blank...

Страница 193: ...n for mula L V t 2 L Measured axial length V Soundvelocityforaxiallength t Timefromtransmittingtoreceivingultrasoundecho Pseudophakic Measured values are calculated by the following equation Lp L Th 1...

Страница 194: ...t characteristics of log amplifier linear am plifier and S curve amplifier which are selected in A scan di agnosis function are as shown in the following figure Log amplifier Linear amplifier Input Ou...

Страница 195: ...emme REF CR 3 Post surgery expected refractive power D REFiol Pemme P CR Where L 20 0 A1 A 3 20 0 L 21 0 A1 A 2 21 0 L 22 0 A1 A 1 22 0 L 24 5 A1 A 24 5 L A1 A 0 5 Pemme 14 CR 1 00 Pemme 14 CR 1 25 A...

Страница 196: ...al to the post surgery refractive power D S C 2 C Cylinder lens power D S Spherical lens power D RF Refractive factor P 16 RF 1 25 P 16 RF 1 L Axial length mm K Average corneal refractive power K1 K2...

Страница 197: ...1P V L1 r V X L1 r X na r L1 nc 1 Y na r C1 nc 1 L1 Optical axial length mm L 0 65696 0 02029L L Axial length mm REF Post surgery expected refractive power D r Average corneal curvature mm 337 5 K W C...

Страница 198: ...ACDconst 3 336 0 62467A 68 747 3 336 H Height of the corneal dome mm r r2 W2 4 A A Constant K Average corneal refractive power D K1 K2 2 P Implanted IOL power D V Vertex distance mm 12 na Refractive...

Страница 199: ...al refractive power D K1 K2 2 SF Distance from iris to the optical center of implanted IOL mm REF Post surgery expected refractive power D V Vertex distance mm 12 P Implanted IOL power D L2 Corrected...

Страница 200: ...erage corneal curvature mm 337 5 K K Average corneal refractive power D K1 K2 2 V Vertex distance mm 12 L Axial length mm L2 Corrected axial length L 0 2 S Spherical lens power D C Cylindrical lens po...

Страница 201: ...M 23 5 L 2 tan 0 1 G L 2 0 99166 L 23 M 1 G 28 L 23 M 1 G 23 5 L 31 L 31 L 18 5 L 18 5 where P Implanted IOL power D L Axial length mm C1 Personal ACD mm K Average corneal refractive power D K1 K2 2 R...

Страница 202: ...2 0 99166 L 23 M 1 G 28 L 23 M 1 G 23 5 L 31 L 31 L 18 5 L 18 5 where P Implanted IOL power D L Axial length mm C1 Personal ACD mm K Average corneal refractive power D K1 K2 2 ARx Post surgery expecte...

Страница 203: ...6 nc Corneal refractive index 1 3315 A A Constant RC Average corneal curvature mm K1 K2 2 DC Average corneal refractive power D L Axial length mm ACD Anterior chamber depth mm REF Post surgery expecte...

Страница 204: ...refractive indexes nc Corneal refractive index 1 3315 DC Average corneal refractive power D AREF Post surgery refractive power D V Vertex distance mm 12 d a1 ACD a2 L 72 434 A ACD g 0 0 62467 d L a2...

Страница 205: ...L 24 5 R A 2 5L 0 9K P 1 67 24 5 L 27 0 R A 2 5L 0 9K 0 71 P 1 25 27 0 L R A 2 5L 0 9K 1 69 P 1 69 3 Personal A constant L 22 0 A P 2 5L 0 9K 1 4 1 45AREF 22 0 L 24 5 A P 2 5L 0 9K 1 67AREF 24 5 L 27...

Страница 206: ...ngth V Average sound velocity t Time Calculation with sectional velocity L Axial length Vacd ACD ultrasound velocity Vlns Lens ultrasound velocity Vvit Vitreous ultrasound velocity tacd ACD measuremen...

Страница 207: ...e below table The IOL ultrasound ve locity varies depending on the material manufacturer and other conditions such as room temperature Axial length is calculated by the following formla Lp Axial lengt...

Страница 208: ...nformation 5VCTVKPI 7 XGT FLWUVKPI 2TQDG 5ECP The Start up screen Fig 1 is displayed when turning on the main switch Software version A is displayed in the upper right area of the screen Fig 1 A 4 5 S...

Страница 209: ...sed by the purchaser s failure to follow instructionsforproperinstallation useandmaintenanceoftheproduct This warranty is only applicable to the new product and does NOT cover any damage resulting fro...

Страница 210: ...Re move the two fuses with the new parts 4 Check to see if the fuses B are broken and if broken re place both of them with the new parts 5 Load the new fuses into the fuse holder in the reverse order...

Страница 211: ...with ethanol for disinfection and then clean the head with water z Besuretosufficientlyremovewateraftercleaningisgiven c Disinfection No sterilization by autoclave or EOG is allowed which may otherwi...

Страница 212: ...h with distilled neutral detergent and remove the solution from the cloth by tightly squeezing and next wipe the stains off by lightly rubbing the surface Then finalize cleaning with wet and drycloths...

Страница 213: ...e your hand cut when opening or closing the printer cover 1 Open the printer cover B upward 2 Remove the paper roll shaft from the printer 3 Place the new paper roll into the printer with its lead ing...

Страница 214: ...be case z When the instrument is reused a while after it is stored make sure before using it that it operates properly Storing conditions z Storing room temperature 20 to 70 C z Relativehumidity less...

Страница 215: ...uble not be remedied by the following countermeasures request your local distributor for in spection and repair Common countermeasures z z z z z Thepowerindicatordoesnotilluminate whenturningthemainsw...

Страница 216: ...ark to see Cause 1 The brightness of the screen is low Remedy Turn the brightness control volume to adjust the brightness of the monitor screen The volume is on right side of the monitor z z z z z No...

Страница 217: ...out from the Video Printer Cause 1 The setting of the Printer is not correct Remedy In case of using the Video Printer having the memory function previously stored data other than the image being disp...

Страница 218: ...he marking in the same manner until the marking will not be displayed When this operation is fin ished the initial screen of the B scan image diagnosis function is displayed to make the ordinary opera...

Страница 219: ...footswitch Cause 1 The auto freeze function was actuated Remedy In case the user s input is suspended in the real time for five minutes the operation is automatically shifted to the freeze state To r...

Страница 220: ...T SEND PRINT SAVE PRINT or SEND SAVE PRINT in the procedures prescribed in 3 11 2 h Setting of the footswtich z z z z z No sending data can be made even by pressing the SAVE PRINT pedal for footswitch...

Страница 221: ...ID input device can only be made when displaying the screen mentioned in 3 3 5 In putting of the ID number from the external connection ID input device barcode reader etc Make ID input after these scr...

Страница 222: ...d Cause 1 The connection of the LAN cable is not correct Remedy Check to see if the connection of the LAN cable to the connector provided at the rear side of the instrument unit and to the net work si...

Страница 223: ...ate countermeasures shall be taken by referring to the Operation Manual for TOMEY Link including registering of patient information z z z z z Server Connection ERROR 042 is displayed Cause 1 The setup...

Страница 224: ...ayed Comm ERROR Illegal Format System ERROR Server Comm ERROR 041 Server Comm ERROR 043 Cause 1 These errors are caused by internal nonconformities Remedy Try again minutes later If the same error is...

Страница 225: ...blished tempo rarily because of internal processes Remedy Try again after a while z z z z z NO ID is displayed Cause 1 Patient ID number is not input Remedy Try again after inputting the patient ID nu...

Страница 226: ...1 No response from TOMEYLink server computer Remedy Make sure that the TOMEYLink server DATA Trnsfer is running properly Cause 2 Network Setup of the instrument is not correct Remedy Give correct conn...

Страница 227: ...in strument TOMEY Link DATA Transfer and contact the place of the purchase Cause 3 TOMEYLink server DATA Transfer is not up graded enough to respond the request Remedy TOMEYLink Server software shoul...

Страница 228: ...n after a while z z z z z HTTP Error 003 is displayed Cause 1 LAN cable connection is not correct Remedy Check if the connector in the rear side of the instrument and the connection of LAN cable to th...

Страница 229: ...r Cause 1 The B scan probe connection is not correct Remedy Make sure the probe is inserted sufficiently into the main unit Cause 2 The gel for ultrasound diagnosis is not used or not sufficient Remed...

Страница 230: ...s function cannot be used Cause 1 Saved data is not formatted by Echo Data or no data is saved in the memory card Remedy The data that can be displayed by this in strument is only images saved in the...

Страница 231: ...withced as NEAR FAR Remedy Press the Volume Function select button 2 to select it to NEAR FAR Cause 2 The images are frozen Remedy NEAR FAR Gain control works only on scan ning the images Take picture...

Страница 232: ...or clear Cause 1 The connection of the B scan probe is not correct Remedy Make sure that the B scan probe is inserted sufficiently for secured connection Cause 2 The gel for eye protection is not used...

Страница 233: ...se 1 The volume has not selected as TOTAL CON TRAST Remedy Press the Volume Function Select button 1 to select the function to TOTAL CONTRAST z z z z z NEAR FAR volume cannot work Cause 1 The volume f...

Страница 234: ...z The saved image load function cannot be used Cause 1 The data was not saved in the Echo Data mode Remedy The memory card is not saved with data Use this function after data is saved in he memory car...

Страница 235: ...is directly touching cornea with the immersion mode without any ultrasound media Remedy While setting the immersion mode use the immersion attachment or the gel for mea surement in the procedures pre...

Страница 236: ...all measurement conditions without any clue or ex perience Remedy It is not necessary to continue to take data in until automatic freeze is reached If measure ment is difficult you can stop measuremen...

Страница 237: ...ord hook so that the cord may not be applied with undue pulling force 3 6 6 b Handling of the slider for measure ment when using the chinrest Cause 3 The position of the retinal waveform cursor is not...

Страница 238: ...e measured and converted sound velocity Cause 9 The eye contacting part of the probe is damaged Remedy If such damage is found immediately stop using the probe and contact your local rep resentative C...

Страница 239: ...b Connect ing of the biometry probe Cause 2 The grounding of electrical power is not in use or it is not wired Remedy Check if the grounding for power plug is con nected Cause 3 Ambient noises Remedy...

Страница 240: ...mory card Memory Full appears on screen Remedy Change the memory card with the empty card or delete unnecessary data from the card be fore saving new data z z z z z Data cannot be saved in the memory...

Страница 241: ...sary askyourlocalTomeyRepresentatives 7 1 Option parts z A scan diagnostic probe Please specify A scan disgnostic probe for UD z Monochrome video printer Contact your local dealer for the printer z Co...

Страница 242: ...n parts 7 2 Spare parts z Built in printer paper Pleasespecify Built inPrinterPaper forUD z Gel for ultrasound diagnosis Pleasespecify Gelforultrasounddiagosis z ImmersionAttachment Pleasespecify Imme...

Страница 243: ...202 images z Image display range Normal 34 5mm 46 4 Ultrasound velocity 1 550m s Wide 46mm 46 4 Ultrasound velocity 1 550m s z Vector A mode Display step 0 4 z Color scale 240 gradation sequences z D...

Страница 244: ...etry z Converted sound velocity rates set for shipping Normal Axial length average ultrasound velocity 1 550m s Dense Axial length average ultrasound velocity 1 548m s Aphakic Axial length average ult...

Страница 245: ...y 0 1mm Resolution 0 01mm z Converted ultrasound velocity by factory setting Axial length average ultrasound velocity Normal 1 550m s Dense Cataract 1 548m s Aphakic 1 532m s Lens ultrasound velocity...

Страница 246: ...LPowerCalculationFormulas SRK II SRK T SRK SHOWA HOLLADAY Hoffer Q HAIGIS optimized HAIGIS standard Biometry probe Type Solid type Fixation light Enclosed in the probe Red LED Oscillator frequency 10M...

Страница 247: ...Dimensions and weight W360 D427 H346mm 14kg 8 1 6 Power Source z Voltage AC 100 120V 220 240 V z Frequency 50 60Hz z Consumption power Less than 80AV 15 Specifications and outlook of the unit will be...

Страница 248: ...y designed as an ultrasound diag nosis equipment for ophthalmic use Since therefore the instrument is set for the application of a very weak ultrasound energy to suit the application of this instrumen...

Страница 249: ...ssure Wo theultrasonicpower fc thecenterfrequency Zsp the axial distance at which the reported parameter is measured x 6 y 6 arerespectivelythein plane azimuthal andoutofplane elevational 6dB dimensio...

Страница 250: ...ERAGEINTENSITY Ipi PULSE INTENSITYINTEGRAL Ipi ATTENUATEDPULSE INTENSITYINTEGRAL MI MECHANICAL INDEX P OUTPUT POWER P ATTENUATEDOUTPUTPOWER Pr PEAK RAREFACTIONALACOUSTIC PRESSURE Prr PULSEREPETITIONRA...

Страница 251: ...print When pressing various keys When measuring such as taking measurement data When inserting and recognizing the completion of inser tion of the memory card When data transfer is completed When erro...

Страница 252: ...environment specified below The customer or the user of the UD 6000 should assure that it is used in such an environment Electromagnetic environment guidance Emissions test Compliance RF emissions CI...

Страница 253: ...that of a typical commercial or hospital environ ment Surge IEC 61000 4 5 1kV differential mode 2kV common mode 1kV differential mode 2kV common mode Mains power quality should be that of a typical co...

Страница 254: ...n each frequency range b Interference may occur in the vicinity of equipment marked with the following symbol Conducted RF IEC 61000 4 6 3 V rms 150kHz to 80MHz 3 Vrms Note1 At 80MHz and 800MHz the hi...

Страница 255: ...the communi cations equipment Separation distance according to frequency of transmitter m 80 MHz to 800 MHz d 1 2 800 MHz to 2 5 GHz d 2 3 0 01 0 12 0 12 0 23 0 1 0 38 0 38 0 73 1 1 2 1 2 2 3 10 3 8 3...

Страница 256: ...8 14 This page is intentionally blank...

Страница 257: ...3 118 AXIALDT 3 163 B B Diag key 3 61 B Diag select key 3 72 B mode image diagnosis 1 6 B mode probe 1 4 B mode probe attachment 1 4 B mode probe cable guide 1 4 B mode probe connection terminal 1 5...

Страница 258: ...dard 3 114 3 117 3 151 8 4 Hand 3 98 3 106 6 23 HofferQ 3 117 3 151 4 9 8 4 HOLLADAY 3 114 3 117 3 151 4 7 8 4 Horizontal key 3 34 I IDnumber 3 17 3 21 3 73 3 112 6 27 Immersion 3 158 3 161 ImplantedI...

Страница 259: ...24 3 93 S Save Echo 3 74 Save key 3 91 3 114 Save Main 3 63 Scope 3 17 3 19 3 62 Sectional Velocity 3 95 Select cursor move key 3 90 Selectkey 3 92 3 108 3 109 Set P key 3 154 SF 3 121 3 152 Simple 3...

Страница 260: ...A 4 INDEX...

Страница 261: ...7 Fax 81 52 561 4735 Europe Tomey GmbH AmWeichselgarten19a 91058Erlangen GERMANY Tel 49 9131 77710 Fax 49 9131 777120 Manufacturer Tomey Corporation 2 11 33Noritakeshinmachi Nishi ku Nagoya 451 0051 J...

Страница 262: ...0123 ID 0608...

Отзывы: