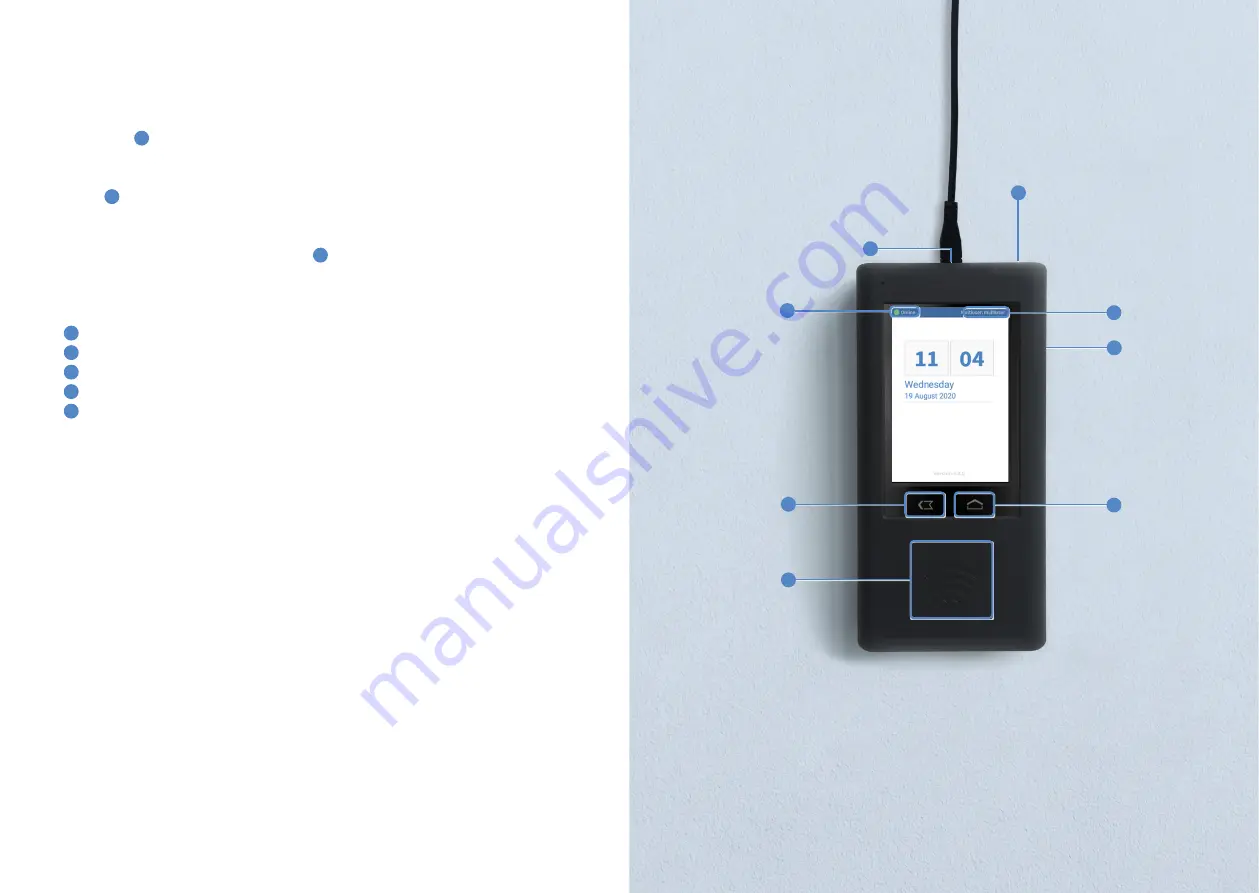
background image

Initial activation

Via the included cable you can connect your time clock to a socket. Press the 

on/

off button


1

 and the start screen will appear soon after.

The upper left corner of the start screen features the 

network status indi-

cator 

2

. After the setup, this display indicates if your Mini Time Clock is con

-

nected to the internet (green light = online, red light = offline). Once the inter

-

net connection has been established, the name of the 

connected mulituser 

access  

appears in the top right corner 

3

. The main section of the start screen 

displays the current date and time.

Further controls

4

 charging socket

5

 volume button

6

 transponder reader unit

7

 back button

8

 home button

1

2

3

4

5

6

7

8

6

7

Содержание Mini Time Clock

Страница 1: ...Manual for the Mini Time Clock Getting started with TimeTac www timetac com Information Knowledge Base support timetac com The enterprise solution for time tracking...

Страница 2: ...Mini Time Clock Index Overview and initial activation 4 Establishing an internet connection 8 Configuration of transponders 12 Settings 14 Time tracking with the different modes 20 Multiuser login 24...

Страница 3: ...hat allows the power cable to connect to the device must be on the upper side of the time clock The backside of the mounting is correctly affixed to the device if it has clicked into place The frontsi...

Страница 4: ...e setup this display indicates if your Mini Time Clock is con nected to the internet green light online red light offline Once the inter net connection has been established the name of the connected m...

Страница 5: ...internet connection Connection via Wi Fi Press the upper volume button 1 for two seconds in order to get to the device menu Tap now on the arrow below the menu Connectivity 2 Enable the op tion WIFI...

Страница 6: ...W 3 is where you must insert your sim card Then put the battery back in and the rear cover back on Your time clock can then be connected to a socket via the included cable for power sup ply 4 Press t...

Страница 7: ...etting Full Employee Access is enabled as well as the permissions Show User Settings Menu and Show Assign Transponders Menu are in hand Open the settings in the side menu on the left hand side of the...

Страница 8: ...ng mode appears on the screen In the upper right corner you can find a setting symbol three points 1 Tap on it to open the settings Changing the tracking mode In the settings menu tap on Tracking mode...

Страница 9: ...break 2 Tap on it to define the task that shall be started when you identify at the time clock and indicate your break Define further tasks Within the settings menu you can find the item Assigned Task...

Страница 10: ...me Define a Timeout With the aid of the Timeout you can define a time span after which the time clock if not used changes back to the start screen Tap on Idle Timeout 2 in the settings menu in order t...

Страница 11: ...tracking tasks Managers with full employee access can determine which task is tracked when you start time tracking or which tasks are available under Others Multiuser task list In this view you have...

Страница 12: ...ffers in the following point compared to the multiuser project list Here all projects are listed that have been assigned to the respective employee no matter if they have been activated in the web app...

Страница 13: ...count name 1 that appears at the end of your web browser link https go timetac com accountname Then insert your username 2 and password 3 You can view this data within the Multiuser Menu in the web br...

Страница 14: ...the volume button for a few seconds You then enter the dashbo ard 1 and open the menu item Device Information Here you can deactivate the auto launch 2 Then tap on the home button 3 and select Settin...

Страница 15: ...Have a successful start with TimeTac www timetac com...

Отзывы: