background image

MAINTAINING YOUR TidalFit cont...

REMOVING, INSTALLING AND CLEANING FILTERS

These  are  the  steps  needed  to  successfully  replace  your  filters  You 

should replace your disposable pool filters and clean your non-dispos

-

able filters every four months. 

1) Turn off all power to your pool and remove the filter lid by lifting it out 

towards you.

2) Turn the filter counterclockwise and remove it from the filter well.

3) Dispose of the used filter.

4) To replace, set screen back into its place turn clockwise to fasten. DO 

NOT\ over-tighten.

5)   Place the new filter into position and turn clockwise to fasten. DO 

NOT over-tighten.

6)   

Follow the directions 1) and 2) for the pleated filter cartridge. You 

then rinse the  filter with a garden hose and soak the filter in a mixture 

of one pint of filter cleaner with 2.5 gallons of water for at least 12 hours. 

The filter must be completely submerged. You then follow the directions 

4) and 5) to replace the filter

WARNING:  Power to your pool must be turned off prior to remov

-

ing your filters. The suction at the filter is extremely strong and 

can cause injury if there is no filter. NEVER run your pool without 

the filters properly installed. Injury to person and damage to the 

equipment can occur. Any damage to equipment due to this cir

-

cumstance will not be covered under warranty.

35

Содержание Premium EP-14

Страница 1: ...Part 11 0096 11...

Страница 2: ...This manual covers your new 2009 TidalFit...

Страница 3: ...g the GFCI Breaker Priming the Pump Water Preparation ML 700 Panel User Guide Diagnostic Messages Various Exercises Rowing Exercise Upper Body Exercise Treadmill Advanced Swimming w Superswim 1 3 5 6...

Страница 4: ...TABLE OF CONTENTS cont Spa Chemicals Glossary Maintaining the Proper pH Warranty Information Interior Pool Diagram 45 46 47 53...

Страница 5: ...nt and therapy for your family and friends Please take time to read and understand all of the instructions provided before you install your TidalFit exercise pool This owner s manual is meant to be a...

Страница 6: ...ipment enclosure area as shown below Spa Serial Number_____________________________________ Spa Model Number_____________________________________ Spa Installation Date_________________________________...

Страница 7: ...equipment metal water pipe or conduit within 5 feet 1 5 m of the unit 4 DANGER Risk of Accidental Drowning Extreme caution must be exercised to prevent unauthorized access by children To avoid acciden...

Страница 8: ...d persons with a history of heart disease low or high blood pressure circulatory system problems or diabetes should consult a physician before using a pool f Persons using medication should consult a...

Страница 9: ...nnel KEEP THESE SAFETY INSTRUCTIONS IN A CONVENIENT AND READILY ACCESSIBLE LOCATION 5 LINE DRAWING KEY Name of Component Symbol for Component Line Drawing may not be exact model of your particular spa...

Страница 10: ...y filled 2000 16 303 lbs 907 7 395 kg Dimensions 168x91x52in 427x231x132 cm Control CE SWIM SPA CE SWIM SPA Heater 4kW in THERM 4kW in THERM Circulation System Hi Flo Standard Hi Flo Standard Ozone CD...

Страница 11: ...stings from the independent listing facility 1 The TidalFit requires a 240 VAC dedicated system The pool must be hard wired to the power supply with no plug in connections extension cords or sharing o...

Страница 12: ...e Service 3 wires line neutral ground 230VAC 50Hz 1 16A 32A Circuit Breaker rating 20A 40A max Dual Service 5 wires line 1 neutral 1 line 2 neutral 2 ground 230 VAC 50Hz 1 2x 16A Circuit Breaker ratin...

Страница 13: ...9 60Hz GFCI WIRING DIAGRAM...

Страница 14: ...l ON THE GFCI BREAKER usually behind the white pig tail on the breaker itself 6 The white pig tail from the GFCI breaker must connect to the dedicated ground bus inside the GFCI breaker box 7 The gree...

Страница 15: ...te J57 J58 and J59 are electrically identical The blue wire may be attached to any of these terminals before removal Move the brown wire from J23 or J32 to J28 DIP Switch A2 must be ON DIP Switch A2 m...

Страница 16: ...sprin klers 4 OUTDOOR POOL Consider building codes electrical and plumbing codes desired proximity to house wind and sun exposure location of trees falling leaves shade dressing area landscaping and l...

Страница 17: ...l before filling 1 Prepare to fill the tub by removing all debris 2 Remove the filters from your pool see Removing Installing and Cleaning Filters page 35 3 Place your garden hose in the center of the...

Страница 18: ...GFCI BREAKER NOTE The electrical service panel for your pool should be equipped with a GFCI breaker To avoid the risk of electrical shock perform the following safety test before each use of your pool...

Страница 19: ...power at electrical service panel 2 Locate and loosen one of the pump plugs on each pump by turning it counterclockwise one half of one turn 3 Allow air to escape from fittings When a steady stream of...

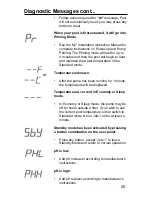
Страница 20: ...tructions on Power up and Pump Priming The Priming mode will last for up to 4 minutes and then the pool will begin to heat and maintain the water temperature in the Standard mode You can exit Priming...

Страница 21: ...e Time Once the pool has been properly connected the first time every power up on the EL1000 and some EL2000 systems notice the TIME icon appearing on the screen Then to enter Press Each press changes...

Страница 22: ...election Standard Mode maintains the desired temperature Note that the last measured pool temperature displayed is current only when the pump has been running for at least 1 minute The STANDARD icon w...

Страница 23: ...ow and high speeds if it is a two speed pump If left running the pump will turn off after a timeout period Invert Press the Warm or Cool button then Blower to change the numbers in the display to read...

Страница 24: ...gramming mode For continuous filtration use F 12 and dn Note EL 1000 and some EL2000 are capable of being programmed by time rather than by duration see Preset Filter Cycles section On EL 2000 and EL1...

Страница 25: ...e the exact same time In this case the filter 2 start time only controls when the second purge happens Filter 2 end time will be unavailable Light Some systems are equipped with both a spa light and a...

Страница 26: ...ction acts similarly except with the temperature thresholds determined by the switch See your dealer for details Locking the Panel Press Time Jets 1 then Warm within 3 seconds When locked the PL PL l...

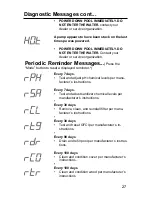
Страница 27: ...t off the power to the pool and call your dealer or service organization Overheat The pool has shutdown One of the sensors has detected that the pool water is 110 F approximately 43 3 C DO NOT ENTER T...

Страница 28: ...ures sensors was detected This could indi cate a flow problem Check water level in pool Refill if necessary If the water level is okay make sure the pumps have been primed Press any button to reset Pe...

Страница 29: ...erature unknown After the pump has been running for 1 minute the temperature will be displayed Temperature not current in Economy or Sleep mode In Economy or Sleep mode the pump may be off for hours o...

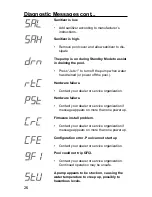
Страница 30: ...dealer or service organization Hardware failure Contact your dealer or service organization if message appears on more than one power up Firmware install problem Contact your dealer or service organiz...

Страница 31: ...isplayed reminder Every 7 days Test and adjust pH chemical levels per manu facturer s instructions Every 7 days Test and adust sanitizer chemical levels per manufacturer s instructions Every 30 days R...

Страница 32: ...apply to GL Systems GFCI Protection Your pool may be equipped with a GFCI Protection feature If your pool does not have this feature enabled the GFCI Trip Test must occur to allow proper pool function...

Страница 33: ...ner by initiating it with the following button sequence Press Warm then Jets 1 then Light Each press must be within 3 seconds of the previous press Press the Warm button repeatedly until 9FC is displa...

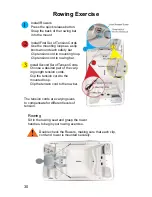
Страница 34: ...bar into the mount Install Second Set of Tension Cords Choose a desired pair of the vary ing length tension cords Clip the tension cord to the mounted loop Clip the tension cord to the row bar 2 1 3...

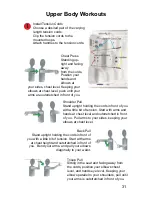
Страница 35: ...itting in the seat and facing away from the cords position your elbows chest level and hands eye level Keeping your elbows parallel to your shoulders pull until your arms is outstretched in front of y...

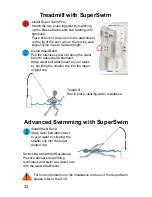
Страница 36: ...and Pull the stainless steel clip along the waist band to adjust belt s diameter Strap waist belt attachment to your waist by buckling the smaller clip into the larger angled clip Swimming with Added...

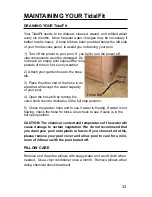
Страница 37: ...that will accept the water capacity of your pool 4 Open the hose bib by turning the valve knob counter clockwise to the full stop position 5 Check the garden hose end to see if water is flowing If wat...

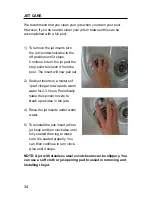
Страница 38: ...now pull out 2 Soak jet inserts in a mixture of 1 part vinegar to two parts warm water for 2 3 hours Periodically rotate the spinner nozzle to break up residue in the jets 4 Rinse the jet inserts und...

Страница 39: ...osition and turn clockwise to fasten DO NOT over tighten 6 Follow the directions 1 and 2 for the pleated filter cartridge You then rinse the filter with a garden hose and soak the filter in a mixture...

Страница 40: ...is NOT covered under warranty Please contact your local Artesian dealer to assist you in winterizing your pool REPLACING THE LIGHT BULB 1 Turn off the power at the main electrical service panel 2 Remo...

Страница 41: ...mental conditions 1 Gently wash the cabinet with mild soap and water and allow to dry completely 2 Moisten a rag with the stain you have purchased from your dealer 3 Apply the stain on the entire cabi...

Страница 42: ...ng cleaner and wipe clean Never use laundry detergent abrasives alcohols dish soaps or harsh cleaners These can actually remove some of the topcoat and cause premature vinyl failure 3 For stubborn dir...

Страница 43: ...s chemical residues are left behind As the levels of the residues combine with other types of residue such as body oil and detergents your water becomes increasingly difficult to maintain Because of t...

Страница 44: ...ry place WATER TREATMENT GLOSSARY 1 Total Alkalinity Total Alkalinity measures the water s ability to re sist fluctuations in the pH level It is measured in ppm parts per million ranging from 0 400 or...

Страница 45: ...total amount of matter dissolved in the water When this level becomes too high action is advised 6 Calcium Hardness The measure of the amount of calcium dis solved in the water as expressed in PPM Ha...

Страница 46: ...and the latter burns off chloramines or bromines The use of P S or non chlorine shock is advantageous because you can bathe only 15 minutes after treatment however oxidizing the water will not kill t...

Страница 47: ...ch as calcium hypochlorite 21 Ions The electrically charged state that an element assumes in true solution In the ionic state ions are chemically reactive Some ions such as copper silver and zinc are...

Страница 48: ...mine ozone hy drogen peroxide or non chlorine shock Oxidation may cause miner als such as iron manganese and copper to form discoloring stains and precipitates if not treated properly 29 Ozonator A de...

Страница 49: ...y grease body oils scale and lotions Clean filters also contrib ute to better water circulation and superior pool performance be cause dirty filters can substantially impede water flow Keeping your fi...

Страница 50: ...lar manner MAINTAINING THE PROPER pH BALANCE The pH factor is a measure of the relative acidity or alkalinity in the wa ter It is measured on a scale of 1 to 14 Pure water has a value of 7 which is ne...

Страница 51: ...s the frame skirt and all equipment will be reinstalled If new equipment is desired there will be additional charges to the customer If the frame and or skirt of the TidalFit has been badly damaged th...

Страница 52: ...acts pictures or any other data presented by the dealer or customer In all cases pictures of the affected area and foundation of the TidalFit must be provided before any decisions to repair or replace...

Страница 53: ...is described as the outer material encasing the Ti dalFit structure The manufacturer warrants it to be free from defects in material and or workmanship from the date of delivery THIS WAR RANTY IS ONL...

Страница 54: ...r manufacturer for TidalFit warrants the cover for one year Do not return the TidalFit cover to the manufacturer This will delay the replacement or repair of the cover The TidalFit manufacturer is not...

Страница 55: ...May Manufacturing LLC or its agent shall not be liable for any injury cost or other damage whether incidential or consequential arising out of any defect covered by the LIMITED WARRANTY The liability...

Страница 56: ...he TidalFit that has not been pre authorized by the manufacturer will void all warranties If the manufacturer approves an alteration verify that this alteration is covered under warranty Dam age cause...

Страница 57: ...INTERIOR SPA DIAGRAM 53...

Страница 58: ...er Care Department 4720 N Lamb Blvd Las Vegas NV 89115 __________________________ __________________________ __________________________ Please do not send products or other correspondence to the addre...

Страница 59: ...___________________ Spa Model ______________________________________________________________________________ Your Dealers Name and Location_____________________________________________________________...

Отзывы: