background image


EXPLORER 122  
User Manual 


98-150578-A  


vii 


Figure A-2.  Connector Part Description ................................................................................................................................................ A-6 
Figure A-3.  Cable Assembly - Step 1 ...................................................................................................................................................... A-6 
Figure A-4.  Cable Assembly - Step 2 ...................................................................................................................................................... A-6 
Figure A-5.  Cable Assembly - Step 3 ...................................................................................................................................................... A-6 
Figure A-6.  Cable Assembly - Step 4 ...................................................................................................................................................... A-7 
Figure A-7.  Cable Assembly - Step 5 ...................................................................................................................................................... A-7 
Figure B-1.  Ligado’s SkyTerra-1 Satellite Coverage Map................................................................................................................. B-8


List of Tables 

Table 1-1.  EXPLORER 122 Terminal Key Specifications .................................................................................................................... 1-5


Table 2-1.  EXPLORER 122 Terminal Connector Pinout Table......................................................................................................... 2-6


Table 3-1.  Network Status ............................................................................................................................................................................ 3-5


Table 3-2.  System Status Fault Codes ..................................................................................................................................................... 3-5


Table 4-1.  Self-Tests ....................................................................................................................................................................................... 4-1


Table 4-2.  Troubleshooting Guide ............................................................................................................................................................ 4-2


Table 4-3.  Web MMI Status ......................................................................................................................................................................... 4-4


Содержание EXPLORER 122

Страница 1: ...cobham com satcom Service and support or from the distributor Thrane Thrane A S is not responsible for the content or accuracy of any translations or reproductions in whole or in part of this manual from any other source In the event of any discrepancies the English version shall be the governing text Thrane Thrane A S is trading as Cobham SATCOM Copyright 2016 Thrane Thrane A S All rights reserve...

Страница 2: ...rd s Operation is subject to the following two conditions 1 this device may not cause interference and 2 this device must accept any interference including interference that may cause undesired operation of the device Le présent appareil est conforme aux CNR d Industrie Canada applicables aux appareils radio exempts de licence L exploitation est autorisée aux deux conditions suivantes 1 l appareil...

Страница 3: ...EXPLORER 122 Terminal WARNING This device emits radio frequency RF energy when in transmit mode In order to comply with FCC RF Exposure limits the unit must be installed in such a way as to ensure that a minimum separation distance of 44 cm 18 inches is maintained between the antenna and any nearby persons WARNING A Warning is an operation or maintenance procedure that if not obeyed can cause inju...

Страница 4: ...t Service and Support Cobham SATCOM Service and Support 24 7 Self Service Center Technical Downloads Acronyms Acronyms and Definitions A ADC Analog Digital Conversion AES Advanced Encryption Standard ANSI American National Standards Institute B BIT Built in Self Tests D DHCP Dynamic Host Configuration Protocol H EIA Electronic Industries Alliance EIRP Effective Isotropic Radiated Power E Es No Ene...

Страница 5: ... Multi Media Interface MSS Mobile Satellite Services N NAT Network Address Translator O OSD Over The Air Software Download OTA Over The Air P PC Personal Computer PLL Phase Locked Loop POST Power On Self Tests R RF Radio Frequency RHCP Right Hand Circular Polarization RX Receive S SCADA Supervisory Control and Data acquisition SSID Service Set Identifier T TCP Transmission Control Protocol TIA Tra...

Страница 6: ...tenna Pointing 2 5 2 7 Connecting the EXPLORER 122 Terminal to Other Equipment 2 5 2 7 1 Interfaces 2 5 2 7 2 Wired Interface 2 5 2 7 3 Wireless Interface 2 8 3 Connecting To The Explorer 122 Terminal 3 1 3 1 Web Server Connection 3 1 3 1 1 Address Port Number 3 1 3 1 2 Protocol 3 1 3 1 3 Web Browsers Supported 3 2 3 2 Login 3 3 3 3 Status Tab 3 4 3 3 1 Network 3 4 3 3 2 GNSS 3 5 3 3 3 System Stat...

Страница 7: ... Wiring 2 7 Figure 3 1 Login Screen 3 3 Figure 3 2 Failed Login 3 3 Figure 3 3 Status Tab 3 4 Figure 3 4 Logs Pane 3 6 Figure 3 5 Network Interface Pane 3 8 Figure 3 6 DHCP Server Active Leases 3 9 Figure 3 7 DHCP Server Wired Ethernet DHCP Dynamic Address Pool 3 9 Figure 3 8 DHCP Server WLAN DHCP Dynamic Address Pool 3 9 Figure 3 9 DHCP Server Static IP Assignments Table 3 10 Figure 3 10 DHCP Ser...

Страница 8: ...able Assembly Step 4 A 7 Figure A 7 Cable Assembly Step 5 A 7 Figure B 1 Ligado s SkyTerra 1 Satellite Coverage Map B 8 List of Tables Table 1 1 EXPLORER 122 Terminal Key Specifications 1 5 Table 2 1 EXPLORER 122 Terminal Connector Pinout Table 2 6 Table 3 1 Network Status 3 5 Table 3 2 System Status Fault Codes 3 5 Table 4 1 Self Tests 4 1 Table 4 2 Troubleshooting Guide 4 2 Table 4 3 Web MMI Sta...

Страница 9: ...ely on Simply place the antenna on the roof of your vehicle and get access to the Internet instantly The EXPLORER 122 Terminal uses ViaSat s L band Mobile Satellite Service MSS which offer 99 9 network availability MSS provides encrypted connections with latencies below 800 milliseconds and uses the high performance Ligado satellite that covers North America The EXPLORER 122 two way networking cap...

Страница 10: ... 2 Features of the EXPLORER 122 Terminal Key Features of the EXPLORER 122 l include IP based networking Wired Ethernet and wireless LAN Interfaces Built in DHCP NAT router Full duplex connectivity Low latency for instant text message transfer and real time monitoring with no delays Embedded commercial GPS IP66 10 30 VDC Input Built in Web MMI AES 256 Encryption 1 3 EXPLORER 122 Standard Equipment ...

Страница 11: ...EXPLORER 122 User Manual 98 150578 A 1 3 ...

Страница 12: ...requency Range L band RX 1525 0 1559 0 MHz TX 1626 5 1660 5 MHz Modulation RX BPSK QPSK 8 PSK and 16 APSK TX CRMA Waterproof Dustproof IP 66 Humidity up to 95 condensing at 45 C per IEC 60068 2 30 Temperature Operating 20 C to 55 C Temperature Storage 40 C to 85 C Solar Radiation 1120 W m2 per IEC 60068 2 5 Vibration Operational Random vibration of 1 05g rms at vibration spectrum 5 to 20 Hz 0 02g2...

Страница 13: ...EXPLORER 122 User Manual 98 150578 A 1 5 Category Specification Shock Survival Transportation shock per IEC 60068 2 29 A 180m s2 t 6mS Approval FCC IC Table 1 1 EXPLORER 122 Terminal Key Specifications ...

Страница 14: ... Dependent NOTE Contact your terminal integration partner for specific mounting equipment 2 2 Selecting Mounting Location The EXPLORER 122 Terminal is designed for mobile vehicle installation The terminal can be permanently mounted with mounting screws or temporarily mounted with magnetic mounts using the Installation kit optional accessories Mounting location should be selected to provide the ter...

Страница 15: ...EXPLORER 122 User Manual 98 150578 A 2 2 ...

Страница 16: ...N The Caution icon identifies procedures or factors that can affect the installation and configuration of the system may damage or render equipment inoperable Figure 2 2 Terminal Mounting Hole Locations The terminal should be installed with the connector facing the rear of the vehicle An example of installation with a rear facing connector is shown in Figure 2 3 CAUTION Do not over tighten CAUTION...

Страница 17: ... up sequence the terminal will automatically search for GNSS and MSS satellite signals CAUTION Do not stand in front of the unit once power is applied 2 5 Obtaining a GNSS Fix The MSS network does not require the terminal location to access the network However terminal location enables optimal customer service At the completion of its power up sequence the terminal will automatically search for GN...

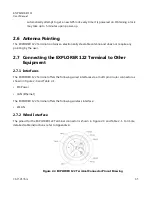
Страница 18: ...ing the EXPLORER 122 Terminal to Other Equipment 2 7 1 Interfaces The EXPLORER 122 Terminal offers the following wired interfaces via a multi pin circular connector as shown in Figure 2 4 and Table 2 1 DC Power LAN Ethernet The EXPLORER 122 Terminal offers the following wireless interface WLAN 2 7 2 Wired Interface The pinout for the EXPLORER 122 Terminal connector is shown in Figure 2 4 and Table...

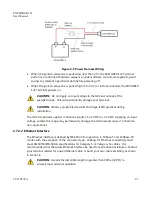
Страница 19: ... Interface The terminal is designed to use 10 to 30 Volt Direct Current VDC negative ground vehicle power systems For safety the EXPLORER 122 Terminal should be installed in a circuit with an inline 7 5 A fuse that will trip during extended overcurrent events The nominal power consumption when receiving is approximately 9 Watts W During transmission bursts or terminal boot up the power draw can be...

Страница 20: ...tices during installation The terminal protects against continuous inputs of 32 VDC to 32 VDC Applying an input voltage outside this range may permanently damage the terminal and cause it to become non operational 2 7 2 2 Ethernet Interface The Ethernet interface is defined by IEEE 802 3 for operation in 10Base T and 100Base TX modes with the exception of the connector type Cabling for Ethernet co...

Страница 21: ...e WLAN networks on your device 4 The default SSID will be vmt_ FTI _base where FTI should be replaced with the fixed terminal identifier unique to your terminal Check the label on the terminal enclosure to obtain the FTI 5 Select the SSID of your terminal network when it appears on the list NOTE Default password of your EXPLORER 122 WLAN is terminal Encryption type is WPA2 6 It may take up to 2 mi...

Страница 22: ...k and will not transmit data over the satellite network 3 1 Web Server Connection 3 1 1 Address Port Number The web server address will be the same as the terminal IP Address By default the terminal IP addresses are Wired Ethernet interface 192 168 100 1 WLAN interface 192 168 200 1 The terminal IP Addresses are defined as the Destination IP address for incoming datagrams to the terminal These add...

Страница 23: ...EXPLORER 122 User Manual 98 150578 A 3 2 3 1 3 Web Browsers Supported The EXPLORER 122 Terminal may be accessed by using the latest released version of Google Chrome ...

Страница 24: ...page The terminal will be responsive to all login requests during all modes of operation Contact your terminal retailer or integrator for login credentials for your terminal Figure 3 1 Login Screen The default Username Password is admin admin After a successful login the user will be directed to the System Status page in Section 3 After an unsuccessful login the following web page with error banne...

Страница 25: ...ngth bars indicate the current received signal strength The number of bars that are green indicates the strength of the received signal for the modulation scheme being used on the current received forward link The more bars there are the stronger the signal The status field shows the current state of the terminal on the network Possible statuses are shown below in NOTE Signal strength will vary ba...

Страница 26: ...out the current system Table 3 2 The Tx Bytes and Rx Bytes fields display the number of bytes sent and received over the satellite The Tx Dropped field displays the number of outgoing packets intended to be sent over the satellite link but were dropped due to queue limitations encryption failure or other transmit errors The Rx Dropped field displays the number of incoming packets that were dropped...

Страница 27: ...ns high priority information that is saved through reboots Figure 3 4 Figure 3 4 Logs Pane System Log The System Log displays information about the operating system environment including drivers and devices Control Message Manager The Control Message Manager processes network control messages and maintains the terminal login state Web Administration This log file contains information about actions...

Страница 28: ...8 A 3 7 3 3 5 Versions This field displays the version number of each terminal software component 3 4 Settings Tab The settings tab lists terminal settings that can be modified by the user A description of each setting is listed below ...

Страница 29: ...hat it will lease to clients The Pool Start and Pool End fields are set to the start and end IP addresses The Netmask field is set to the subnet mask that a client should use Each of these fields must be a valid IP address or subnet mask in dot notation a b c d The lease time is the time in minutes that a lease given to a client will be valid Static Assignments The DHCP server can also be configur...

Страница 30: ...ently active DHCP assignments are shown in the Active Leases and Static IP Assignments in Figure 3 6 Figure 3 6 DHCP Server Active Leases Ethernet DHCP Address Pool The IP address allocation and lease time for the wired Ethernet dynamically assigned DHCP address pool is configured in Figure 3 7 Figure 3 7 DHCP Server Wired Ethernet DHCP Dynamic Address Pool WLAN DHCP Address Pool The IP address al...

Страница 31: ...nly way to access a device behind the terminal is either Have the device behind the terminal initiate the connection Create a port forwarding assignment to the device in the terminal Port forwarding allows incoming UDP or TCP packets destined for a specific port to be forwarded to a network device client or host behind the terminal NAT The incoming packet will be forwarded to the destination port ...

Страница 32: ...coming Port Set to the port number of the service to be forwarded such as 21 for FTP 3 Protocol Select between UDP TCP Both 4 Server IP Set to the IP address in dot notation of the host that the packets will be forwarded to 5 Server Port Set to the port number on the Server IP that the packets will be sent to This port can be the same as the Incoming Port but does not need to be 6 When complete cl...

Страница 33: ...nsmit settings These settings can be used to inhibit terminal transmissions both in real time and at boot up Figure 3 13 NOTE If terminal transmit is inhibited at boot up it will not be able to communicate on the VMS network until transmit is enabled Figure 3 13 Satellite Interface Pane The IP Address and Subnet Mask fields contain the external Satellite Interface address configuration assigned to...

Страница 34: ...signal strength indicator RSSI of the terminals satellite network link Figure 3 14 Figure 3 14 Antenna Pointing Pane 3 5 2 Crypto Displays status of the encryption engine used to provide data security Figure 3 15 Figure 3 15 Crypto Pane 3 5 3 File Upload The file upload function is used to upload terminal configuration files Figure 3 16 CAUTION Improper file uploads can cause severe damage to the ...

Страница 35: ...They can aid in finding the cause of any hardware faults reported by the terminal These tests should only be run when the terminal is offline Figure 3 17 Figure 3 17 HW Diagnostics Pane 3 5 5 Logout Initiates logout from the current webpage session Figure 3 18 Figure 3 18 Logout Pane 3 5 6 Net Diagnostics Network diagnostics initiates pings to the destination IP address up to a maximum of 10 times...

Страница 36: ...EXPLORER 122 User Manual 98 150578 A 3 15 Figure 3 19 Net Diagnostics Pane ...

Страница 37: ... the satellite link instead of a local file upload This page displays the current status of any downloads in progress OSD is a trickle file download using only idle capacity in the satellite link sent in the background Figure 3 20 Figure 3 20 OSD Status Pane 3 5 8 Reboot Initiates a reboot of the terminal Figure 3 21 Figure 3 21 Reboot Pane ...

Страница 38: ...terminal operation These tests can also be run manually through the HW Diagnostics section 3 5 4 A list of these self tests is provided in Table 5 1 Table 4 1 Self Tests Self Tests Description Ethernet Controller Verifies the operation of the Ethernet controller chip Information Assurance Verifies the operation of the data encryption and decryption McBSP1 Serial Interface Verifies the operation of...

Страница 39: ... 4 2 Troubleshooting Guide Faults may be detected by visual observation or by the built in test BIT Problems uncovered during preventive maintenance or while the terminal is in service their possible cause and recommended corrective action s are described in Table 5 2 Table 4 2 Troubleshooting Guide Problem Observation Possible Cause Corrective Action Cannot access terminal web server Terminal not...

Страница 40: ...terminal toward L band satellite Web server status shows terminal does not exit searching mode View toward satellite is blocked Ensure that no object is in front of antenna WLAN connection cannot be established Your device is too far from terminal Mover closer to the terminal Terminal cannot login or does not exit searching mode No signal or weak signal Interference Provide terminal with unobstruc...

Страница 41: ... the systematic scheduled care and inspection of equipment to prevent equipment failure and to reduce downtime The primary preventative maintenance for the EXPLORER 122 Terminal is to keep the equipment clean Use a soft brush moist sponge and a clean cloth for this purpose The radome should be visually inspected for any attached substances which could potentially obstruct functionality e g mud on ...

Страница 42: ...r details on www cobham com satcom where you also find the Cobham SATCOM Self Service Center web portal which may help you solve the problem Your dealer installer or Cobham SATCOM partner will assist you whether the need is user training technical support arranging on site repair or sending the product for repair Your dealer installer or Cobham SATCOM partner will also take care of any warranty is...

Страница 43: ...quired Tools The following tools are required to assemble the power Ethernet cable Utility knife or similar 18 26 AWG wire stripper Diagonal cutters Long nose pliers Soldering iron and solder A 2 Connector Pinout Information The figures below show the connector and cable wiring diagram P1 Connector P2 Connector A 3 Cable Specification The cable selection for this application is influenced by three...

Страница 44: ... elements can degrade the insulation of the cable and allow moisture to penetrate the conductor and subsequently degrade the copper conductor It s highly recommended that the cable chosen shall be able to withstand UV rays Cable shielding is a critical design element over long distance The cable selection can adversely be affected by EMI RFI ESI The cable carries both power and Ethernet data The d...

Страница 45: ...n Thickness Diameter PVC UV resistance 40 C to 105 C 1 10 0 84 9 5 0 0 40 Color Wire Jacket Pair 1 green white green Pair 2 orange white orange 3C black red blue Black A 3 2 Mechanical Characteristics Storage Temperature 40 C To 105 C Operating Temperature 25 C To 105 C Tensile Strength insulation jacket Before 1 05 Kgf mm2 Elongation Aging 100 Aging Condition 136 2 C x 168 hours Tensile Strength ...

Страница 46: ...tic Impedance 100 15 Ω NEXT 30 1 dB PS NEXT 27 1 dB ELFEXT 17 4 dB PS ELFEXT 14 4 dB Return Loss 20 1 dB 100 m Delay Skew 45 ns 100 m Min at 100 MHz A 4 Cable Assembly Steps Use a utility knife to remove 12mm of the outer jacket of the cable and use diagonal cutters to remove any shielding as shown in Figure A 1 Carefully remove 2 3mm of insulation from the wires using a wire stripper Avoid nickin...

Страница 47: ...EXPLORER 122 User Manual 98 150578 A A 5 Figure A 1 Cable Assembly Preparation ...

Страница 48: ... a thin coat of solder for tinning on the bare wires and on the connector socket contacts in preparation of soldering the wires to the end connector contacts as shown in Figure A 3 Solder the tinned wires to the socket contacts Figure A 3 Cable Assembly Step 1 Assemble the gasket into the clamp ring The gasket is directional and the flat surface should be installed on the housing side as shown in ...

Страница 49: ...Manual 98 150578 A A 7 Slide the seal ring to the end of the clamp ring as shown in Figure A 6 Figure A 6 Cable Assembly Step 4 Assemble the seal nut and clamp ring as shown in Figure A 7 Figure A 7 Cable Assembly Step 5 ...

Страница 50: ...EXPLORER 122 User Manual 98 150578 A B 8 Appendix B Satellite Coverage Maps Figure B 1 shows the Ligado SkyTerra 1 satellite coverage map Figure B 1 Ligado s SkyTerra 1 Satellite Coverage Map ...

Отзывы: