


Left-side view
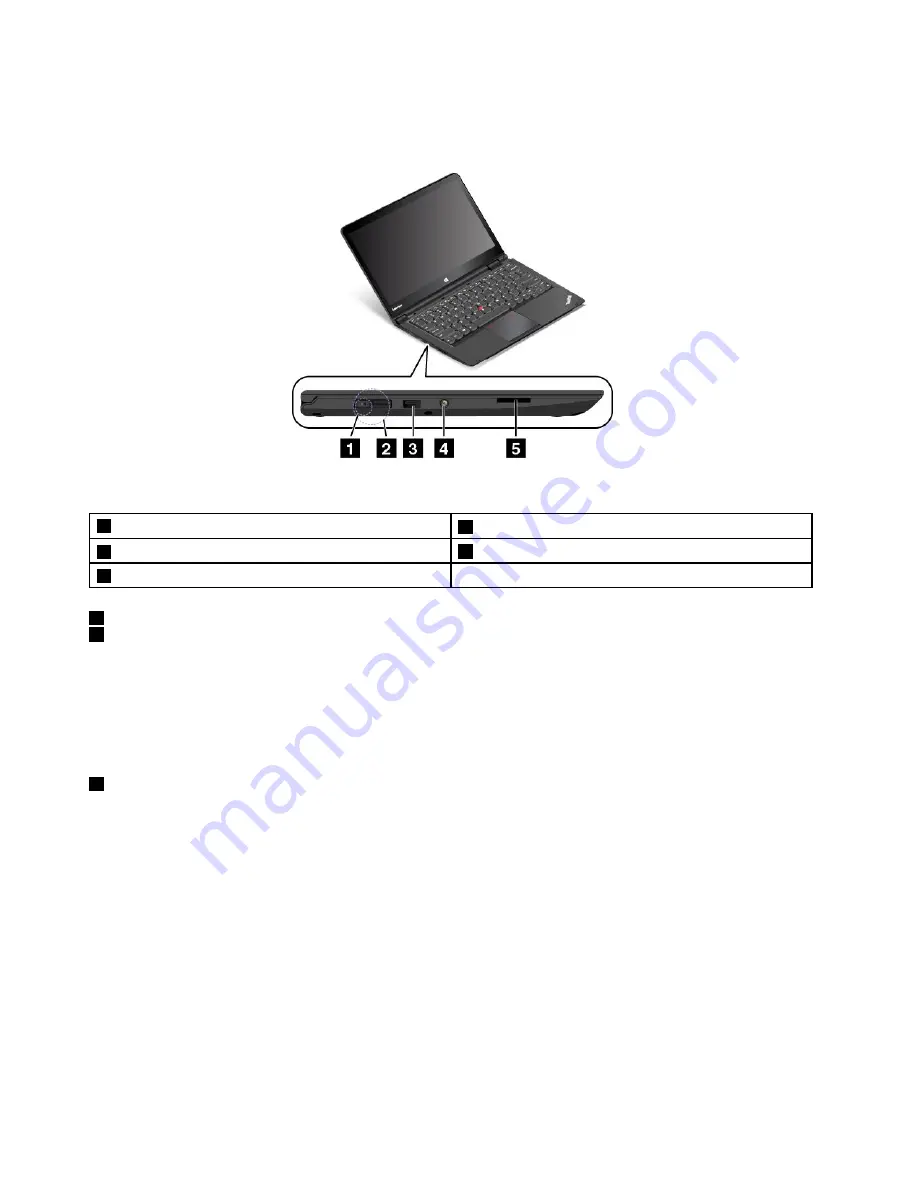
Figure 3. Left-side view
1
ac power connector
2
Lenovo OneLink connector
3
Always On USB connector (USB 2.0 connector)
4
Audio connector
5
Media-card slot
1
ac power connector
2
Lenovo OneLink connector
When the ac power adapter is connected to the ac power connector, the ac power adapter provides ac
power to the computer and charges the battery. When a supported ThinkPad OneLink Dock option is
connected to the Lenovo OneLink connector, the option can not only extend the computer capabilities but
also provide ac power to the computer and charge the battery.
To use the Lenovo OneLink connector, remove the connector cover from the Lenovo OneLink connector first.
3
Always On USB connector (USB 2.0 connector)
By default, the Always On USB connector enables you to charge some mobile digital devices and
smartphones when your computer is in the following situations:
• When your computer is on or in sleep mode
• When your computer is in hibernation mode or is turned off, but connected to ac power
If you want to charge these devices when your computer is in hibernation mode or is turned off, and the
computer is not connected to ac power, do the following:
• For Windows 7: Start the Power Manager program and click the
Global Power Settings
tab. Then select
Enable USB charge from the computer battery even when the computer is off
, and click
OK
or
Apply
.
• For Windows 8.1: Press the Windows key to go to the Start screen. Click
Lenovo Settings
➙
Power
.
Then select
Enable USB charge from the computer battery even when the computer is off
check
box under Always On USB.
4
User Guide
Содержание Yoga14
Страница 1: ...User Guide ThinkPad Yoga 14...
Страница 6: ...iv User Guide...
Страница 16: ...xiv User Guide...
Страница 64: ...48 User Guide...
Страница 92: ...76 User Guide...
Страница 98: ...82 User Guide...
Страница 139: ...6 Remove the dc in bracket 7 Remove the audio USB OneLink ac power card Chapter 9 Replacing devices 123...
Страница 140: ...8 Install the new audio USB OneLink ac power card in place 9 Install the dc in bracket in place 124 User Guide...
Страница 142: ...4 Detach the connector 5 Remove the screws Then remove the speaker assembly 126 User Guide...
Страница 146: ...130 User Guide...
Страница 150: ...134 User Guide...
Страница 158: ...142 User Guide...
Страница 164: ...148 User Guide...
Страница 168: ...152 User Guide...
Страница 172: ...156 User Guide...
Страница 177: ......
Страница 178: ......


