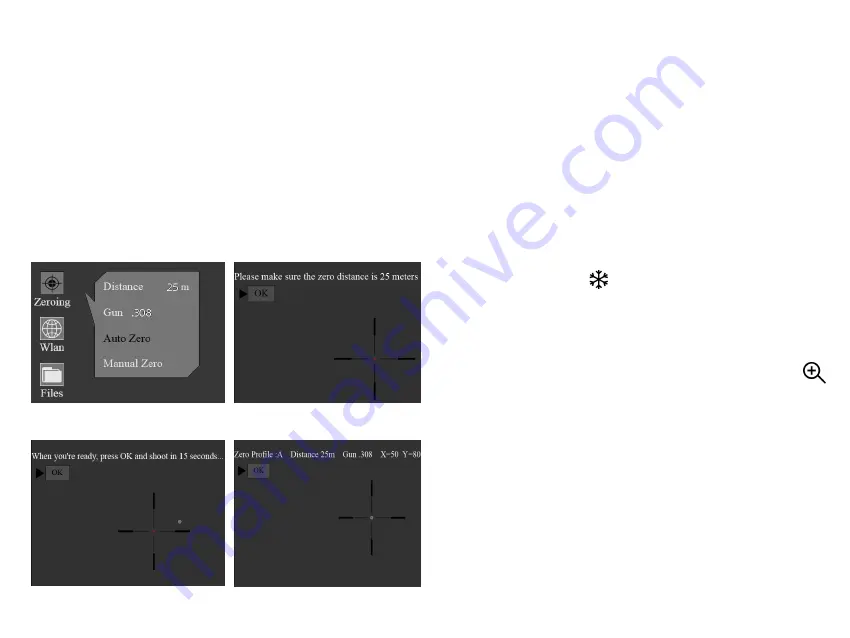
①
Rotate the knob anticlockwise, and move the
cursor to Auto Zero.
②
Short press the rotary knob to enter the Auto
Zeroing screen. Confirm the zeroing distance, and
short press “OK” button to enter the next step.
③
When you are ready, press “OK” and finish the
shooting within 15s.
④
Short press the rotary knob to save the zeroing
data to any profile (A, B, C, D, E). Finally, long
press the rotary knob to exit.
5.10.1
①
5.10.1
②
5.10.1
③
5.10.1
④
24
①
Rotate the knob anticlockwise, and move the
cursor to Manual Zero.
②
Short press the rotary knob to enter the Manual
Zeroing screen, confirm the zeroing distance, and
short press “OK” to enter the next step.
③
After your first shooting is finished, align the reticle
with point of aiming, and rotate the knob to turn on
the Freeze function. A screenshot will be taken.
(The Freeze function allows you to freely move or
manipulate the scope without losing reticle
placement on the point of aim during adjustments.)
④
Rotate the knob to change the magnification
when necessary, which helps to improve the
accuracy of zeroing.
⑤
Adjust the coordinates (X, Y) of the reticle by
rotating the knob, and move the reticle from the
original position to the bullet hole position manually.
Short press the rotary knob to save the zeroing data to
any profile (A, B, C, D, E). Finally, long press the rotary
knob to exit.
5.10.2 Manual Zeroing
Содержание ARES 335
Страница 1: ...ARES SERIES Thermal Imaging Scope User Manual...
Страница 2: ......
Страница 29: ...Connect the ARES Hotspot on your phone Successful Hotspot Connection 29...


