background image

5.5.1  Taking photos/videos

1. Take photos - short press the 

Capture/Record button; Take videos - long 

press the Capture/Record button.

5.5.2  AI Ranging

1. AI Ranging - long press the AI Rangefinder 

button

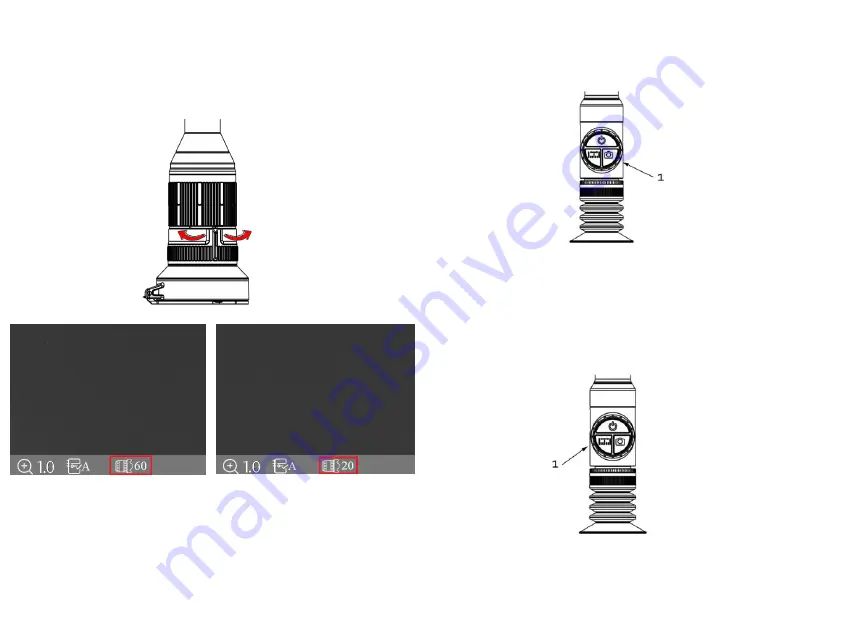
Shift the FOV 

from 60

°

to 20

°

FOV successfully 

shifted

The device is set with dual-field of view. Rotate 

the lens to shift the field of view from 20

°

to 

60

°

or from 60

°

to 20

°

.

5.5 Shortcut Menu

15

Содержание ARES 335

Страница 1: ...ARES SERIES Thermal Imaging Scope User Manual...

Страница 2: ......

Страница 3: ...wer on the Device 12 5 3 Menu Unlocking 13 5 4 Lens Adjustment 13 5 4 1 Diopter Adjustment 13 5 4 2 Objective Lens Focusing 13 5 4 3 Digital Adjustment of Focus Distance 14 5 4 4 FOV Selection and Shi...

Страница 4: ...ed partially or wholly by any means without the prior written permission of ThermTec Unless otherwise stipulated ThermTec does not make any warranties guarantees or representations express or implied...

Страница 5: ...e 2014 53 EU the EMC Directive 2014 30 EU the RoHS Directive 2011 65 EU 2012 19 EU WEEE directive Products marked with this symbol cannot be disposed of as unsorted municipal waste in the European Uni...

Страница 6: ...orithm to get clear view under harsh environments even in poor visibility or total darkness It helps to see through obstacles hindering the detection of targets and measure the distances The function...

Страница 7: ...deep learning algorithm the animal species and object distances can be identified automatically by the scope 4 Automatic Object Detection After the wireless network is connected the scope detects the...

Страница 8: ...bjects Do not aim the lens directly at the sun or high temperature light sources Do not use the device in extremely cold or hot environment Charge the battery once every three months when it is not us...

Страница 9: ...Packing List Scope 1 18650 battery cap 1 18500 battery cap 1 30mm tube clip 2 USBcable 1 Eyeshade 1 Scope x1 18650 battery cap x1 18500 battery cap x1 30mm tube clip x 2 USB cable x1 Eyeshade x1 9...

Страница 10: ...lack white red and blue Display Type AMOLED Resolution pixel 1024x768 Display size 0 39 inch Color palette 6 Operational Characteristics Max recoil power on rifled weapon 850 Gs Mounting brackets on w...

Страница 11: ...OFF AI Rangefinder Shift color plates AI rangefinder function on off Capture Record Take photos Take videos 4 2 Buttons and Controls Rotary Knob Before the entry of Main Menu Rotate Knob Short Press...

Страница 12: ...2 Power on the Device 1 Power button The screen after turning on the device 1 Rotary knob 2 USB 3 Battery slot 4 Power button 5 AI Rangefinder button 6 Capture Record button 7 Objective Lens 8 Objecti...

Страница 13: ...ecord button for 5 times 5 4 Lens Adjustment 5 4 1 Diopter Adjustment Slowly rotate the diopter adjustment ring and adjust the position of diopter level to optimize the image sharpness on the OLED dis...

Страница 14: ...t Focusing finished 5 4 3 Digital Adjustment of Focus Distance On the main screen rotate the knob to digitally adjust the focus distance Rotate upward for zooming in and rotate the knob downward for z...

Страница 15: ...ong press the Capture Record button 5 5 2 AI Ranging 1 AI Ranging long press the AI Rangefinder button Shift the FOV from 60 to 20 FOV successfully shifted The device is set with dual field of view Ro...

Страница 16: ...the Power button 5 5 4 Contrast Adjustment The screen of Contrast Adjustment by clicking the shortcut button Rotate the knob to increase or decrease the contrast degree 1 Short press the middle of th...

Страница 17: ...egree The screen of Brightness Adjustment by clicking the shortcut button 5 6 Entry of the Main Menu Long press the middle of the rotary knob to enter the main menu After the entry of Main Menu short...

Страница 18: ...operation of Confirmation and long press the button for the operation of Exit After entering the Main Menu select the first icon of Color Plate and short press the AI Rangefinder button to shift the...

Страница 19: ...and rotate the knob to adjust the images 5 8 Image Settings Color Plates White Black Red Golden Green Violet Image Setting Sub menus Brightness 1 10 Adjust the image brightness to make the image brig...

Страница 20: ...value is 5 Denoise 0 10 Adjust the image noise to make the image cleaner The recommended value is 5 Sub menus of Settings Zeroing profiles A E There are five zeroing profiles from A E in the file fol...

Страница 21: ...urn on heat tracking function to mark the hottest target on the screen in real time Setting microphone Turn on the microphone for audio recording The device takes photos automatically when cracks of s...

Страница 22: ...Time Adjust the local time manually Date Adjust the local date manually 22 System Language The language of the current system Reset After resetting the configuration parameters are restored to the fa...

Страница 23: ...appears Short press the rotary knob to add the Gun Type customizable press Enter on keyboard to add the Gun Type Rotate the knob clockwise and short press the rotary knob to select the Gun Type Long...

Страница 24: ...he zeroing distance and short press OK to enter the next step After your first shooting is finished align the reticle with point of aiming and rotate the knob to turn on the Freeze function A screensh...

Страница 25: ...view for shooting In case that the sensor performance or the image quality need to be recovered or optimized please follow below steps for image correction Exit the main screen first and then short p...

Страница 26: ...f Move and Center for selection Move Under 1x magnification the location of the reticle keeps the same as the zeroing coordinates The reticles will be returned to the center of the screen when image i...

Страница 27: ...hen finished long press the middle of the rotary knob to exit 5 13 5 13 Connect the device to the computer and drag the updating file to the file folder The device should be connected all the time Ent...

Страница 28: ...he sub menu of Wi Fi and the device will search for network Wi Fi nearby Choose the Wi Fi to be connected and enter the password to connect by rotating the knob After it shows successful connection yo...

Страница 29: ...Connect the ARES Hotspot on your phone Successful Hotspot Connection 29...

Отзывы: