24
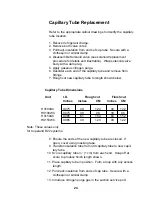
Capillary Tube Replacement
Refer to the appropriate callout drawings to identify the capillary
tube location.
1. Recover refrigerant charge.
2. Remove both valve cores.
3. Pull back insulation from ends of cap tube. Secure with a
clothespin or similar clamp.
4. Disassemble Solenoid valve (see solenoid replacement
procedure for details and illustration). Wrap solenoid valve
body with a damp rag.
5. Apply gaseous nitrogen purge.
6. Desolder each end of the capillary tube and remove from
fittings.
7. Rough cut new capillary tube to length shown below.
Capillary Tube Dimensions
Unit I.D.
Rough cut
Finish cut
Inches
Inches CM Inches
CM
HX100AC
0.075
49
124
48
122
HX100WC
0.075
39
98
38
96
HX150AC
0.085
61
154
60
152
HX150WC
0.085
49
124
48
122
Note: These values only
for Copeland R22 systems.
8. Ensure the ends of the new capillary tube are closed. If
open, cover using masking tape.
9. Transfer insulation tube from old capillary tube to new capil-
lary tube.
10. Score capillary tube ½” (1 cm) from each end. Snap off at
score to produce finish length shown.
11. Place capillary tube in position. Form a loop with any excess
length.
12. Pull back insulation from ends of cap tube. Secure with a
clothespin or similar clamp.
13. Introduce nitrogen purge gas in the suction service port.
Содержание NESLAB HX 150
Страница 9: ...9 Troubleshooting Chart Weak cooling ...
Страница 10: ...10 Troubleshooting Chart Weak cooling continued ...
Страница 11: ...11 Troubleshooting Chart Refrigeration pressures ...
Страница 42: ...42 ...
Страница 47: ...47 ...
Страница 51: ...51 ...


