19
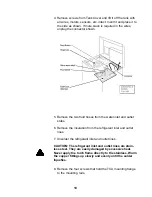
4. Remove screws from Tank Cover and lift it off the tank with
all wires, motors, sensors, etc. intact. Invert it and place it to
the side as shown. If more slack is required in the wires,
unplug the connector shown.
5. Remove the two fluid hoses from the water inlet and outlet
stubs.
6. Remove the insulation from the refrigerant inlet and outlet
lines.
7. Unsolder the refrigerant inlet and outlet lines.
CAUTION: The refrigerant inlet and outlet lines are stain-
less steel. They are easily damaged by excessive heat.
Never apply the torch flame directly to the stainless. Warm
the copper fittings up slowly and evenly until the solder
liquefies.
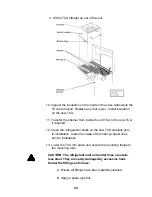
8. Remove the four screws that hold the TCA mounting flange
to the mounting rails.
Содержание NESLAB HX 150
Страница 9: ...9 Troubleshooting Chart Weak cooling ...
Страница 10: ...10 Troubleshooting Chart Weak cooling continued ...
Страница 11: ...11 Troubleshooting Chart Refrigeration pressures ...
Страница 42: ...42 ...
Страница 47: ...47 ...
Страница 51: ...51 ...


