Form: 2435-3
Arctic Installation and Operation Manual
Revision: 10
P/N 105641-01
Date: 12-1-2018
Thermal Solutions, 1175 Manheim Pike, Lancaster, PA 17601
Web:
Phone:
717-239-7642
Fax:
877-501-5212
Email:
37
5.2
Ignition Assembly Cleaning
1.
Disconnect power and shut off the
external manual gas valve to the boiler
prior to removing the ignition assembly.
2.
When removing the igniter, extra
caution must be taken to prevent
damaging the ceramic insulator.
3.
Remove any excess oxide deposits from
the surface of the igniter with steel wool
or emery cloth. Do not use sandpaper.
4.
Inspect the ceramic insulator for cracks,
and if necessary, replace the igniter.
After each inspection of the igniter,
replace gasket and apply anti-seize
compound to mounting screws prior to
reinstalling them.
5.
Ensure that igniter electrode spacing is
within 1/8 inch.
6.
When reinstalling the igniter after
inspecting it, make sure there is a
⅜
inch
gap between the igniter and the burner
surface.
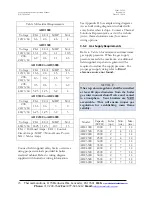
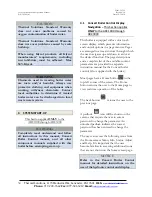
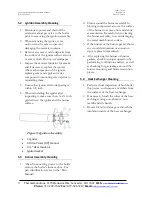
Figure 8: Ignition Assembly
1. Igniter
2. Ultra-Violet (UV) Scanner
3. ½” Heat Insulator
Igniter Gasket
5.3
Burner Assembly Cleaning
1.
After disconnecting power to the boiler,
remove the boiler’s furnace door. For
part identification, refer to the “Parts
Manual”.
2.
Clean around the burner assembly by
blowing compressed air over the surface
of the burner to remove lint and debris
accumulation. Be careful when cleaning
the burner assembly, to avoid damaging
the metal mesh burner surface.
3.
If the burner or the burner gasket shows
any visual deterioration or corrosion
signs, replace it immediately.
4.
After replacing the burner or burner
gaskets, check for proper operation by
performing combustion analysis, as well
as checking for gas leakage around the
burner mounting and blower transition
pieces.
5.4
Heat Exchanger Cleaning
1.
Perform visual inspection of both boiler
flue passes, and remove any debris from
the surfaces of the heat exchanger.
2.
If necessary, brush the tubes of the heat
exchanger using non-abrasive, non-
metallic bristle brush.
3.
Be careful not to damage or disturb the
insulation inside of the heat exchanger.

