Form: 2435-3
Arctic Installation and Operation Manual
Revision: 10
P/N 105641-01
Date: 12-1-2018
Thermal Solutions, 1175 Manheim Pike, Lancaster, PA 17601
Web:
Phone:
717-239-7642
Fax:
877-501-5212
Email:
11
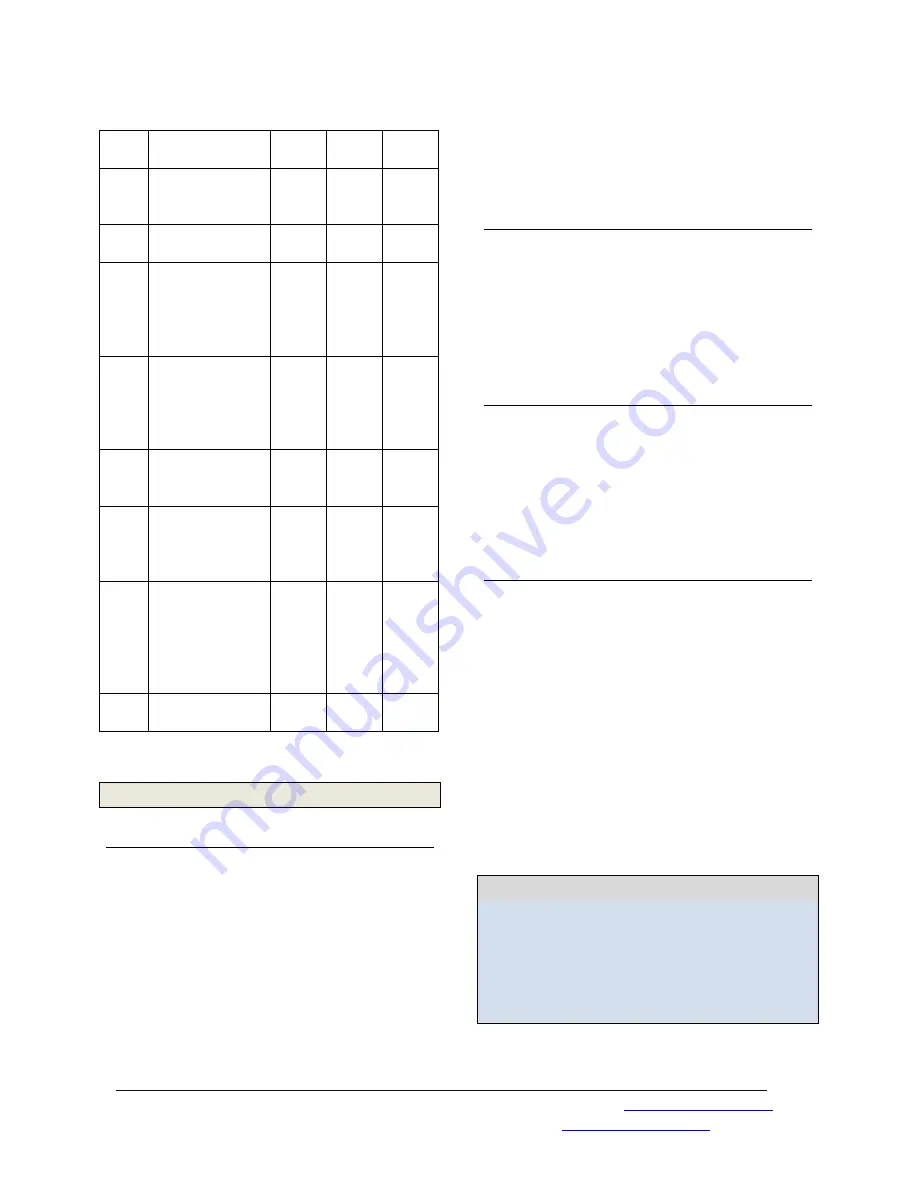
Dim
Description
1000
1500-
3000
3500-
6000
A
Clearance
Above Top of
Boiler
6”
6”
6”
B
Front of Boiler
– Burner End
24”
32”
43”
C
H
From Chimney
or Vent
Collector
measured
horizontally
18”
18”
18”
C
V
From Chimney
or Vent
Collector
measured
vertically
18”
18”
18”
D
Rear of Boiler -
opposite burner
end
6”
6”
6”
E
L
Left Side - tube
access side on
standard
construction
16”
23”
23”
E
R
Right Side –
tube access side
on standard
construction
(ARC3500-
6000)
6”
6”
23”
E
C
ARC1500 -3000
only
N/A
23”
N/A
Table 2: Clearances and Serviceability
3
Installation
3.1
Receiving The Boiler
The boiler is shipped from the factory with
(4) shipping feet/legs bolted to the skids.
These are provided to facilitate unloading
/moving with a forklift. Lifting points are
also provided to enable over-head lifting with
spreader bars to prevent damage to the boiler.
The shipping feet/legs MUST BE
REMOVED after the boiler is set in-place on
its concrete foundation before any
piping/electrical connections are made. It is
recommended that the plastic protective
cover be left on as long as possible to reduce
finish damage from the installation.
3.2
Boiler Connections
Do not run any pipes along the tube access
panel side of the boiler. Maintain clearances
as shown on the dimensional drawing for
servicing of the boiler tubes. All piping
should be designed and installed to avoid any
loadings on the boiler connections or piping.
3.2.1
Flow Connection
The system supply and return flow
connections are shown on Figure 1. A gate
valve should be installed on the boiler outlet
and inlet lines. This allows the boiler to be
isolated from the heating system for draining
and servicing.
3.2.2
Safety Relief Valves
Safety relief valve(s) are shipped loose.
Connections are provided in the top of the
boiler for the safety relief valve(s). The safety
relief valve discharge piping must be the same
size as the safety relief valve discharge
opening and run to a point of safe discharge.
No shutoff valves are to be placed between
the relief valve and the appliance or in the
discharge piping. Avoid over-tightening as
this can distort valve seats. All piping from
the safety relief valve(s) must be
independently supported with no weight
carried by the valve.
NOTICE
If the relief valve discharges periodically,
this may be due to thermal expansion in a
closed water supply system. Contact the
water supplier or local plumbing inspector
on how to correct this situation. DO NOT
PLUG THIS RELIEF VALVE.


