3-20
Chapter 3 - Real-Time Guidance
Data Setup
SmartPad II
Software Version 4.02
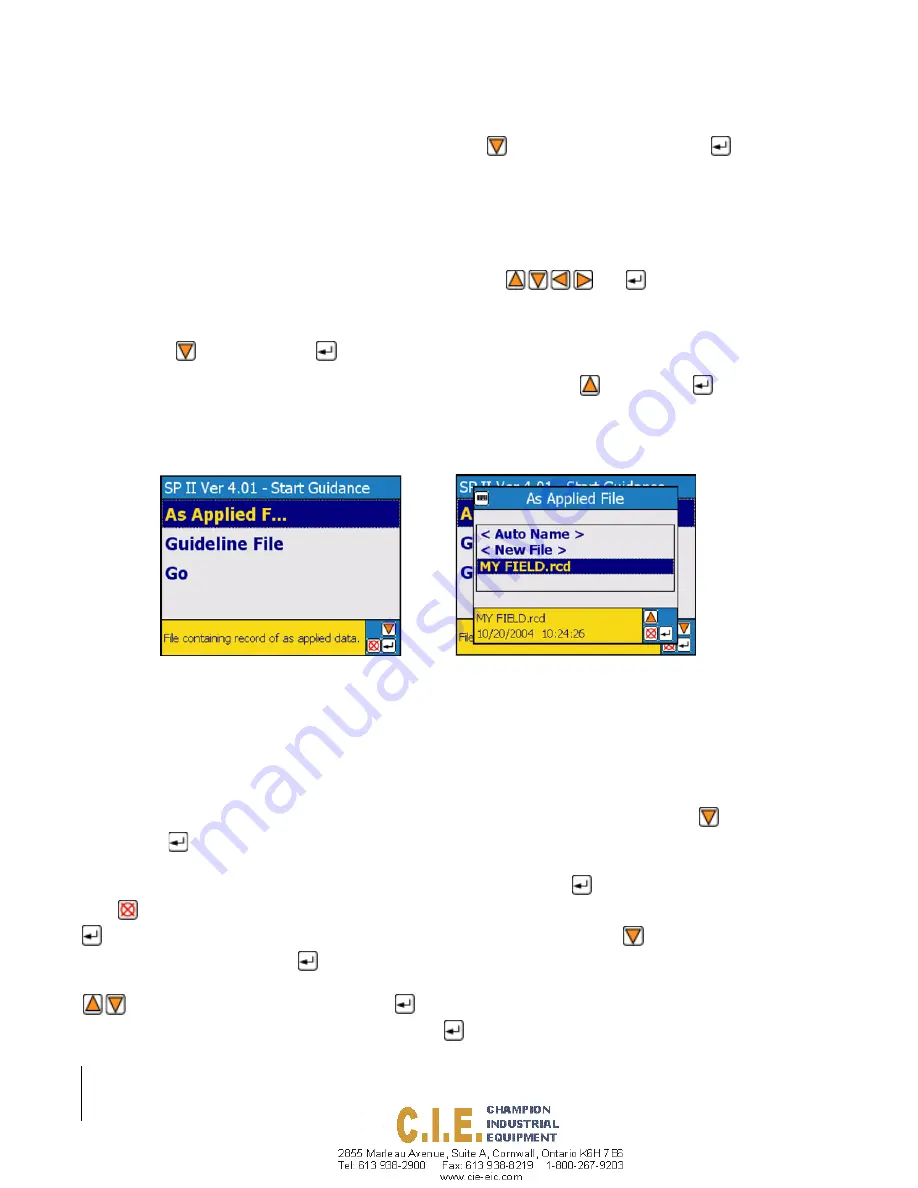
To name an As Applied, highlight the As Applied menu item using
, Figure 3-23 (left side). Pressing
will
bring up the As Applied dialog box, Figure 3-23 (right side). There are three options once in the As Applied File dia-
log box, Auto Name, New File or selecting an existing file.
The Auto Name option will automatically name the As Applied file using the current date using the format mmd-
dyyyy-#. For example the first file saved on September 14th, 2004 will be named 091420004-1.rcd. Using this nam-
ing method results in a unique file name every time a file is created.
The New File option allows you to enter your own file name using the
and
keys.
The Existing file option allows you to select any existing As Applied files that are listed in the As Applied File dialog
box. Figure 3-23 shows the existing file named My Field.rcd. To select the existing file, My Field, highlight the file
name using the
key and then press
to accept it.
Once an As Applied file name has been selected, highlight the GO menu item using
and then press
to start the
real time guidance process.
Example 3: Creating or Showing an Existing Field Boundary
This example describes how to create or show an existing boundary file. With SmartPad II you can map out a field
boundary while spraying or spreading the field headlands. If a file containing the field boundary already exists and is
stored on the CompactFlash card
,
the boundary can be displayed in the background of the guidance view page.
To select one of the field boundary options in the Data menu, highlight the Boundary menu item using
24, then press
to move to the Boundary dialog box, Figure 3-25. There are four field boundary options to choose
from in the field boundary dialog box see Table 3-7, “The Boundary Menu Item Settings,” on page 3-16. In this exam-
ple the Field Boundary option Show is selected. Once the option is selected using
, return to the Main Menu page
using
. From the main menu start the guidance process by highlighting the Start Guidance menu item and pressing
. This will bring you to the Start Guidance menu, see Figure 3-26 (left side). Using the
key move down to the
Boundary File menu item and press
, this will bring up a Boundary File dialog box. Figure 3-26 shows the Bound-
ary File dialog box with the file My Field.BND selected. Selecting an existing file is accomplished by using the
keys. Once the existing file is selected press
to accept and return to the start guidance menu page. To start
the guidance process, highlight the Go menu item and press
.
Figure 3-23: Changing the As Applied File Name
Содержание SmartPad II
Страница 1: ...SWATH XL GUIDELINE SMARTPAD II USER GUIDE Software Version 4 02 98 05067 R0 MID TECH...
Страница 8: ...1 8 Table of Contents SmartPad II Software Version 4 02...
Страница 22: ...1 14 Chapter 1 Introduction Chapter 1 Notes SmartPad II Software Version 4 02 Chapter 1 Notes...
Страница 54: ...2 32 Chapter 2 Software Overview Chapter 2 Notes Fieldware for Smartpad II Software Version 4 02...
Страница 130: ...3 76 Chapter 3 Real Time Guidance Chapter 3 Notes SmartPad II Software Version 4 02 Chapter 3 Notes...
Страница 172: ...4 42 Chapter 4 Waypoint Navigation Chapter 4 Notes SmartPad II Software Version 4 02 Chapter 4 Notes...
Страница 197: ...Fieldware for Smartpad II Software Version 4 02 Chapter 5 Field Mapping 5 25 Chapter 5 Notes Chapter 5 Notes...
Страница 198: ...5 26 Chapter 5 Field Mapping Chapter 5 Notes Fieldware for Smartpad II Software Version 4 02...


