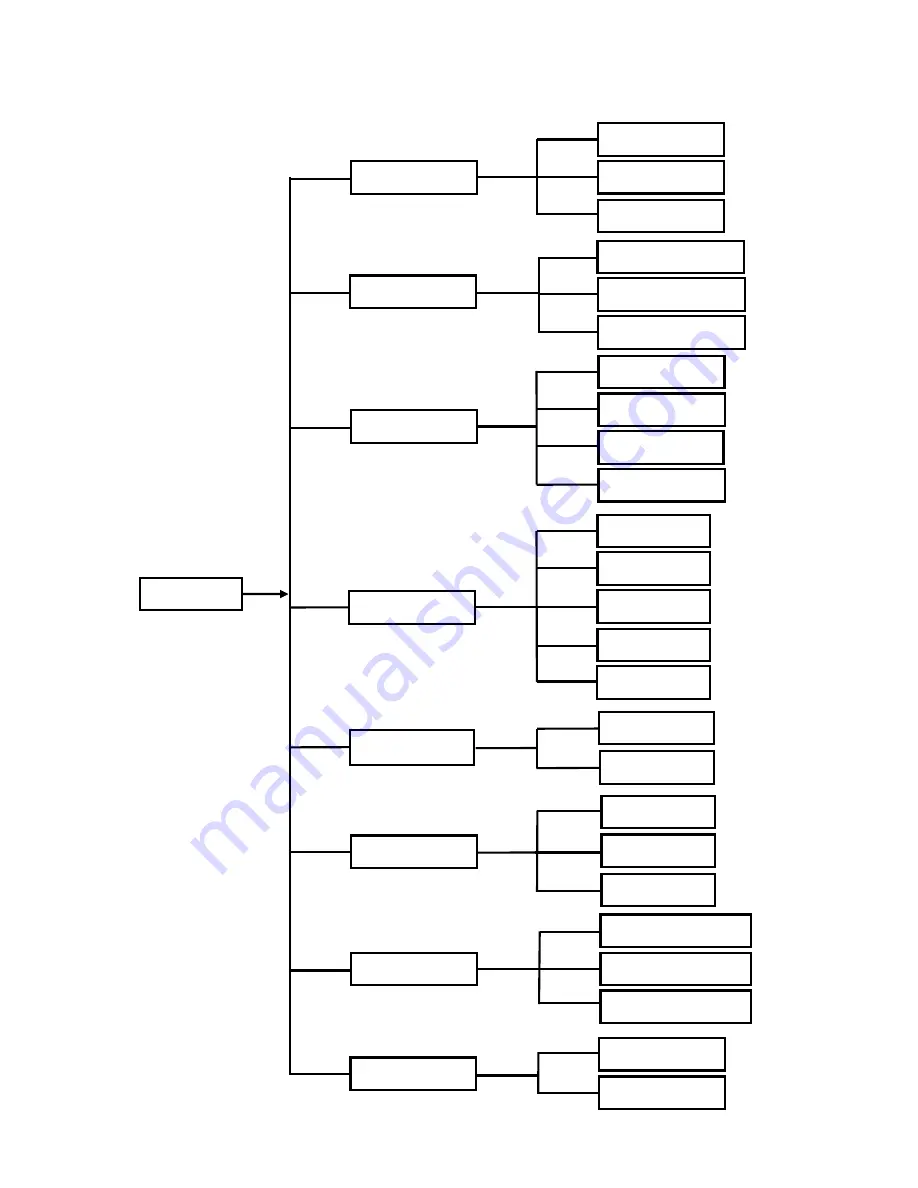
TECHVIEW QV-3028 Скачать руководство пользователя страница 12

User  Manual 


8

5.2 Main Menu Guide 


Main Menu 

Maintain 

Advanced 

Event   

System 

Users 

System Information 

General 

Device 

PTZ set 

Serial Set 

HDD 

Motion 
Detection     

Alarm set 

Alarm 

Search 

Record Search 

Event Search


Backup 

Log search 

Display 

Output Set 

Live set 

Privacy Zone 

Record 

Record Parameters 

Schedule 

Main Stream 

Network 

Sub stream 

Network Set 

Email Set 

Mobile Set 

DDNS Set 

Содержание QV-3028

Страница 1: ...User Manual...

Страница 2: ...nterface 7 Chapter 5 DVR Menu 7 5 1 Pop up Menu 7 5 2 Main Menu Guide 8 5 3 Main Menu 9 5 3 1 Display 9 5 3 2 Record set 11 5 3 3 Search 13 5 3 4 Network 17 5 3 5 Alarm 20 5 3 6 Device 22 5 3 7 System...

Страница 3: ...Chapter 7 Appendix 46 7 1 Operation Function Table 46 7 2 Record Alarm setting 47 7 3 Mail box server List 47 7 4 Troubleshooting 48 7 5 Usage Maintenance 49 7 6 System Connection Diagram 49 7 7 Acce...

Страница 4: ...for cleaning 8 Lightning Unplug this equipment during lightning storm or when unused for long periods of time 9 Accessories Do not place this equipment on an unstable cart stand or table When a cart...

Страница 5: ...management and external alarm signal inputs Network operation Supports remote surveillance by authority users to increase system security Mouse Operation Supports Mouse operation for faster menu navig...

Страница 6: ...H3 CH4 CH select key 5 QUAD On Live or Playback mode switch to Quad display 6 REW Move to left Rewind function decrease PTZ rotation speed and parameter value On preview mode holding pressing the butt...

Страница 7: ...LAN Ethernet RJ45 interface 6 VGA Port Connect to VGA monitor such as PC monitor Optional 7 USB Port Connect USB device Flash Drive Hard Drive and Recorder etc mouse 8 RS 485 RS485 interface 9 Power P...

Страница 8: ...iple display mode 4 Menu Enter into Main menu Exit 5 Up arrow key Volume adjust 6 Down arrow key Volume adjust 7 Left Down key Decrease increase parameter value of control bar 8 SEL Select key Edit ke...

Страница 9: ...stop dwell time display when dwell time display is activated By clicking left key you can adjust Color control bar and volume control bar Clicking combo box to access pull down menu By clicking left k...

Страница 10: ...n fix the bracket with HDD to DVR body 5 Put the upper cover back carefully re attach screws Note If user requires higher performance HDD strongly recommend you use special hard driver for security an...

Страница 11: ...ise and Vo Switch etc Clicking 0 key on the remote controller or holding press Esc key on the front panel could switch system to other output device After finishing initialization the system will ente...

Страница 12: ...em Information General Device PTZ set Serial Set HDD Motion Detection Alarm set Alarm Search Record Search Event Search Backup Log search Display Output Set Live set Privacy Zone Record Record Paramet...

Страница 13: ...et at the factory On Live mode click Menu button on the front panel or Remote controller to enter into Main menu interface shown as Picture 5 2 And also you can click icon to enter the main menu scree...

Страница 14: ...er into the output set interface shown as Picture 5 5 Click Live to pop up the interface shown as Picture 5 6 Now you could perform channel sequence setting Click Spot output option and set relative p...

Страница 15: ...et 1 Select the area no Area 1 Area 4 2 Click Setup to adjust position of mask area 3 After finishing position adjust click right key of mouse to return back Privacy zone interface 4 Click Apply to sa...

Страница 16: ...el you desired To setup weekly schedules tick select the box of the record status you want Alarm General or No Record and then click on each box in the schedule time line that you want this method to...

Страница 17: ...ck to previous menu the play control bar will display current playing processing shown as 20 When user click any time at the control bar and this point have not any record file system will auto return...

Страница 18: ...check boxes which correspond to the records and click Backup button to enter into the below windows illustrated in Picture 5 21 Picture 5 21 Picture 5 22 Picture 5 23 First Page go to the first page o...

Страница 19: ...k Search button select all the files you desire to backup Click the Backup on the bottom Media Player backup backup file to your PC Open Playback player and click icon or button to find select the bac...

Страница 20: ...click the icon to open one record file click the icon to enter into full screen mode Click the icon to never place one target to top Click the icon to place one target to top Click the icon to place t...

Страница 21: ...ation Picture 5 32 When selecting DHCP from the Type A router will automatically allocate IP address for your DVR After restarting each time the IP address captured by your DVR may be different So por...

Страница 22: ...range 1025 65535 of router to IP address of DVR allocated or automatically captured and select All or Both in corresponding protocol column and save the above setting Above steps may differ from the...

Страница 23: ...t mails is 25 except such as Gmail server Port No 465 SMTP server indicates server address you used Sender address indicates sender s email address The email address should be consistent with the serv...

Страница 24: ...0 Click Main menu Network Mobile to enter into the Mobile interface shown as Picture 5 41 User Name indicate user name of DVR and support numbers and characters and 1 15 bits length User password indi...

Страница 25: ...ease refer to List 5 1 Picture 5 42 Latch time you can set how long the buzzer will sound when external sensor alarm is detected 10s 20 40s 60s Show Message You can set show message on the screen when...

Страница 26: ...actual application environment I O Status System can convert alarm signal triggered by external sensor into signal identified by system HDD loss When Hard Drive is not detected HDD damage power suppl...

Страница 27: ...erase all data i e footage which is stored on it and re create the FAT file allocation table USB Format If you have a USB flash drive connected to the DVR you can format that too To do this click the...

Страница 28: ...into the interface shown as Picture 5 48 and you are allowed to set DST status and mode When operate DVR via keyboard it is required to set communication protocol Baud rate set baud rate of serial co...

Страница 29: ...to set common user s authority Log Search allow you check the entire system log Parameter allow you set all the parameters Maintain allow you update version recover ex factory value device reboot and...

Страница 30: ...tain interface shown as Picture 5 55 Picture 5 55 Shutdown Click the Shutdown button to shutdown the device System Upgrade 1 You can insert a USB memory into USB port for updating 2 Do not take out th...

Страница 31: ...del displays 4 8 live images in the sequence of single 4 split and 9 split modes If you enter into 4 split mode the live images will be displayed in turn CH1 4 CH5 8 and CH13 16 If you enter into 9 sp...

Страница 32: ...Stop time sets the stop time at each point GOTO allow you go to a specific preset point Set allow you set a set of specific preset points of a PTZ camera 1 Select a camera you desire to set a preset p...

Страница 33: ...al record 5 11 Stop record To stop record quickly please click the icon or Stop button on the front panel or remote controller 5 12 Start Sequence In the single mode when entering into Start sequence...

Страница 34: ...m OK Vista system Vista Win 7 system Reminder If the plug in program is not downloaded successfully please check if your browser s safety level or firewall setting is too advanced Please run IE Tools...

Страница 35: ...lication Manager on your local PC system will be Live interface shown as Picture 6 3 You can click Play button to Open close live images and enter into on spot record and Capture quad 9 ode by operati...

Страница 36: ...the right key of mouse on each Live window to pop up the interface shown as CH Display mode you open all the live channels you close all the live channels Display previous channels Display next chann...

Страница 37: ...ure 6 33 Video control icon to enter into playback interface shown Picture 6 7 Picture 6 7 The Web Application Manager supports up to 4 channels playback simultaneously Record search one day you want...

Страница 38: ...then click 9 On the time axis red part stand for alarm record yellow stand for normal record and original part stand for no record during this period Picture 6 9 option that means the selected channel...

Страница 39: ...apture Download Open all the channels After opening playback click icon to clip the selected file and click again to Record clip file will be saved as 264 format the mouse curse to the channel you wan...

Страница 40: ...the Config interface shown as Picture 6 allow you set Display configuration Record Network Alarm Device System parameters and Advance according to your actual request Display Configuration Unfold Dis...

Страница 41: ...d its sub options Record parameter Schedule and Main Under Record parameters option allow you set channel record status shown as Picture 6 1 Picture 6 15 Detailed parameters please refer to DVR local...

Страница 42: ...tream Email The model support three network type including Static DHCP and PPPoE Static System default Static as its network type User could allocate IP and perform Port forwarding for DVR according t...

Страница 43: ...cal setting Picture 6 20 shown as Picture 6 21 Relative parameters should be consistent with DVR Picture 6 21 Click Email setting option to allow you set alarm email configuration parameters shown as...

Страница 44: ...setting Picture 6 23 user applies for DDNS service shown as Picture 6 24 you could enable DDNS function under any one network type mode Static DHCP and PPPoE Now you remotely visit the DVR through do...

Страница 45: ...y Alarm out Alarm record and Alarm Capture etc Details setting should be consistent with DVR local setting Shown as Picture 6 26 you configure I O Status Alarm output I O Alarm record and etc Details...

Страница 46: ...th DVR Picture 6 29 Click System option to unfold its sub options General Users and information User could check DVR s language and video system and also set system time date format DST and NTP shown...

Страница 47: ...43 you configure user name and password shown as Picture 6 31 should be consistent with DVR local setting Picture 6 31 you check out device name number type MAC address software ardware version shown...

Страница 48: ...w steps to upgrade the system Select the upgrade file s path shown as Picture 6 34 Please note that the format of Picture 6 34 Click Start update now processing bar will display current upgrade Pictur...

Страница 49: ...g should be consistent with DVR local setting Picture 6 37 Maintain allow you set auto system maintain for DVR remotely shown as Picture 6 g should be consistent with DVR local setting Picture 6 38 Un...

Страница 50: ...space video loss I O status alarm management and Email alarm 15 Motion detection Set on off status of MD select sensitivity and set motion detection area 25 PTZ setting Select CH and set PTZ protocol...

Страница 51: ...R stand for alarm record NLR stand for normal record and NOR stand for no record Once alarm is triggered alarm icon will occur and when many alarms are triggered alarm remarks will occur on the screen...

Страница 52: ...system is properly connected and data cord and power cables are securely connected 2 Q We have changed the password but do not remember the new password how can we access the system A If you forget sy...

Страница 53: ...cient space available check if video has lost etc 11 Q Why can t stop Stop function A Pressing Stop button only can stop manual record If you want to stop Scheduled record please revise to No Record d...

Страница 54: ...User Manual 50 7 7 Accessories Software CD Power cord Power Adaptor User Manual USB Mouse Remote Controller...

Страница 55: ...arantee is given as to the correctness of its contents We do not undertake any responsibility for the harms cause by using our product The model of the products in the user s manual only for recogniti...

Отзывы: