background image


TRAÇABILITÉ CRÉATIVE


CREATIVE TRACEABILITY


TECHNOMARK 

1 Allée du développement 


66


42350 La Talaudière (France) 

Tel : +33 (0) 4 77 22 25 91 

Fax : + 33 (0) 4 77 22 38 93 

E-mail : [email protected] 


V : SJ 

    Le : 20/06/17  R : DD 

www.technomark-marking.com 


To use Electric Z Axis, you must first declare it as 

accessory

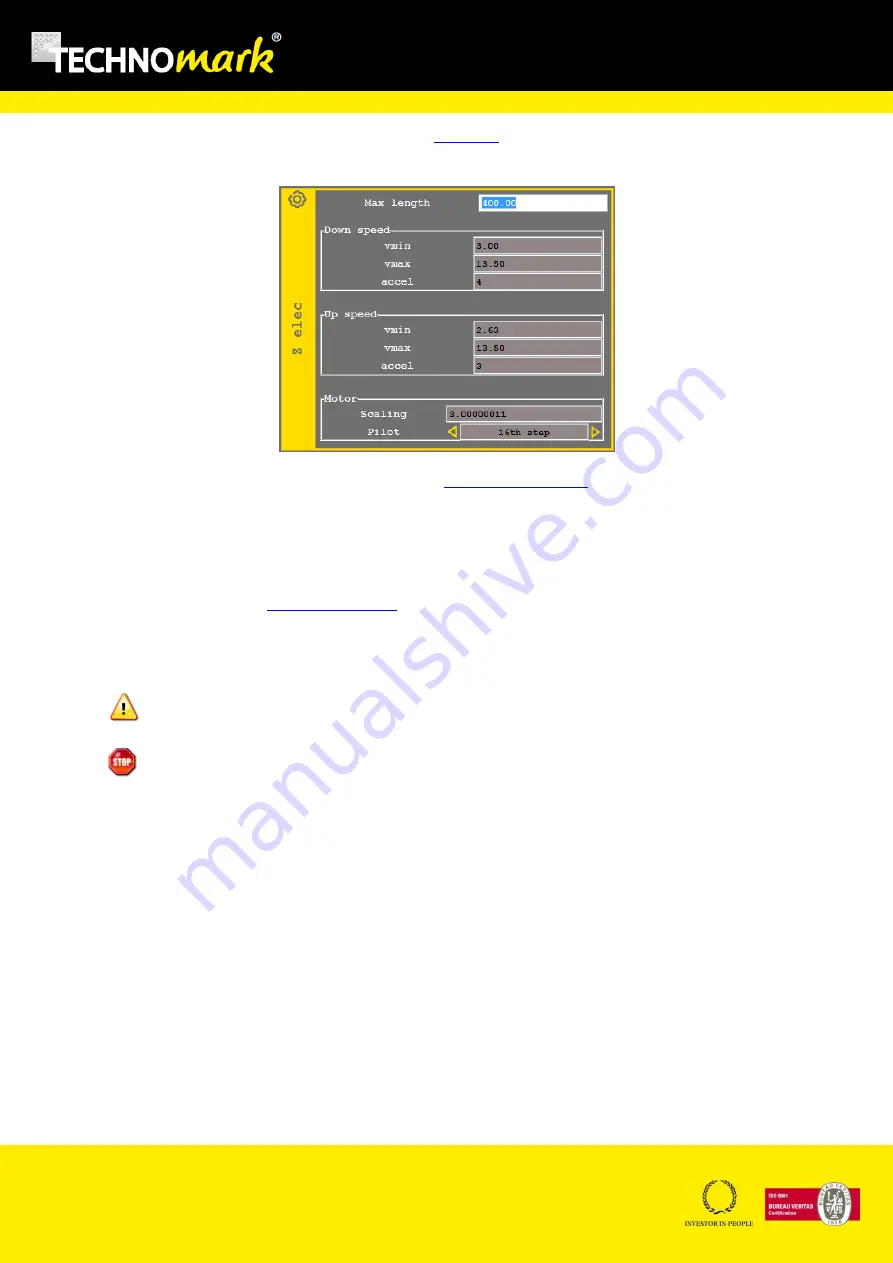
 of your marking machine. The maximum 

course can be modified with the configuring accessory window: 


The distance is defined for each marking file using 

 marking parameters. 

When marking using Electric Z accessory, the marking head moves first along XY for the first marking 
point, then the head goes down at the defined distance. 

During the marking you can define the upward movements of Electric Z (to avoid an obstacle for 
example) using function

 Electric Z  upwards


When the machine reaches an electric Z upward line, the column will lift the marking head of the 
desired value. If the entered value is negative, the head will go down. 

 Errors in defined values could damage the machine if it comes to hit the part or the base.


For operators’ safety, make sure that nobody can put a part of his body between the stylus and 

the part to be marked during the down movement of the marking head. It is the user’s responsibility 
to make sure the working set up is safe.


D.


Z Tor Axis 


Z Tor Axis 

is a function to 

activate relays driving a pneumatic equipment bringing and taking away 

parts

For more information, consult your distributor.


Содержание Multi4 V3

Страница 1: ...7 22 38 93 E mail info technomark marking com www technomark marking com Multi4 V3 User Guide MT4V3 software release 3 0 or greater Type Main version as of 25 06 2012 Revision 2 0 Date 20 06 2017 Written by D Duverney Controlled by S Jacob 1 Allée du développement 42350 La Talaudière FRANCE www technomark marking com Tél 33 0 4 77 22 25 91 Fax 33 0 4 77 22 38 91 ...

Страница 2: ... customer service is at available for all additional inquiries And now enjoy marking SUMMARY 1 INTRODUCTION 6 A Safety instructions 7 B PLEASE READ THESE INSTRUCTIONS CAREFULLY BEFORE USING YOUR MARKING EQUIPMENT 7 2 INSTALLING AND STARTING 10 A Installation 10 B Normal condition of use 12 C Starting your marking equipment 12 D Front Panel 13 3 MAIN SCREEN AND GENERAL OPERATION 14 4 MODES AND FUNC...

Страница 3: ...Easy shift 34 b Set force IDI 35 c Setting height and width 36 d Set angle and circular marking circular text 37 e Centre 38 D Text parameters mode 39 a Set Density Change dot matrix 39 b Set Font type 40 c Set Italic 41 d Set spacing 41 e Back to default values 42 E File Mode 42 a Save 43 b Open 44 c New 44 d USB 44 e Folder 45 Create a folder 46 Rename a folder 46 File copy in another sub folder...

Страница 4: ...de example 62 Generator mode example 64 B Z Axis Sensor 65 C Electric Z Axis 65 D Z Tor Axis 66 E Plate Feeder 67 F Battery Optional 67 b Operating 69 c External Charger Optional 70 G Carte 8E S Optional 70 H Ethernet Card Optional 71 6 USE OF INPUTS OUTPUTS AND RS232 COMMUNICATION 71 7 MAINTENANCE AND EVERYDAY CARE 72 A Identification of mechanical components 72 B General maintenance informations...

Страница 5: ...MARK 1 Allée du développement 5 42350 La Talaudière France Tel 33 0 4 77 22 25 91 Fax 33 0 4 77 22 38 93 E mail info technomark marking com V SJ Le 20 06 17 R DD www technomark marking com H Error code and trouble shooting 78 8 COMPLIANCE STATEMENT 85 ...

Страница 6: ... of possible risks associated with the use of the equipment Technomark guarantees the equipment made by the company as defined in the general sales conditions Unless otherwise specified on our order receipt our equipment is guaranteed 1 ONE year from the date of delivery This guarantee consists in us replacing free of charge the parts identified as defective except for sub assemblies supplied by t...

Страница 7: ... an optimised life to your marking equipment B PLEASE READ THESE INSTRUCTIONS CAREFULLY BEFORE USING YOUR MARKING EQUIPMENT The Technomark marking machine must be used only by persons trained and qualified in its use Technomark marking equipment is using high voltage power Therefore it can be dangerous to work with or around marking machines The following safety instructions must be followed at al...

Страница 8: ...part to be marked should never exceed 9 5 mm when marking To do so could destroy your stylus see graph page 17 6 WHEN IN BATTERY USE IT IS ESSENTIAL TO DISCHARGE FULLY THE BATTERY AT LEAST TWICE A MONTH To do so will avoid a fast decay of the battery performances NimH type 7 The head cable s minimum bending radius must be maintained at R 125mm 5 inch when it is static R 200mm 8 inch when it is mob...

Страница 9: ...veloppement 9 42350 La Talaudière France Tel 33 0 4 77 22 25 91 Fax 33 0 4 77 22 38 93 E mail info technomark marking com V SJ Le 20 06 17 R DD www technomark marking com 13 DO NOT TWIST THE CABLE OF THE MARKING HEAD 14 DO NOT PULL OR LIFT THE MARKING HEAD BY THE CABLE ...

Страница 10: ...e control box Please follow the instructions here under to install properly your marking equipment Install the control box in an aerated area where the temperature will be between 0 and 45 C In case of use of a battery the temperature will be between 0 and 40 C Connect the marking cable head in the corresponding control box connector Connect the power cable into the corresponding plug on the contr...

Страница 11: ...20 06 17 R DD www technomark marking com Connectors are located on each side of the controller External circuits to be connected to the product shall be SELV type as stated by the standards IEC60950 1 2005 and EN60950 1 2006 A11 ON OFF Switch and power plug Connector to optional rotation axis 3 Inputs connector Marking head connector RS232 Connector USB Host Port USB Device Port 4 output connector...

Страница 12: ...n a residential area is likely to cause harmful interference in which case the user will be required to correct the interference at his own expense Changes or modifications not expressly approved by the party responsible for compliance could void the user s authority to operate the equipment This product belongs to Class A In a domestic environment this equipment could emit radio interferences and...

Страница 13: ...91 Fax 33 0 4 77 22 38 93 E mail info technomark marking com V SJ Le 20 06 17 R DD www technomark marking com D Front Panel Home Mode Position Mode Text parameters Mode File Mode Test Mode System Mode Confirm Cancel Start Marking Stop Marking Alphanumeric keyboard Shift Erase Special characters Led Battery switch Position arrows ...

Страница 14: ...at the power up looks this way The file name shown is the one of the current file If a file is in a sub folder his name is on the left of the file name see Folder If the file has been modified but not saved a small star is added at the end of the name to warn the user Once the modifications have been saved see save or automatic save the star disappears The marks counter is incrementing at the end ...

Страница 15: ...wing order Content What is in the line it will depend on the type of line The position arrows up and down on the front panel allows to select a line it will become the current line and to scroll the lines on the screen in the line information zone In the graphic view the current line is highlighted in grey and framed by a blue line The graphic view is the image on the screen of the marking which w...

Страница 16: ...cancel the modification and allows coming back to home mode To start marking press on the start button A single click on the stop button force the marking process into pause A second click cancels the marking and the machine comes back to its origin There are two types of users for the marking machine A production user with limited rights and a supervisor user who can accede to the full functional...

Страница 17: ... the text line use the right and left position arrows When changing line the text fully selected is highlighted by a change of colour Then use the right and left arrows to deselect the text otherwise typing a character will replace the whole line selected It is as well possible to insert special characters using the special characters key In that case the following window will open The position ar...

Страница 18: ...he following functions to the supervisor user For a Production user the tool bar offers only the key enter variable predefined Pressing this key opens the following window See Variables or Serial number This feed variable or serial number window is also available to user Supervisor using the same button in combination with the shit key a Marking functions You can insert or edit marking functions u...

Страница 19: ...a function is selected in the current line like in the following example Then the configuration window for this function will appear Serial number Marking incrementing text A serial number is a text that will increment at the end of each marking All serial numbers are for one file except for the SHARED serial number common to all the machine files A scrolling menu allows choosing among the differe...

Страница 20: ...w The configuration window is the following creation mode The Name field correspond to the name of your serial number It should be unique and different from SHARED If you edit an existing serial number this field is grey as you cannot modify it The Value field is the current value of the serial number It will be incremented of the step value according to the defined frequency number of markings Fo...

Страница 21: ...month Year the serial number is reset each year Hour the serial number is reset each hour The starting at field is the value given to the serial number when it is reset The end at field is the maximum value used when we want a reset on the Value criteria Once again the number of digits is essential for the Starting at and End at fields There must be coherence and therefore a same number of digits ...

Страница 22: ... the Preview field you can see in live the result of your entry The actual message as it will be marked Example To configure time or teams see date parameters Logo Marking shapes and drawings Inserting logos is an option requiring a licence see licences It allows inserting logos created with the LogPro software from a computer in a marking file When inserting or editing a logo a window opens allow...

Страница 23: ...atrix code is a high density 2D bar code symbol allow to record a high quantity of information on a small surface It complies with norm ISO IEC 16022 The QR code QR for Quick Response is a 2D bar code datamatrix composed of black modules arranged on a white square Note this code type requires specialised equipment to ensure its reading The configuration window for a two dimensions code is as follo...

Страница 24: ...at corresponds to the code format and depends on the code type selected Datamatrix The code can be automatic rectangle or square or at a fixed format selected in the list QR The code is always square Its size is automatic or defined by one of the format of the list Format defines the code size number of elements but as well the maximum number of characters than can be encoded Datamatrix 16x16 Data...

Страница 25: ... the error correction the more characters can be encoded for a given format To delete a datamatrix or QR code use the delete key in the Edit menu UID code button allows user to insert UID code in Datamatrix Text As pressed the following windows open Fill the UID code number in a 3 digit mode for example 030 for RS and validate In the datamatrix text field the UID code number is added with specific...

Страница 26: ...oice other than new in a line select it and press the arrow at the right of the keyboard The variable configuration window opens To create a new variable select new and confirm with The variable configuration window opens To delete a variable select it in the list and press the erase key on the keyboard Deleting variable reference in a marking line doesn t suppress the variable To quickly feed a v...

Страница 27: ...itional field The allocation allows to define the way CB variables are fed when more than one are used Sequence Variables are fed in the order they are scanned The firs scan feed CB the second CB1 and the third CB2 Length bar code length corresponds to a variable length and the variable is fed with the read content The maximum number of CB variables is 10 CB CB1 CB9 The maximum number of serial nu...

Страница 28: ...fication allows modifying the marking lines parameters of the file using the following table Use the position arrows to navigate in the table Line indicates the number of the considered line indicates part of the line text X and Y give the positions of the line beginning in the selected units mm or inches gives the height of the line in the selected units mm or inches gives the marking force from ...

Страница 29: ...ion from 50 to 150 gives spacing between characters from 0 to 9 gives the italic inclination of the text from 0 to 9 gives the number of impact for each marking point from 1 to 9 Use key to confirm your modifications Use key to cancel your modifications c Add a mechanical function Pressing add a mechanical function key shows the following scrolling menu Pause Set a pause during a marking process A...

Страница 30: ...f using the direct red way Use the line position see position mode or modify parameters to position correctly the crossing point Using crossing points makes possible to define marking head position circuits sometimes useful for parts with complex shapes Add a D axis rotation Make the D axis turn of a given angle depending on options If you have the D axis rotation option you can force the axis to ...

Страница 31: ...s and confirm with d Edit Menu Edit Menu is a scrolling menu allowing to select common publishing operation Insert allows inserting a new line between two existing ones To use line insertion select with the up and down arrows the line on top of which you intend to insert the new line and chose insert Copy allows copying a marking line with all its parameters Paste allows inserting a line previousl...

Страница 32: ...he more the risks to alter the marking quality are high Avoid high speed with very little characters The Max speed can significantly reduce the marking quality IDI allows configuring IDI mode for the current marking file There are 3 IDI modes o Off no IDI o IDI flat mode o IDI curved mode For more information on IDI use please refer to Force IDI Mirror mode Allows to return horizontally or vertica...

Страница 33: ...done in x y so flat For more information about D Axis option use see D Axis Z Sensor Allows configuring the use of optional Z sensor axis for the file When using Z sensor axis you must enter the distance height where the marking head should be positioned This distance is the distance stylus part Z axis must have been previously activated in accessories Z Electric Allows configuring the use of opti...

Страница 34: ...le in Supervisor Mode a Set position Easy shift Pressing Set Position key allows using the position arrows to position the current line with steps from 0 2 to 1 6mm The key stays in the press state during modifications The position is visualised on the grid and the position origin point at bottom left of the line outline and the z axis position is shown in a window at the top left of the screen Po...

Страница 35: ...ge the stylus distance For all other marking heads it is recommended to use the following distances stylus part for the 5 forces Force 1 distance of 1 mm Force 2 distance of 1 5 mm Force 3 distance of 2 to 4 mm Force 4 distance of 5 to 8 mm Force 5 distance of 5 to 8 mm Force 6 distance of 5 to 8 mm Respecting those distances is very important to obtain a good result For weak force 1 2 even 3 If t...

Страница 36: ...te Ideal to mark parts with a constant depth when they present an uneven distance along the length of the marking Marking with IDI curved mode and without IDI The IDI mode is displayed on the main screen with the following icons IDI deactivated IDI flat IDI curved c Setting height and width Pressing on Set Height and Width allows using the position arrows to change height and compression of the cu...

Страница 37: ...ressing Set angle and circular marking allows using the position arrows to adjust the angle and the diameter for circular marking Up and down arrows modify the angle of the current line by steps from 2 5 to 20 Right and left arrows modify the diameter to mark a circular text by steps from 0 25mm to 2mm If the diameter value is positive the bottom of the characters is aligned on the virtual circle ...

Страница 38: ...ing com Use or press again the key to confirm your modifications Use to cancel your modifications e Centre Pressing the centre key allows displaying the centring menu X allows centring the line following X axis Y allows centring the line following Y axis XY allows centring the line following X and Y axis so in the middle of the marking window Use or press again the key to confirm your modification...

Страница 39: ... the buttons Combined use of those keys with the shift key allows applying those modifications to all the marking lines This tool bar is only available in Supervisor Mode a Set Density Change dot matrix Press Set density key allows displaying the dot matrix choice scrolling menu 5x7 characters are defined by a 5x7 matrix 9x13 characters are defined by a 9x13 matrix Continuous character points are ...

Страница 40: ...ting of the spacing Right and left position arrows modify the spacing value which will be shown immediately The possible values are 0 3 mm 0 45 mm 0 6 mm 1 mm between the dots Use or press again the key to confirm your modifications Use to cancel your modifications b Set Font type Touch Set font key allows displaying the font type choice scrolling menu The font in use is grey Use the up and down p...

Страница 41: ...allow increasing or decreasing the incline value The italic value is indicated in a window at the top left of the screen A straight text has an italic value of 5 This value can vary from 0 to 9 below 5 the text leans to the left and above 5 the text lean to the right Italic 0 Italic 9 Use or press again the key to confirm your modifications Use to cancel your modifications d Set spacing Pressing s...

Страница 42: ...d and above 4 it is widened Spacing 0 Spacing 9 Use or press again the key to confirm your modifications Use to cancel your modifications e Back to default values Pressing back to default values allows restoring the default text parameters for the current line These parameters values are Matrix 5x7 Font OCR Italic value 5 Spacing value 4 E File Mode File Mode allows configuring the marking files T...

Страница 43: ... up to 3 lines of comments and confirm with This window opens even if the file has already been saved It allows changing the file name function save under The filename can only contain alphanumeric letters dashes or underscores _ If the file name already exists a confirmation will be asked Confirm with The folder icon at the bottom right of the window allows you to select the subfolder in which yo...

Страница 44: ...ield The corresponding file will be underlined in the list Files will be sorted alphabetically lowercase names will be before uppercase names for files beginning with the same letter The file can as well be selected using the up and down arrows to move in the list Select the file to open with The wastebasket key deletes the selected file c New New allows creating a new file This file will be empty...

Страница 45: ...haracter If the filename contains spaces they will be replaced with a low hyphen _ For example if the name of a file is 1 to 3 4 it will be renamed 1 3_4 Export save all the marking and logo files from the controller onto the USB key e Folder This feature allows creation of sub folders in the main folder to sort marking files with the following button This window contains the list of marking files...

Страница 46: ...reate a sub folder is only available in the main folder A window appears to choose a sub folder name Only alphanumeric and dash characters are allowed Press the key to create the sub folder and close the window Rename a folder If a folder is selected in the main folder a window appears to choose a new name of the sub folder File copy in another sub folder If a file is selected a window appears wit...

Страница 47: ...the tool bar presents the following buttons Any of the tests can be set to pause restarted stopped in the same way than a marking See marking a Line Outline Test Line Outline allows testing the current line outline The marking head is moving around the line marking its outline b File Outline Test File Outline allows testing the full file outline The marking head is moving around the assembly of al...

Страница 48: ...g allows testing of the complete file The marking head follows all the movements of the real marking but without any impact G System Mode System mode allows the user to configure its marking system The tool bar presents the following functions In Production Mode only Zoom and Users functions are available a Zoom Zoom allows watching a part of the marking file at a different scale Pressing Zoom dis...

Страница 49: ...iew part it represents the enlarged part It moves using position arrows and the zoom window updates depending on its position Use or to close the zoom window b Date and Hour Teams configuration Date and Hour function allows configuring the date and time of the controller as well as the time zone and the shift teams turnover using the following window Navigating inside the window is done with the u...

Страница 50: ... arrows Time Zone To change time zone use the right position arrow and select the time zone corresponding to your geographical zone in the proposed list Configuring your time zone allows automatic changes between summer and winter time Teams You can configure up to 5 shift team on you marking machine You must define for each team the starting time format HH MM and the name up to 10 characters Team...

Страница 51: ...ion allows to be identified on the machine as a Production User with limited capabilities Supervisor allows to be identified on the machine as a Supervisor User with all capabilities If this account has been protected by a password the machine will ask your identification Password allows to change the supervisor account password with the following window There is a universal password MULTITEC if y...

Страница 52: ...al parameters with the following window Navigation in the window is done with up and down position arrows Language Language of your machine can be modified using the right and left position arrows Units Units of your machine can be modified using the right and left position arrows Auto Save Automatic save of the current file on power fail can be activated deactivated using the right and left posit...

Страница 53: ...s into deep sleep with a consumption mode as low as possible a few milliamps The machine wakes up from any outside event keyboard USB key Button start and stop this parameter allows to block start or stop button on the lexan if it is on OFF Timestamp blocking this parameter allows to block timestamp at the date and time at the beginning of the marking If there is a pause in the marking file timest...

Страница 54: ...to the marking window length really used It cannot be larger than the mechanical window length Width correspond to the marking window width really used It cannot be larger than the mechanical window width Mode correspond to the used mode of the mechanics o Hand held default mode the origin of the marking window is situated at the level of the origin position sensors o Bench in this mode the mechan...

Страница 55: ...ut additional axis Accessories are configurable with Accessories Parameters if they have been selected D Axis D Axis Max you can modify Y offset of the D axis position It corresponds to the D Axis position related to the marking window More information in D Axis Z Sensor and Z Electric You can modify the maximum course corresponding to the physical column dimension More information in Z Axis Senso...

Страница 56: ...ach line from beginning to end of each line o On The machine optimises the course and can be conducted to inverse the marking direction Easy shift Allows activating or deactivating of the easy shift function Easy shift moves the marking head when you are positioning the marking line Parking You can define a parking point for your marking head If this option is ON the marking head will move to the ...

Страница 57: ... maximum number of possible characters before maintenance More when the filling function is activated see TechnoProd function the minimum maximum and average values number of measurements and drift type are recorded as well as others archives data This function is not available for a Multi4 Mini 60x30 marking head Lubrication The LED turns red if your machine requires lubrication every 500 000 imp...

Страница 58: ...sensor s detection limit Thus during origin return LEDs display consecutively red then green and finally red To check if sensors are working try to move smoothly by hand the solenoid block to X and Y home position Auto diagnosis Auto diagnosis function will initiate several mechanical controls Impactor analysis make an impact and check that the current circuit is correct Cross table analysis check...

Страница 59: ...an be configured with this window Navigation inside the window is done with up and down position arrows Right and left position arrows allow modifying the values The TCP IP part is displayed only if the controller has the Ethernet option If DHCP mode is activated IP address is given by a server If DHCP mode is deactivated you must enter manually the affected IP address and the subnet mask Control ...

Страница 60: ... Frame D If the machine receives a wrong command an error appears with the ASCII code of the bad character For example if you send the command Z on the serial port the message will be COM RS232 Bad Char 90 H Marking Marking is started by pressing on the start key The following window opens during the time of marking A press on stop key will set the marking in pause A second press stops the marking...

Страница 61: ...portable mode to use this accessory To activate this option select first this function as accessory by choosing the D Axis type D Axis can work in two ways o Circumference the marking is done on the part circumference It is compulsory to enter the part to be marked diameter as the marking window will be adapted to the useful perimeter The marking head moves simultaneously along the 3 axis and it i...

Страница 62: ...umference is less than the marking window the view is reduced to the circumference development of the part to be marked If the circumference is more than the marking window the view is set at the marking window scale You can then scroll the circumference using a combination shift position arrow up or down In circumference mode even if the marking will be done on all the part circumference the erro...

Страница 63: ... V SJ Le 20 06 17 R DD www technomark marking com Create a new marking file and open the marking parameters window Choose the circumference mode for the D Axis field enter the marking part diameter in the diameter field and then validate Enter your text lines Use the angle function to mark on the circumference Use the shift up down arrows to scroll the circumference in the graphical view ...

Страница 64: ...rking Generator mode example If not already done first associate the D axis accessory depending on your model Create a new marking file and open the marking parameters window Choose the Generator mode for the D Axis field then validate Enter a text line insert a rotation in the next line Enter a new text line The first text will be marked without d axis movement and then d axis will rotate the set...

Страница 65: ...king parameters When marking using Z sensor accessory the marking head moves first along XY for the first marking point then the column goes down to come and feel the part and position itself at the defined height During the marking you can define the upward movements of Z sensor to avoid an obstacle for example using function Z sensor upwards When the machine reaches a Z sensor upward line the co...

Страница 66: ...e defined distance During the marking you can define the upward movements of Electric Z to avoid an obstacle for example using function Electric Z upwards When the machine reaches an electric Z upward line the column will lift the marking head of the desired value If the entered value is negative the head will go down Errors in defined values could damage the machine if it comes to hit the part or...

Страница 67: ...ask how many plates should be marked Enter the number of plates and confirm with The marking of the first plate is starting straight after confirmation The marking window displays the number of plates left to be marked including the current one The plates are taken one after each other to the marking position held in place marked then put aside To stop series press two times on in the same way tha...

Страница 68: ...the accumulators The battery kit is protected against over heat 60 C and short cuts Never plug unplug the battery if the MULTI4 control panel is under power Before any replacement operation of the battery disconnect the power plug and make sure the control panel is switched OFF There is an explosion risk if the battery is replaced by an incorrect type battery Dispose of used batteries according to...

Страница 69: ... asking if the user wishes to shut down the machine or not If you answer yes the machine shuts down If the answer is no or no answer after 2 seconds the machine toggles to battery mode The charge mode is fully automatic The battery will charge as soon as needed The charge is completed in 2 30 h The battery key allows to switch off the machine when it is working in battery mode or to switch on if n...

Страница 70: ...s available through icons in the status bar No battery detected battery full battery middle battery empty battery charging empty battery charging middle battery charging full c External Charger Optional The external charger characteristics are Power supply 110 115 V AC or 220 240 V AC Usable temperature 32 F to 115 F 0 C to 45 C Quick charge current 1 A The quick charge time is around 2 30h There ...

Страница 71: ...et card allowing to connect the marking machine to the client internal net straight cable or directly to a PC crossed cable Ideally connect your control box on your company network switch hub See Interfacing instruction for Multi4 Control Unit dedicated document for more information 6 Use of Inputs outputs and RS232 communication Your MULTI 4 controller is equipped as standard with 3inputs 4output...

Страница 72: ...nomark marking com V SJ Le 20 06 17 R DD www technomark marking com 7 Maintenance and everyday care Maintenance and service operations must be done with the machine out of power The power cable must be unplugged If you have an optional battery the battery must be disconnected too A Identification of mechanical components 1 General view of the marking machine Pin assembly ...

Страница 73: ...1 Fax 33 0 4 77 22 38 93 E mail info technomark marking com V SJ Le 20 06 17 R DD www technomark marking com 2 Marking machine mechanical components view except Multi4 mini 3 Stylus assembly open view Hand nut Stylus guide Return spring Stylus Core Guiding rod Pin assembly Guiding rail Guiding wheel Spline shaft Translation screw ...

Страница 74: ...t care is the stylus assembly It is absolutely necessary to lubricate the stylus to avoid that it gets stuck inside its guide In case of accumulation of dust metal parts the stylus position can show some hard points affecting the marking quality The lubrication frequency is variable depending on the conditions of use of your machine Environment number of marking matrix hitting force are all parame...

Страница 75: ...e highest top position Unscrew the nut by hand Never use a tool Using a tool as a universal spanner for example can definitely damage your machine Pull out the guide the return spring the stylus and the core Clean as necessary the core the stylus and the guide using a dry clean rag Use Vaseline oil from your maintenance kit pour a little bit of fine oil inside the guide and on the stylus Put back ...

Страница 76: ... best for optimised marking quality life time Nevertheless we offer different sharpening angles for specific applications 60 120 Aeronautic with a 0 2mm round tip Check first the sharpening angle of your stylus before starting any sharpening operation The stylus can turn freely inside its guide So a non concentric sharpening will always result in bad quality marking E Return spring The spring is a...

Страница 77: ...ing machine mechanical components view are kept as clean as possible To do so turn down the machine so the stylus is facing you and wipe the dirty parts with a dry rag You can as well use a dry compressed air gun to do this cleaning Once clean it is advisable to lubricate all rolling parts with the Vaseline oil available in your maintenance kit It will help to remove the recalcitrant dust parts at...

Страница 78: ... ambient temperature near the maximum allowed value a message can appear on the screen In case of excessive temperature which could damage your equipment it could stop working wait until it cools down before being able to work again The only maintenance to be recommended is to pass a clean dry rag from time to time to keep the best possible usage H Error code and trouble shooting The Technomark ma...

Страница 79: ...ce Error 9 Open circuit The pin assembly cable is cut or damaged Check the pin assembly cable condition and restart the controller The connector of the pin assembly is not plugged properly or damaged Check the connector of the pin assembly cable and restart the controller The marking head cable is cut or damaged Check the marking head cable condition and restart the controller Contact After Sales ...

Страница 80: ...s Service Error 14 Origin X and Y error The pin assembly is mechanically stopped by an outside obstacle Check that the path of the marking head is free then restart the controller Can happen only after a first or n marking The detection elements are faulty Check that the detection tabs are not bent and so not passing inside the detectors and restart the controller The detection card is faulty Cont...

Страница 81: ...is The Z sensor origin detection element is faulty Configure your marking machine without Z Sensor Contact After Sales Service Error 18 Origin Z electric error NO Z Electric The Z electric origin detection element is faulty Configure your marking machine without Z Electric axis Contact After Sales Service Error 19 Plate charger origin error No plate charger The plate charger origin detection eleme...

Страница 82: ...ice Error 34 Discharging plate error Discharging of a plate is too long Contact After Sales Service Error 39 40 41 42 EEPROM error Contact After Sales Service Error 43 44 45 46 USB key error The USB key in use is faulty Try a different USB key Restart the controller Internal controller fault Contact After Sales Service Error 47 Internal error Restart the controller Contact After Sales Service Erro...

Страница 83: ...ing speed Reduce the marking strength If still a problem call After Sales Service Error 56 Unknown error Restart the controller Contact After Sales Service Error 57 Datamatrix license error The datamatrix license missing Delete datamatrix in the marking file Fill the datamatrix license number in the license menu Error 58 Logo license error The logo license missing Delete logos in the marking file ...

Страница 84: ...on a short press on the trigger start a test a long one a cycle start The stylus is blocked and or is not going down or up Clean the stylus check the spring and if the core is present Hand tight the nut The machine is making unusual noises The driving systems and or guides are too dirty Clean the mechanical parts following the user s manual guidelines If problem not solved call After Sales Service...

Страница 85: ...TRACEABILITY TECHNOMARK 1 Allée du développement 85 42350 La Talaudière France Tel 33 0 4 77 22 25 91 Fax 33 0 4 77 22 38 93 E mail info technomark marking com V SJ Le 20 06 17 R DD www technomark marking com 8 Compliance statement ...

Отзывы: