R
2800 LAURA LANE • MIDDLETON, WI 53562 • (800) 288-9383 • FAX (608) 836-9044 • www.tcsbasys.com
7
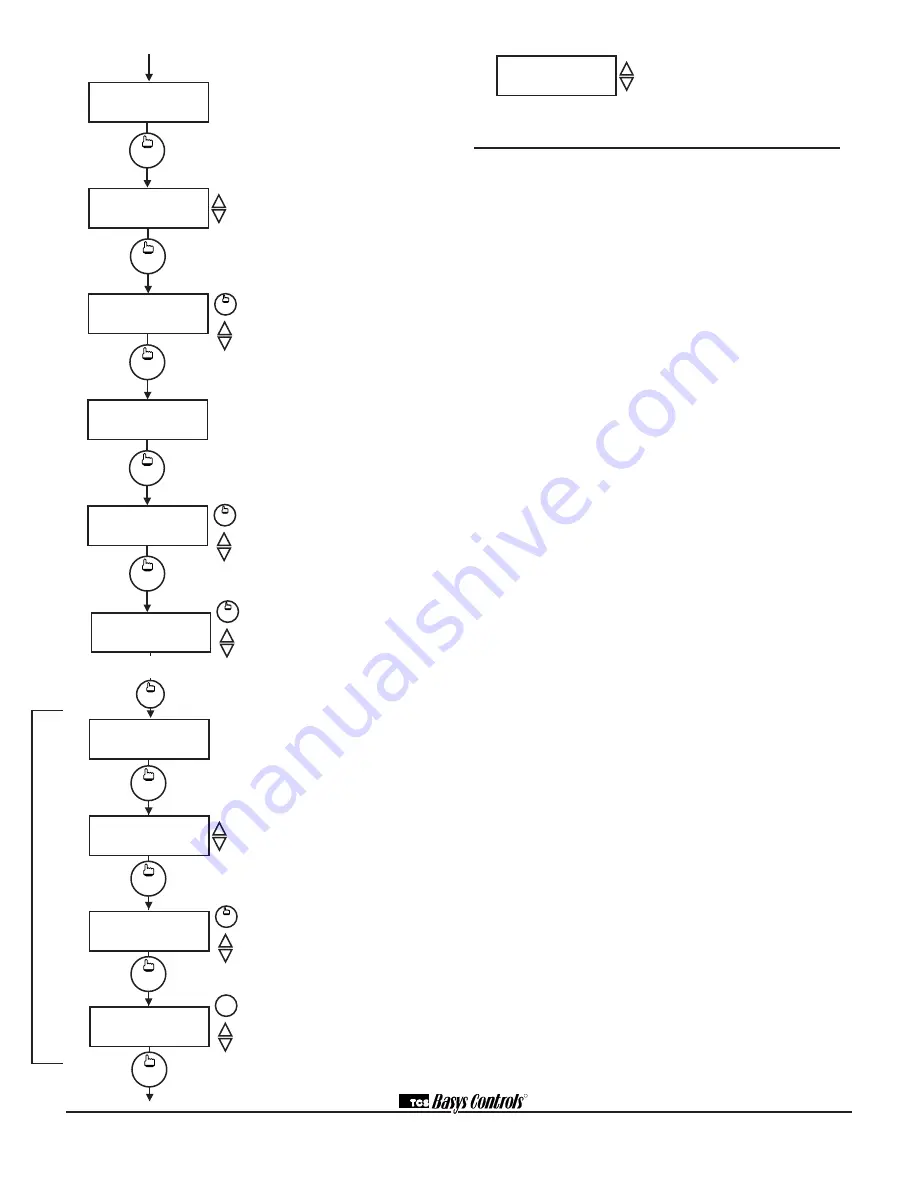
Main Monitoring Screen.
Press the
clock setup button to access the fol-
lowing screens.
Access Code Entry Screen.
May
appear if access code is required for
setting clock and schedules. 248 is
the default code. If the wrong code
is entered, it will revert to the previ-
ous screen.
Time and Day Screen.
Set the
hour, minutes, AM or PM, and day of
the week.
clock
setup
SET TIME & DAY:
12:00 AM MON
2.
override
Schedule Announcement Screen.
Announces the next screen.
Occupied Times Screen.
Set hours
and minutes of start and end times
for up to two occupied periods.
Occupied Times Screen.
Set hours
and minutes of start and end times
for up to two occupied periods.
Schedule Announcement Screen.
Announces the next screen.
Copy Schedule Screen.
Indicate
whether or not to use the same
schedule that was used for the previ-
ous day. If the same schedule is
used, the following 2 screens are not
displayed.
Occupied Times Screen.
Set hours
or minutes of start and end times for
up to two occupied periods.
Occupied Times Screen.
Set hours
and minutes of start and end times
for up to two occupied periods.
SET OCCUPIED
TIMES MONDAY:
clock
setup
3.
SET OCCUPIED
TIMES TUESDAY:
clock
setup
6.
COPY MON FOR
TUE?
NO
clock
setup
7.
A:08:00 TO 12:00
B:00:00 TO 00:00
clock
setup
8.
override
Operation
UNOCCUPIED SETBACK
The SZ1009 operates in either an occupied or unoc-
cupied mode. During the occupied mode, the occupied
heating and cooling setpoints will be maintained, and
the fan will operate according to its occupied setting.
During the unoccupied mode, the unoccupied heating
and cooling setpoints will be maintained, and the fan
will operate according to its unoccupied setting. The
occupied LED will be lit when the unit is operating in the
occupied mode.
The occupied schedule may be set utilizing the internal
time clock or DI3 may be used with an external time
clock, where- as when DI3 is closed, the unit is in the
occupied mode. The Smart Recovery function is dis-
abled when DI3 is used for external time clock.
OVERRIDE
A timed override is available using the button on the
face of the thermostat or through momentary contacts
wired into the OVR terminal. The amount of time the
unit will be overridden is set from 0 to 255 minutes in
the programming screen. This override behaves differ-
ently depending on the mode the thermostat is operating
in (occupied or unoccupied) and the options that have
been enabled within the software. In standard mode, the
override only activates in unoccupied mode and takes
the thermostat into occupied mode. If "Override for
Occupied Period" is enabled, the override also activates
in occupied mode and takes the thermostat into unoccu-
pied mode. In either case, you are able to view the time
remaining in the override period both within the software
and by using the service button to scroll through the sta-
tus screens. If the occupant desires to return the ther-
mostat to unoccupied or occupied operation (depending
on how the override was used) before the time interval
is up, they may press the override again. If "Continuous
Occupied Override" or "Continuous Unoccupied
Override" is enabled, then pressing the override once
and then pressing and holding it for 5 seconds puts the
thermostat into a "hold” mode (the override LED on the
thermostat will flash quickly). In this mode, the over-
ride setpoints are used until the next occupied period is
reached, or until the thermostat is manually taken out of
the "Continuous Override" mode by pressing the over-
ride again.
Continuous override is available through the DI3 contact
or the software. If DI3 is set to external override, the unit
will be in the occupied mode whenever the DI3 contact
is closed. When using this option, the timed override
may still be activated.
The software allows you to override the thermostat by
putting the override parameter into the remote mode,
and thus disabling the timed override.
clock
setup
MON
12:00AM
72F
clock
setup
ENTER ACCESS
CODE 000
1.
A:08:00 TO 12:00
B:00:00 TO 00:00F
4.
override
clock
setup
C:00:00 TO 00:00
D:00:00 TO 00:00
clock
setup
5.
override
The following screens are repeated for
Wednesday, Thursday Friday Saturday, Sunday.
MON
12:00 AM 72F
Main Monitoring Screen.
C:00:00 TO 00:00
D:00:00 TO 00:00
9.
override
clock
setup


