R
2800 LAURA LANE • MIDDLETON, WI 53562 • (800) 288-9383 • FAX (608) 836-9044 • www.tcsbasys.com
4
SET ADDRESS:
000
Programming
The SZ1009 may be programmed through the keypad on
the face, or with a PC.
If programming with a PC, the following must be set via
the display and keypad
prior
to programming:
• Address (step #2)
• Baud rate (step #3)
• Temperature scale (step #4)
For more information on programming through the PC,
consult your TCS software manual.
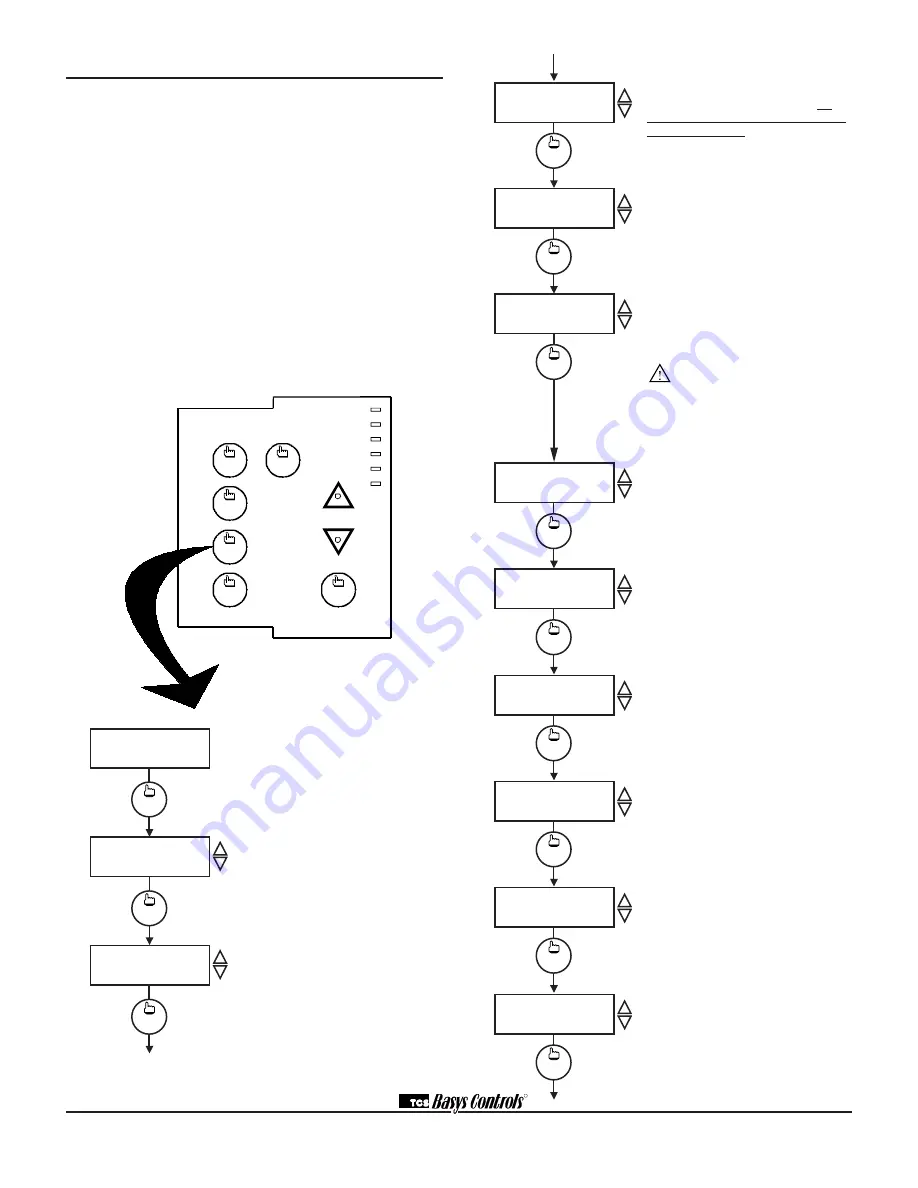
PROGRAMMING THROUGH THE KEYPAD
To access the programming screens, press the program
setup button. To make changes, use the warmer and
cooler keys. Access may be locked out with dipswitch-
es, or an access code may be required.
fan
Occupied
Heating
Cooling
Fan
Service
Program/
COOLER
WARMER
Data
switch
system
switch
program
setup
clock
setup
override
service
status
Main Monitoring Screen.
Press the pro-
gram setup button to access the following
screens.
Access Code Entry Screen.
Will appear
if access code is required for program-
ming. 248 is the default code. If the
wrong code is entered, it will revert to the
previous screen.
Controller Address Screen.
If using
a PC to program, set a unique address
from 0 to 255, excluding 248. All control-
lers on a network must have a separate
and unique communications address.
Communication Baud Rate Screen.
If using a PC to do programming,
all
controllers on a network must be set to
the same baud rate
. Choose between
2.4K, 4.8K, 9.6K and 19.2K.
Display Type Screen.
Choose between
FAHRENHEIT and CELSIUS for tem-
perature indication.
Controller Type Screen.
Choose
Conventional or Heat Pump mode. Unit
will reset (the screen will momentarily
go blank) immediatley after choice is
altered.
WARNING
if you switch between
CONVENTIONAL and HEAT PUMP
modes, some digital output functions
change. Refer to the Mode Conversion
Table on Page 6. All the rest of the menus
will remain unaltered.
System Access Screen.
Choose
whether or not to enable user’s access
to the system switch to set the system
mode.
System Mode Screen.
Choose from
AUTO, HEAT, COOL, or OFF for your
system mode. In the OFF mode, no
contacts shall close.
Fan Access Screen.
Choose whether
or not to enable the user’s access to the
fan switch to set the occupied fan mode.
(See page 8.)
Occupied Fan Mode Screen.
Choose
between AUTO (continuous), ON (gas
heat or no heat), or COOL for your fan
run times during the occupied modes.
Unoccupied Fan Mode Screen.
Choose from ON, COOL or AUTO for
your fan run times in the unoccupied
mode.
Occupied Heat Setpoint Screen.
Set the heat setpoint for this occupied
period.
program
setup
program
setup
2.
program
setup
SET BAUD RATE:
9.6k
3.
program
setup
TEMP SHOWN IN:
FAHRENHEIT
4.
program
setup
SET UNOCCUPIED
FAN MODE: AUTO
10.
program
setup
SET OCCUPIED FAN
MODE:
AUTO
9.
program
setup
USER ACCESS TO
FAN MODE? YES
8.
program
setup
SET SYSTEM
MODE:
AUTO
7.
program
setup
USER ACCESS TO
SYSTEM MODE? YES
6.
program
setup
OCCUPIED HEAT
SETPOINT A: 70F
11.
ENTER ACCESS
CODE
000
program
setup
1.
program
setup
CONTROLLER TYPE:
CONVENTIONAL
5.
MON
12:00 AM 72F


