


Centrifugal Juicing
(Beet root, Bitter gourd (karela), Cucumber, Apple, Pineapple, Carrot etc.)
(Fruit/Vegetables without seeds)
Steps
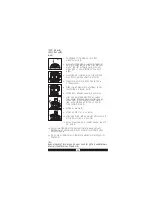
1. Ensure that the processor is unplugged from the
power supply.(Fig.1)
2. Place the bowl the processor aligning the
unlock marking on the bowl & processor unit
the turn clockwise to lick. The lock markings of
bowl & processor unit should align.
3. When the processor bowl is fitted correctly, the
processor bowl handle will be to the right of the
food processor assembly. (Fig. 2)
4. Place the centrifugal juicer in the center of bowl.
(Fig.3)
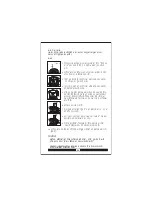
5. Holding the processor bowl, lock the centrifugal
juicer lid by rotating clockwise aligning feeder tube
with handle of processor bowl.(Fig.4) Ensure tap
on the lid clicks into place.
6. Plug in the processor.
7. Run the processor at "1" to "2" or "3".
8. The juice will be collected in processor bowl.
9. The pulp will be accumulated in the centrifugal
juicer.
10. Remove the pulp as and when it gets filled.
11. To remove the juice, stop the processor, remove the centrifugal juicer
attachment by turning it in anticlockwise direction.
12. Turn anticlockwise to unlock the processor bowl and lift.
13. Store the juice in a container.
NOTE:
1. After completing juicing of each cycle, continue to run the juicer for
at least 30 seconds to attain maximum juicing results.
2. In higher speed ("3") the juicer may vibrate gently. This is normal.
15
Centrifugal Juicing
(Beet root, Bitter gourd (karela), Cucumber, Apple, Pineapple, Carrot etc.)
(Fruit/Vegetables without seeds)
Steps
1. Ensure that the processor is unplugged from the
power supply.(Fig.1)
2. Place the bowl the processor aligning the
unlock marking on the bowl & processor unit
the turn clockwise to lick. The lock markings of
bowl & processor unit should align.
3. When the processor bowl is fitted correctly, the
processor bowl handle will be to the right of the
food processor assembly. (Fig. 2)
4. Place the centrifugal juicer in the center of bowl.
(Fig.3)
5. Holding the processor bowl, lock the centrifugal
juicer lid by rotating clockwise aligning feeder tube
with handle of processor bowl.(Fig.4) Ensure tap
on the lid clicks into place.
6. Plug in the processor.
7. Run the processor at "1" to "2" or "3".
8. The juice will be collected in processor bowl.
9. The pulp will be accumulated in the centrifugal
juicer.
10. Remove the pulp as and when it gets filled.
11. To remove the juice, stop the processor, remove the centrifugal juicer
attachment by turning it in anticlockwise direction.
12. Turn anticlockwise to unlock the processor bowl and lift.
13. Store the juice in a container.
NOTE:
1. After completing juicing of each cycle, continue to run the juicer for
at least 30 seconds to attain maximum juicing results.
2. In higher speed ("3") the juicer may vibrate gently. This is normal.
Содержание INALSA INOX 1000
Страница 3: ...Parts Identification ikVZ l ifjp 2 12 13 Inox 1000...
Страница 4: ...Parts Identification ikVZ l ifjp 3 12 13 Kitchen Master 1000...
Страница 39: ...rs on rock 38...
Страница 40: ...39 or stock...
Страница 41: ...11 40 move...
Страница 42: ...41 nd serve Lemon Ice ices...
Страница 43: ...42 hopped chives...
Страница 44: ...43 e Use when required ght...
Страница 45: ...44 Store i t all ingredients Method Hal garlic...
Страница 46: ...45...