


TASCAM SS-CDR200/SS-R200/SS-R100
15
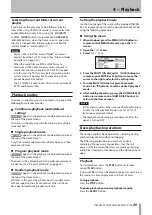
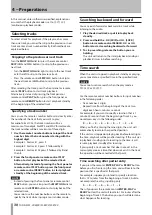
Rear panel
SS-CDR200/SS-R200
SS-R100
g
ANALOG L/R INPUTS (BALANCED)
(SS-CDR200/SS-R200 only)
These balanced analog XLR input connectors have a
nominal input level of +4 dBu.
(1: GND, 2: HOT, 3: COLD)
h
ANALOG L/R INPUTS (UNBALANCED)
These analog RCA pin input jacks have a nominal input
level of −10 dBV.
j
ANALOG L/R OUTPUTS (UNBALANCED)
These analog RCA pin output jacks have a nominal
output level of −10 dBV.
k
ANALOG L/R OUTPUTS (BALANCED)
(SS-CDR200/SS-R200 only)
These balanced analog XLR output jacks have a
nominal output level of +4 dBu.
(1: GND, 2: HOT, 3: COLD)
l
DIGITAL IN (COAXIAL)
This digital input jack accepts inputs in IEC60958-3 (S/
PDIF) and AES3-2003/IEC60958-4 (AES/EBU) formats
(detected automatically).
To link two of these units together, connect the
DIGITAL OUT
jack of the other SS-CDR200/SS-R200/
SS-R100 to this connector. (See “Link playback
connections” on page 38.)
;
DIGITAL OUT (COAXIAL)
This digital output jack can output IEC60958-3 (S/
PDIF) and AES3-2003/IEC60958-4 (AES/EBU) formats
according to the unit’s setting.
To link two of these units together, connect the
DIGITAL IN
jack of the other SS-CDR200/SS-R200/
SS-R100 to this connector. (See “Link playback
connections” on page 38.)
z
CONTROL I/O RS-232C connector
(SS-CDR200/SS-R200 only)
This 9-pin D-sub I/O connector for RS-232C control can
be connected to a computer or other external device.
(See “Using the RS-232C connector” on page 75.)
x
CONTROL I/O PARALLEL connector
(SS-CDR200/SS-R200 only)
25-pin D-sub I/O connector for parallel control can be
used to connect an RC-SS20 (sold separately) or other
external controller.
For pin assignments and other information, see “Using
the parallel connector” on page 75.
c
REMOTE IN connector
Connect the included TASCAM RC-SS2 wired remote
control, which is designed for use with this unit, here.
v
AC IN connector
Connect the included power cord here.
2 − Names and functions of parts


