18
19
Half cylinder
Please note: Ideally, the door with fitting should
be a little thinner than the cylinder body of the
Tapkey Smart Lock, so that the knob does not
scrape on the fitting and operates smoothly.
The cylinder must not project from the fitting
more than 3 mm.
Measure thickness of the door with lock housing.
Ensure that the basic length of the Tapkey Smart
Lock is adapted to the measured thickness.
Remove the old locking cylinder if necessary
(not illustrated).
Carefully remove Tapkey Smart Lock with pre-
assembled outside knob from the packaging.
Align the cam flush with the cylinder body.
Carefully slide Tapkey Smart Lock through
the fitting.
Hold authorised transponder in front of the knob if
necessary, in order to engage the cam and align the
Tapkey Smart Lock.
Fix the Tapkey Smart Lock with the screw as soon
as you feel the correct position.
Check that the knob turns freely without scraping
on the fitting.
Tighten the screw.
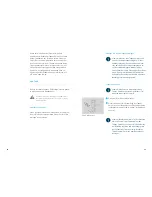
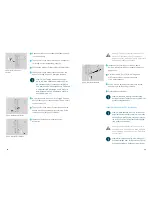
Fig. 15: Measure the thickness
Fig. 16: Align cam
Fig. 17: Fix the Tapkey Smart Lock
COMMISSIONING
If you have installed the Tapkey Smart Lock properly,
you can put the Tapkey Smart Lock into operation.
Please follow the Owner’s Quick Guide enclosed
with the product or watch our instruction video for
self-installation on
tapkey.com/videoguide.
Please note: The registration with the Ow-
ner Card is carried out on each reading knob.
Carry out programming only when the door is
opened so you do not lock yourself out.
Please note: The Tapkey Smart Lock automati-
cally detects transponders upon approaching
the reading knob. In rare cases, environmental
factors in the form of interference fields may
result in the failure of detecting transponders.
Follow the steps below to register the Tapkey Smart
Lock:
› Install Tapkey App
› Sign In
› Set up new lock
› Follow the instructions on the screen
OPERATION
You can now register your Smart Lock with the
Owner Card to your Tapkey Account.
Please note: The Owner Card does not
function as locking media.


