TANDBERG 7000 MXP
12
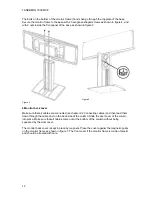
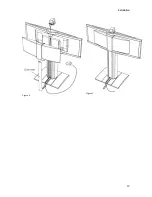
The bolts on the bottom of the monitor frame (front) shall go through the top plate of the base.
Secure the monitor frame to the base with 2 hexagonal-shaped screws as shown in figure 4, and
with 2 nuts inside the front panel of the base as shown in figure 5.
Figure 4
Figure 5
4 Monitor back cover
Make sure that all cables are connected (se chapter 2.2 Connecting cables) and then lead them
down through the cable duct on the back side of the column. Slide the duct cover of the column
into place. Make sure that all cables come out at the bottom of the column without being
squeezed by the duct cover.
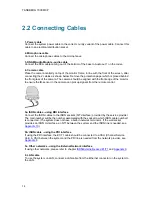
The monitor back cover is kept in place by magnets. Place the cover against the magnetic points
on the monitor frame as shown in figure 7. The front cover if the monitor frame is made of plastic
and should be treated with care.
Содержание 700 MXP
Страница 14: ......
Страница 27: ...Installation 13 Figure 6 Figure 7 ...
Страница 55: ...General Use 41 ...
Страница 140: ...TANDBERG 7000 MXP 126 PC Presentation shown in Wide stretched mode ...
Страница 196: ...TANDBERG 7000 MXP 182 Voice Switched mode ...
Страница 198: ...TANDBERG 7000 MXP 184 4 7 Security Security contains the settings Encryption Encryption Mode Passwords ...
Страница 243: ...Peripheral Equipment 229 All signals are electrically according to RS232 Cable length max 5 meter X21 ...
Страница 249: ...Peripheral Equipment 235 ...
Страница 255: ...Peripheral Equipment 241 ...
Страница 283: ...Glossary 269 Dimensions Front view Side view Rear view Underside view ...
Страница 290: ...TANDBERG 7000 MXP 276 Figure 1 3 Enter the Release key in the Release Key field and press the Install Software button ...
Страница 295: ...Glossary 281 6 16 Appendix 16 Declaration of Conformity ...
Страница 296: ...TANDBERG 7000 MXP 282 6 17 Appendix 17 Dimensions ...

