


3–11
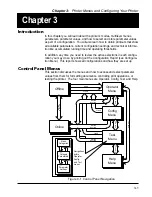
Chapter 3: Printer Menus and Configuring Your Printer
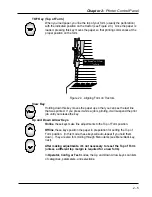
sure the paper is feeding correctly. When you are ready, depress the Clear
key to clear the fault condition, then place the printer Online and continue
printing.
If Print to EOF is OFF, you have two options:
Option 1: Load a new supply of paper into the printer. After paper has been
loaded, set the correct top-of-form location and check for proper paper feed.
When you are ready, depress the Clear key to clear the fault condition, then
place the printer Online and continue printing.
The printer will start printing where it left off, which may cause im-
proper form and print location alignment.
Option 2: Depress the Enter key. The printer prints to the end of the current
form, then the display reads Paper Out and the FAULT Indicator illuminates. At
this point you may load more paper on the printer. After loading paper, set the
correct top-of-form location and check for proper paper feeding. When you are
ready, depress the Clear key to clear the fault condition, then place the printer
Online and continue printing.
The Paper Out Sensor will not work unless the Top-Of-Form location
has been set properly (see Chapter 2).
Quick Access
This feature provides a way for the printer to position printed forms for quick tear-
off access. When Quick Access is enabled, the paper is moved to the tear posi-
tion by pressing the Enter key. If the printer is online and the current print job is
finished, pressing the Enter key will move the paper to the tear position and the
Quick Access Timeout will start. New print jobs will not start printing until the
timeout has expired and the paper has automatically moved to the next available
top of form. (This typically results in a blank form separating the next-to-print form
from the previously printed form.) Alternatively, the printer may first be placed
Offline before pressing the Enter key. Placing the printer back online will align the
paper as described above and printing will resume as soon as data is received.
The default option for the Quick Access parameter is Disabled. The distance that
the paper is ejected is set with the Eject Distance parameter (below). The delay
interval between print jobs is set with the Eject Delay parameter (below).
Eject Distance
The Eject Distance parameter allows you to select the distance at which the pa-
per ejects during a Quick Access operation. The units are in tenths of an inch,
from 0.0 to 25.5; the default is 12.2 inches.
Eject Delay
This parameter specifies the timeout interval in seconds (after which printing will
resume) when Quick Access is Enabled while the printer is Online. The default is
30 seconds.
Содержание T6212
Страница 10: ...Operator Manual TOC 8 Blank Page...
Страница 28: ...Operator Manual 1 16 Blank Page...
Страница 36: ...Operator Manual 2 8 Blank Page...
Страница 78: ...Operator Manual 3 42 Blank Page...
Страница 92: ...Operator Manual S 8 Blank Page...