TallyGenicom T6212 Скачать руководство пользователя страница 14

Operator  Manual

1–2

Unpacking  your  printer

Instructions for unpacking your printer are located on the outside of the
shipping container.  After you have removed your printer from its
container, store the shipping materials for possible later use.

Repacking

Repacking your printer for storage or shipping is the reverse order of
unpacking.  If shipping materials are needed, you can reorder them from
your  dealer.

Reversible  Doors

Both front and back doors may be installed to open either left or right:

Figure 1-1. Reversible Doors

Removing  the  Shipping  Hardware

The Shipping Hardware consists of 4 screws, identified by red tags, that
secure the printer base to the inside mechanism, tie restraints that
secure the Paper Stacking Chains to the Wire Exit Rack inside the back
door of the printer, and a rubber band holding the platen open.

DO NOT power up your printer before removing the
shipping hardware.

CAREFUL!

Содержание T6212

Страница 1: ...T6200 Series Line Printer Operator Manual Serial Parallel Twinax Coax TCP IP Including IPDS A PRODUCT FROM TALLYGENICOM...

Страница 2: ...ot installed and used in accordance with the instruction manual may cause harmful interference to radio communications Operation of this equipment in a residential area is likely to cause harmful inte...

Страница 3: ...Paper Stacking Chains 1 3 Interface Connections and Powering Up 1 4 Interface Connectors 1 4 Maximum Interface Cable Length 1 4 Serial Parallel only 1 4 Twinax 1 4 Coax 1 4 Figure 1 4 Serial Parallel...

Страница 4: ...2 Figure 1 15 Paper Box Placement and Paper Path 1 13 Figure 1 16 Column Alignment Scale 1 14 Let s Check 1 15 Chapter 2 2 1 Introduction 2 1 Control Panel Components 2 1 Figure 2 1 Control Panel 2 1...

Страница 5: ...isplays only if IPDS is installed 3 6 Ser Par Character Set 3 6 Matrix 3 7 OCRA Density 3 7 Ser Par Style 3 7 Tx Cx Style 3 8 IPDS Style 3 8 CPI 3 8 Panel Language 3 8 OCR Standards 3 8 Slashed Zero 3...

Страница 6: ...7 Coax Interface 3 17 IPDS Option 3 17 IO Hold Time 3 17 Report 3 18 Current Config 3 18 All Configs 3 18 Configs 1 10 3 18 Calibrations 3 18 Ribbon Count 3 18 Last Fault 3 18 Fault Log 3 18 Version 3...

Страница 7: ...ale 3 25 Zero 3 25 SFCC 3 25 Special Function Command Character SFCC 3 25 Code V Language 3 25 Free Format 3 25 Automatic PY 3 26 MTPL Bar 3 26 Secured 3 26 IGPTerminator 3 26 BlkMax H 3 26 BlkMax V 3...

Страница 8: ...ategory 3 34 Send PA Coax Only 3 34 Address Twinax Only 3 34 SPD Coax Only 3 34 SCD Twinax Only 3 34 SLD 3 34 Host Font Style Twinax Only 3 35 Screen Size Screen Coax Only 3 35 Case Coax Only 3 35 Com...

Страница 9: ...de Category 3 40 Paper Motion 3 40 Diag Category 3 41 Cal Paper Calibrate Paper Out 3 41 Help Menu 3 41 Appendix A A 1 Introduction A 1 Messages A 1 Faults A 1 Fault Correction Procedure A 1 Table A 1...

Страница 10: ...Operator Manual TOC 8 Blank Page...

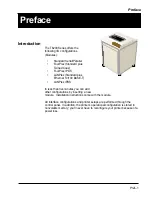
Страница 11: ...0 BASE T LANPlex IPDS In less than five minutes you can add other configurations by inserting a new module Installation instructions come with the module All interface configurations and printer setup...

Страница 12: ...Chapter 3 Printer Menus and Configuring Your Printer Chapter 3 explains the different menus that are available on your printer and all of the parameters contained in them It also presents Menu Tutori...

Страница 13: ...n windows heaters nor in other areas where the temperature changes abruptly The relative humidity should be between 10 and 90 noncondensing Be sure to locate the printer away from any sources of moist...

Страница 14: ...rials are needed you can reorder them from your dealer Reversible Doors Both front and back doors may be installed to open either left or right Figure 1 1 Reversible Doors Removing the Shipping Hardwa...

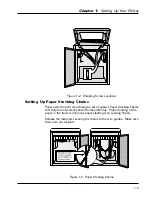
Страница 15: ...print area through a set of passive Paper Stacking Chains that help fold and stack printed forms uniformly Proper loading of the paper in the tractors improves paper stacking see Loading Paper Releas...

Страница 16: ...erface or 6 feet 2 meters for parallel interfaces Communication distances farther than these can cause data transmission problems and printing errors Twinax TheTwinax interface allows a maximum of 5 0...

Страница 17: ...ing theTwinax cable s Verify that the printer address matches the one given it on the host and that no addresses are duplicated anywhere on the line You can check the address of the printer by accessi...

Страница 18: ...figuration correct for the type of printer being emulated Is the cable to the device immediately up cable on theTwinax line correctly connected Are the devices down cable functioning properly Is the l...

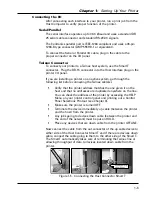
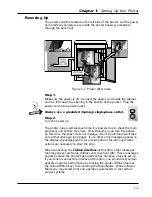
Страница 19: ...r errors Note that when you turn the printer on this time the Paper Out error displays Don t be alarmed we ll take care of that when we load paper If any other error message appears in the display che...

Страница 20: ...past the print mechanism and through the printer Figure 1 8 Paper System Components Tractor Sets Your printer has two tractors to control paper movement located above the print area A lever on each t...

Страница 21: ...see chapter 2 When loading paper with a changed thickness adjust the wheel until it s snug against the form but not too tight Run a print test and adjust the platen gap wheel to obtain optimum print q...

Страница 22: ...r The PaperTension Lever controls the vertical tension between the upper and lower sets of tractors Figure 1 11 PaperTension Lever Paper tension can affect your print quality Raising and lowering the...

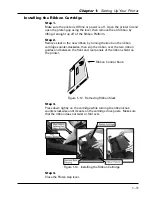
Страница 23: ...on cartridge counter clockwise then slip the ribbon over the two ribbon guides and between the front and rear panels of the ribbon shield on the printer Figure 1 12 Removing Ribbon Slack Step 3 Press...

Страница 24: ...Figure 1 14 Paper Size Specifications Form Characteristics MinimumFormWidth A 2 50in 64mm MaximumFormWidth A 18 00in 457mm HorizontalFormAdjustment C WithoutHorizontalVernier Minimum 0 16in 4 1mm Maxi...

Страница 25: ...he paper can be pulled out freely then place the new box of paper under the printer Figure 1 15 Paper Box Placement and Paper Path Step 3 Raise the printer lid and open the doors on all of the tractor...

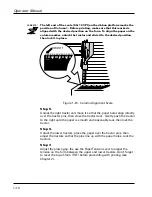
Страница 26: ...ctor and move it so that the paper holes align directly over the tractor pins then close the tractor door Gently push the tractor to the right until the paper is smooth and reasonably taut then lock t...

Страница 27: ...rizontally or vertically The tractors are feeding correctly The paper is properly routed through the print mechanism and between the Paper Stacking Chains Make sure that the Paper Stacking Chains are...

Страница 28: ...Operator Manual 1 16 Blank Page...

Страница 29: ...ure 2 1 Control Panel LED Indicators The green POWER Indicator illuminates whenever there is power to the printer The red FAULT Indicator illuminates whenever an error or fault is detected A message a...

Страница 30: ...tion this area displays Online Offline or a fault message If you re using the printer menu the menu category or parameter items display here as well Options The Options appear in positions 1 15 of the...

Страница 31: ...en Impact Weight is on Auto or set to is on Auto ot set to Normal to Medium H Paper Weight is set to The platen is in the Normal Heavy Impact zone when Impact is on Auto or set to Normal h The platen...

Страница 32: ...the command and maintains the Top of Form position While in a Fault Condition Paper advances one line No data is printed and the Top of Form position moves down one line This allows the use of the LF...

Страница 33: ...can see the last line that was printed If you press it while a job is printing it will suspend the print job until you release the key Up and Down Arrow Keys Online these keys make fine adjustments t...

Страница 34: ...condition the fault clears upon pressing the Clear key If it s not in a clearable fault condition pressing the Clear key brings up the Clear menu In Operator Config Test or Help menus pressing this ke...

Страница 35: ...in NonSCS mode Clear Reprint Coax only This allows you to reprint the previous buffer contents After reprinting the buffer the printer returns to Enable Print condition and continues printing the res...

Страница 36: ...Operator Manual 2 8 Blank Page...

Страница 37: ...you may do so by printing out the Configuration Report see Configura tion Menu This report shows all configurations and how they are set up Control Panel Menus This section discusses the menus and ho...

Страница 38: ...Menus Now you are ready to learn how to access menus Here are some things to remember You must first be in Offline state to access menus The Online Offline key takes the printer Online and Offline All...

Страница 39: ...ept for Help has multiple levels of categories selec tions and parameters You access them by scrolling through the lists with the Up and Down arrows and by pressing Enter when you see the category par...

Страница 40: ...e Clear key to leave Menu Mode and remain Offline Depress the Online Offline key to leave Menu Mode and return the printer to Online How to Print a Control Panel Selections Report The organization of...

Страница 41: ...ons are IRV US German Norwegian Dan French UK Spanish Swedish Finish Italian Japanese Portuguese Canadian Hungarian Chinese French T6 Swedish T6 Italian T6 Canadian Alt Swedish Basic French Withdrwn N...

Страница 42: ...attached to the Parallel Serial and LAN ports except for IPDS over LAN The default depends on the following Emulations DefaultCharacterSet TallyANSI P600 P6000 P5000 Latin18859 1 IBMProprinter MTPL G...

Страница 43: ...hrough the Control Panel or via an escape sequence from the host computer that is not available in Constant Density Mode the printer will automatically switch to Enhanced Mode for printer output OCRA...

Страница 44: ...uage The possible selections are English default German French Italian Swedish Finish and Spanish OCR Standards This parameter defines the combination of ANSI and DIN standards to be used for the OCR...

Страница 45: ...Margin This parameter allows you to set the bottom margin The Bottom Margin is measured in lines from the current Top of Form location The range is 0 to 255 with the default at 66 IPDS In the IPDS em...

Страница 46: ...PI characters per inch setting there will be no current setting indicator asterisk Horz Adjust The print position on the form may be adjusted horizontally in increments of 1 30th an inch The default o...

Страница 47: ...printer to position printed forms for quick tear off access When Quick Access is enabled the paper is moved to the tear posi tion by pressing the Enter key If the printer is online and the current pr...

Страница 48: ...the platen gap sensor tells the printer The Slew Speed varies from 25 IPS to 40 IPS depending on the Paper Weight setting Hammer Paper Slew Parameters Selection Impulse Moves Speed Impact High Thump N...

Страница 49: ...he selections are Enabled and Disabled default The Ribbon Monitor feature helps the printer operator determine when to replace ribbons for optimum and consistent print quality It works by counting the...

Страница 50: ...nt with the Clear Menu Ribbon Count option The printer can then be placed back online and printing will resume If the printing application is particularly heavy it may be necessary to decrease the thr...

Страница 51: ...nel You can select which VFU Channel is designated as the Vertical Tab Channel This parameter applies only to the emulations which makes explicit use of the VFU channels Selections are 1 12 and Unused...

Страница 52: ...through the Printer Control Panel emulation dependent parameters in the Current and Powerup configurations are changed to match the default settings for the selected emulation The following table list...

Страница 53: ...decimal code format in one column and ASCII equivalents in another column Style2 Only control codes are printed in hexadecimal format ASCII characters are printed as is and escape sequences force a ne...

Страница 54: ...Calibrations Produces a printed report of the printer calibration settings The report con tains a header which identifies the installed software and interface and statis tics for time powered on time...

Страница 55: ...eturn moves print location to the left margin when it receives either a Line Feed or Vertical Tab Control Code OFF is the default value The default value is dependent on the emula tion see Emulate und...

Страница 56: ...the same technique used with the bold character attribute selected via emulation escape sequences Form Feed at TOF This parameter dictates how the printer will respond to a Form Feed Control Code rece...

Страница 57: ...wnload or VFU download Selections are 0 255 referring to the decimal value of any 8 bit character or OFF Default is OFF Sub Char From This parameter allows you to select a character that will be repla...

Страница 58: ...lected This parameter allows SI SO operation for bar codes and oversize characters When Disabled default bar code and oversize character modes do not need to be activated with SO and deactivated with...

Страница 59: ...All but the terminator is ignored Free Format Depends on the state for Free Format Mode PN Then This command defines printer response to characters following the PN Com mand on the same line None All...

Страница 60: ...s this parameter also applies to MT660 and Printronix style graphics It does not apply to text following Epson or Proprinter graphics Figure 3 2 Modplot Example Version This parameter controls the ver...

Страница 61: ...signators for ASCII characters PGL Special Function Command Character SFCC This parameter allows you to change the SFCC The Default for this parameter is the ASCII tilde Decimal 126 HEX 7E character S...

Страница 62: ...inated with a carriage return and line feed BlkMaxH BlkMaxV BlkMinH BlkMinV These four parameters provide the ability to create block characters using FreeType fonts However the user may find that ver...

Страница 63: ...tion you save can be tagged with a label of up to 15 characters When you first receive your printer each label is a generic CONFIG followed by a number 1 through 10 See How to Save Configurations next...

Страница 64: ...r is used to set 15 character labels for each configuration slot How to label a configuration slot 1 Make sure the printer is Offline 2 Press the Menu Back key to enter Menu mode 3 Use the Up and Down...

Страница 65: ...or even Default is None The printer must match the parity of the host computer 8th Bit If 8 bits per byte is selected under Data Bits above you use this parameter to determine how the 8th bit is to b...

Страница 66: ...rinter can transmit The bit pattern is as follows Bit Meaning Value 7 Parity if 7 bit data and parity enabled MSB 6 Always a 1 5 1 if Data Overrun 4 Always a 0 3 1 if Parity Error 2 1 if Paper System...

Страница 67: ...s powered up This DTR Selection will not interfere with host reception of the Xoff Xon Serial Protocol because unlike the Busy selection the DTR Signal is not toggled at the same time as the Xoff Sign...

Страница 68: ...controls the bidirectional operation of the Parallel interface The default selection is ON enabled When ON the Parallel interface operates in IEEE 1284 Bidirectional Nibble Mode This mode enables fea...

Страница 69: ...ving to touch an otherwise well working host system Intellifilter permits users to free their systems from hard coded dependence on a specific printer that is no longer maintainable or able to meet th...

Страница 70: ...inute window for one of the PA options to be selected If the correct PA option is not selected during this time the display clears the audible alarm stops and the printer sends a No PA Key message to...

Страница 71: ...determines the printer response to a CR Command located at the right margin plus one character position If OFF the printer performs only a CR and starts printing over the same line again without adva...

Страница 72: ...t byte in the print data and the current print position is not already at Column 1 the printer performs an NL function at the end of the print job If ON the printer performs an FF function after each...

Страница 73: ...AVM The Graphics AVM panel menu setup option only applies to the manner in which the Twinax AVM command is handled within a Code V PGL or Hex Pass Through graphics job ATx Cx Absolute Vertical Move A...

Страница 74: ...th the selection of bar code density used by Code V and PGL Normal vs Dark The densities will be set based on the previous Dark Bar selection table Smooth Size This parameter defines the character siz...

Страница 75: ...OCTET 2 0 255 IP OCTET 3 0 255 IP OCTET 4 0 255 Gateway This options allows you to set the four OCTETS of the Gateway Category Parameter IP OCTET 1 0 255 IP OCTET 2 0 255 IP OCTET 3 0 255 IP OCTET 4 0...

Страница 76: ...uppercase characters followed by 69 spaces ECMA A pattern specified by the European Computer Manufac turers Association Used for acoustic testing Columns Number of columns on the line based on margin...

Страница 77: ...initiate a series of messages instruct ing the operator to calibrate the detection sensor Remove the paper from the printer close the tractor door and press Enter A numeric value will be displayed br...

Страница 78: ...Operator Manual 3 42 Blank Page...

Страница 79: ...to other parts may result If the fault message returns perform the required corrective action If a nondestructive fault occurs in the middle of printing a document one line of text may be lost after...

Страница 80: ...n Ctrl Fault Explanation This message indicates that a fatal fault has occurred in the control processor Corrective Action Call your Customer Service Representative for repair Ctrl Link Flt Explanatio...

Страница 81: ...r Key If the message does not clear cycle printer power If the message still does not clear call your Customer Service Representative for repair Offline Data In Explanation The printer is in Offline c...

Страница 82: ...st If the condition repeats set up the printer for Dump Mode see Configuration Menu Section in Chapter 3 and retransmit the data again If you find no errors in the Dump Mode data call your Customer Se...

Страница 83: ...lt message is displayed Corrective Action Depress the Clear key then put the printer back Online If this doesn t work turn the power switch off then back on again If the error condition persists after...

Страница 84: ...e printed characters in one line are shorter than normal Vertical paper tension is too loose Move the Paper Tension Lever until the paper is taut but not too tight The paper holes are elongated after...

Страница 85: ...two modes Constant Density Fonts CDF and Enhanced Constant Density Fonts print at the same dot density regardless of the CPI This produces consistent print speed even when changing from one CPI to an...

Страница 86: ...s Hr Draft 70 266 62 000 49 600 ECMA 132 Pages Per Hour 2 Letter Performance 10 CPI Draft 1864 1645 1316 3 Letter Performance 10 CPI NLQ 878 775 620 4 Letter Endurance 10 CPI NLQ 884 780 624 5 Spreads...

Страница 87: ...ferent type styles Gothic Courier Data Processing and Draft The ANSI and DIN characters can only be used with the OCR A and OCR B type styles and are selectable in four combinations through the Printe...

Страница 88: ...Maintenance This printer is designed to eliminate the requirement of scheduled mainte nance procedures such as alignment adjustment or lubrication Preventive maintenance is limited to periodic cleani...

Страница 89: ...48 meters Thermal Shock 61 F 20 C per hour Vibration Units meet NSTA National Safe Transit Association requirements Heat Load Contribution The average heat load contribution to the environment is appr...

Страница 90: ...Operator Manual S 6 28 8 in 731 5 mm 40 0 in 1016 0 mm 28 3 in 718 8 mm 62 2 in 1579 9 mm Back and Front View Top View Side View Printer Dimensions Figure S 1 Physical Dimensions...

Страница 91: ...61000 4 4 Surge EN 61000 4 5 RF CM EN 61000 4 6 PF MF EN 61000 4 8 V Dips Int EN 61000 4 11 Energy Conservation ENERGY STAR compliant Safety IEC 60950 1991plus Amendment 1 2 3 and 4 and National Devi...

Страница 92: ...Operator Manual S 8 Blank Page...

Отзывы: