

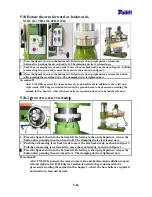


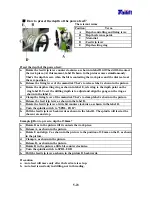


5-24
5.12.2
(
For TPR-1600H/ TPR-2000H
)
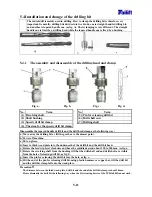
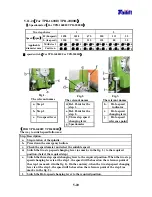
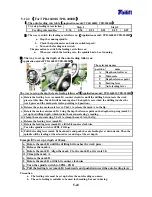
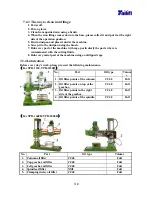
Ⅰ
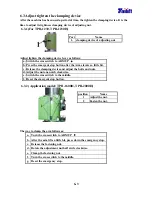
.The auto feeding rate table
(
Application model: TPR-1600H/ TPR-2000H
)
Two step feeding rate selection
Step 1
Step 2
Feeding rate
mm/Rev
0.96 0.56 0.31 0.21 0.12 0.07
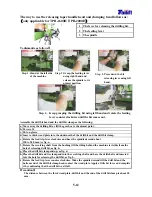
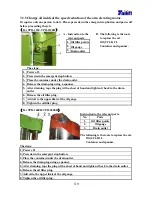
Ⅱ
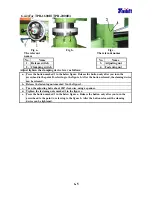
. The way to switch the feeding rate follows as:
(
Application model: TPR-1600H/ TPR-2000H
)
a. Stop the running spindle.
b. Check the speedometer and select a suitable speed.
c. Turn on the feeding rate switch.
The precaution to switch the feeding rate follows as:
a.
When you switch the feeding rate, the spindle has to be at running.
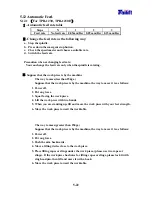
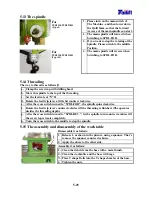
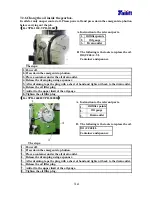
Ⅲ
. The way to set up the depth of the auto feeding follows as:
(
Application model:TPR-1600H /TPR-2000H
)
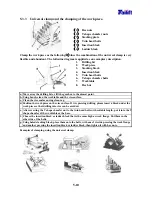
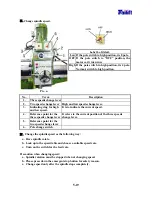
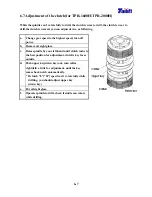
The relevant names
position name
A
Depth control lever
B Main
scale
C
Depth reference point
D Feeding
lever
E
Auto feeding lever
The way to set up the depth of auto feeding follows as
:(
Application model: TPR-1600H/ TPR-2000H
)
a. Rotate the feeding lever (as mark D) counter clockwise until the drilling bit contacts the work
piece (at this time, Mark B will be turning also. The depth is zero when the drilling touches the
work piece and the main scale is also pointing to 0 position.)
b. Release those two main scale levers. That’s to release the mark A in the fig.
c. Rotate the main scale (mark B). Using the depth reference point on the depth setup ring (mark C),
set up the drilling depth, which is also the main scale ring’s reading.
d. Clamp the main scale ring. That’s to clamp the mark A in the fig.
e. Release the feeding lever (mark D)
f. Rotate the feeding lever (mark D) a little bit counter clockwise.
g. Turn the spindle switch to SPDL. FOR.
。
h. Pull the feeding lever (mark D) backwards and push the auto feeding lever downwards. Then the
spindle will be feeding at the selected rate and stop at the set depth.
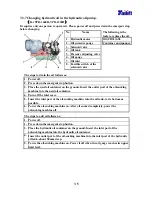
Example
:
To set up a depth of 30 mm.
a. Rotate the mark D until the drilling bit touches the work piece.
b. Release the mark A.
c. Rotate the mark B. Align the mark C to the mark B, at its scale 30.
d. Clamp the mark A.
e. Release the mark D.
f. Rotate the mark D a little bit counter clockwise.
g. Turn the spindle switch to SPDL. FOR
h. Pull the feeding lever (mark D) backwards and push downward the auto feeding lever.
Precaution
a. The feeding rate must be set up before the auto feeding can move.
b. The auto feeding is suitable to be used in threading, but not in boring.
Содержание TPR1230
Страница 1: ...D E C 0 0 5 0 4 TAILIFT LTD 2006 RADIAL DRILLS TPR1230 TPR1230H TPR1600H TPR2000H Operation Manual...
Страница 11: ...1 6 z Gearbox For TPR 1230 TPR 1230H For TPR 1600H TPR 2000H z Hydraulic oil pump...
Страница 32: ...5 3 5 1 2 For TPR 1600H For TPR 2000H The front view of the machine The rear view of the machine...
Страница 74: ...9 4 9 4 Electrical circuit diagram For TPR 2000H CE Standard...
Страница 83: ...9 13 9 9 Electrical circuit diagram For TPR 1230 Standard...
Страница 84: ...9 14 9 10 Electrical circuit diagram For TPR 1230H Standard...
Страница 85: ...9 15 9 11 Electrical circuit diagram For TPR 1600H TPR 2000H Standard...


