


13
Jupiter
6408 216th Street SW
|
Mountlake Terrace, WA 98043 USA
T
+1.425.778.7728
F
+1.425.778.7727
|
www.symetrix.co
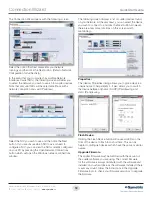
Network Configuration
Jupiter is setup and controlled by a host computer via
Ethernet. This requires the host computer to be connected
to Jupiter directly via a standard CAT5 Ethernet cable,
indirectly via an Ethernet switch, or via an existing Ethernet
network.
The primary difference between the three methods of
connection is that in the first two, the Jupiter software
assumes there is no DHCP server or other network
infrastructure in place. It assumes Jupiter is using a self-
generated IP address and adjusts its connection steps
appropriately. In the third method, it is assumed that a
DHCP server and/or router with DHCP server are already
present on the existing network so Jupiter may already have
obtained an IP address. Consult your network administrator
if in doubt.
General Notes
1. The Jupiter boots up with DHCP enabled by default. This
means that as soon as you connect it to a network, it will
look for a DHCP server in order to obtain an IP address.
If a DHCP server is present, Jupiter will get its IP address
from it. This process may take several minutes. With your
PC attached to the same network and thus getting its IP
address from the same DHCP server, all will be ready to
go.
2. If your network does not have a DHCP server, Jupiter
will not be able to obtain an IP address. While waiting,
Jupiter will default to a private IP address in the range
of 169.254.x.x where x.x is the last four alphanumeric
characters of Jupiter’s MAC address (MAC address
hex value is converted to decimal for IP address). The
Jupiter’s MAC address can be found on a sticker on
the bottom of Jupiter. When there is no DHCP server
present to assign IP addresses to either Jupiter or your
PC, you may need to configure your PC with a static
IP in the range of 169.254.x.x with a Subnet Mask of
255.255.0.0 in order to communicate with Jupiter in a
direct connect mode. However, if your PC is using the
default network settings, it should also have automatically
self-assigned a similar private IP address in the range of
169.254.x.x, and if this is the case, you should be able
to connect to Jupiter directly. Even if the PC’s default
settings have been changed, Jupiter will try to establish
communications by setting up appropriate routing table
entries to reach devices with 169.254.x.x addresses.
3. In the case of the first two methods (direct connection
and indirect connection), the Jupiter software will
attempt to set-up appropriate routing table entries for
a seamless connection regardless of the IP addresses
of your PC and Jupiter. However, under Windows®
Vista or higher, administrative privileges are required to
allow the Jupiter software to modify the routing table.
For best results, launch the Jupiter software while
logged in as an administrator, or choose to run the
software as an administrator.
Note:
To run a program
as the Administrator under Vista or higher, right click
on the program’s icon or shortcut and choose “Run as
administrator”.
Network configuration of Jupiter:
Connecting to Jupiter from a host computer on the
same LAN
Both Jupiter and the host computer require the following
3 items:
1. IP Address - The unique address of a node on a network.
2. Subnet Mask - Configuration that defines which IP
Addresses are included in a particular subnet.
3. Default Gateway (optional) - The IP address of a device
that routes traffic from one subnet to another. (This is
only needed when the PC and Jupiter are on different
subnets).
If you are putting Jupiter on an existing network, a network
administrator will be able to provide the above information or
it may have been provided automatically by a DHCP server.
For security reasons, it is not recommended to put Jupiter
directly on the Internet. If you do, a network administrator
or your Internet Service Provider can provide the above
information.
Jupiter Networking
Содержание Jupiter 12
Страница 1: ...Jupiter 4 Jupiter 8 Jupiter 12 Quick Start Guide ...
Страница 2: ......


