


GB.COMPACTAHSK.210520
Registered design. The company reserves the right to make design changes without prior notice.
42 www.swegon.com
17 MAINTENANCE
Warning
Before carrying out any work, make sure that the
power supply to the unit has been isolated.
17.1 Filter Change
The filters should be changed when the filter alarm has
been activated.
Order new filters from Swegon or its representative!
Specify the type of air handling unit and whether the
change of filters involves one or two directions of airflow.
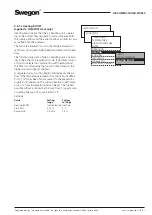
17.1.1 To remove the Filters
Pull out the handles to free the filters from the filter hold-
er. Withdraw the filters.
It is advisable to clean inside the filter space while the
filters are gone.
17.1.2 To fit new filters
Insert the filters into the filter holder.
Insert the filters as far as possible into the unit and press
lightly on the filter frames, so that they will fit tightly.
Push in the handles (A) so that the filters are clamped in
place in the filter holder.
Carry out a filter calibration as described in Section 7.4.2.
17.2 Cleaning and Inspection
17.2.1 General
Clean the interior of the air handling unit as the need
arises.
Inspect the air handling unit thoroughly at the same time
that you replace the filters or at least twice a year.
17.2.2 Filter Space
Cleaning is most appropriate when you change the filters.
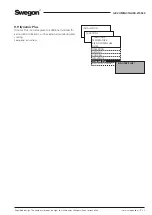
17.2.3 Heat exchangers
Check at least twice a year whether cleaning is necessary.
The cleaning work is carried out from the filter space.
The heat exchanger should preferably be cleaned by
vacuum cleaning with a soft nozzle to prevent damaging
the air passages in the rotor.
Turn the rotor by hand to enable you to vacuum clean its
entire surface.
If the heat exchanger is substantially fouled, it can be
blown clean with compressed air.
If necessary, the heat exchanger can be withdrawn from
the unit casing and washed with degreasing solvent. Only
service personnel trained by Swegon shall be permitted to
use this cleaning method.
FABRIC SEAL
Lift up the fabric seal and inspect its underside. Clean if
needed by brushing or vacuum cleaning.
If the fabric seal is worn or substantially fouled, it should
be replaced. Do not lubricate it!
BELT TENSION
Replace the drive belt if it feels loose or worn and slightly
slips if it meets resistance. Contact service personnel
trained by Swegon!
172.4 Fans and Fan Space
Inspect and clean the fan impellers to remove possible dirt
deposits.
Check the impeller to make sure that it is not out of bal-
ance.
Clean or brush off the fan motor. It can also be cleaned by
carefully wiping it with a damp cloth that has been dipped
in a solution of water and dishwashing detergent.
Clean the fan space, if needed.
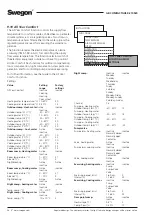
17.3 Performance Checks
General performance checks should be carried out in con-
junction with filter change or at least once a year.
It is then appropriate to compare the current performance
values of the unit with the Commissioning Record. Even-
tual deviations should be remedied.
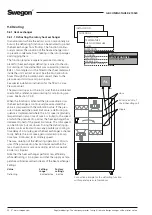
17.4 Damper Actuator for the Change-over
Damper
Normally the damper actuator of the change-over damper
does not require cleaning or maintenance. If in spite of
this, access to the damper actuator is required, for exam-
ple for checking that it operates correctly or replacement,
see the description below.
1. Remove the four screws that hold the front grille of the
lower section. Use a 6 mm Allen wrench. The screws are
located within the outer holes in the corners.
2. Remove the three screws that hold the profiled section in
front of the cover plate, see illustration.
3. Remove the seven screws that hold the cover plate and
dismantle it, see illustration.
4. The valve actuator is now accessible.
2. Reassemble in the reverse order.
Screws for profiled section
Profiled section
Cover Plate
Screws for cover plate


