


Hard Drive)
The hard drive is where
the DVR will save footage. It’s the same
kind of hard drive you’ll fi nd in most
desktop computers.
Hard Drive Caddy)
To protect the
hard drive and to make installation
and transport easier, the hard drive
is mounted in the hard drive caddy.
Note that whilst the caddy offers some
protection, hard drives are still quite
fragile - exercise care at all times!
Screen Controls)
The basic controls
for adjusting the settings on the screen.
Note that these controls will ONLY
affect the screen, and not the way that
the DVR records or displays footage.
ON/OFF:
Turns the screen (but not the
DVR) on and off. This is useful if you
want to turn off the screen (a good way
to save power) but leave the DVR itself
on.
MENU:
Opens the Screen Setup Menu.
Here you can alter the Brightness,
Contrast and Saturation settings.
Brightness:
Alters how bright the screen
is.
Contrast:
Sets the dynamic range - that
is, the difference in intensity between
the darkest black and the whitest
white.
Saturation:
How much color there is in
your images.
UP/DOWN:
Used to navigate the screen
menu.
I/O Cable)
The I/O cable connects to
the External I/O port, located on the
connection panel (see page 9). Do not
twist, bend, pull or tug on this cable!
Connection Panel)
The business side
of the DVR. This is where you’ll connect
your cameras and other input devices
(via the I/O cable), as well as where you’ll
fi nd the LAN, USB and audio/video out
connections. Power is connected here.
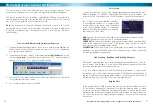
Layout
8
Hard Drive
in Caddy
Screen Controls
Screen
Connection Panel
(detail on page 9)
I/O Cable
NetViewer - Setup
61
In the SETUP you can change the camera record settings. You can turn each channel
on or off, select the recording resolution & quality, turn on or off the audio, select
a record mode and set up the record schedule. Note that you must be logged in
using the ADMINISTRATOR password to be able to change options.
Most of the options that you will fi nd here operate in exactly the same manner
as on your DVR. However, as this software can be used to control a few different
models of DVR, occasionally an option will be displayed which has no effect on your
DVR. Don’t worry about these settings - they won’t interfere with the operation
of your DVR.
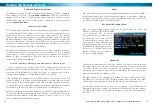
Setup: Record
Here you’ll fi nd the same options
as the Record Options menu in the
DVR. You can change the resolution
and quality settings, enable and
disable audio as well as change the
record mode for each channel.
Also accessible from here is the
RECORDING SCHEDULE, which
operates and can be edited in the
same way as the schedule in the
DVR.
Setup: Host Info
Here you’ll be able to fi nd
information about your setup.
You’ll be able to see how much
space remains on your hard drive,
represented in both GB remaining
and hours of footage at your current
record settings. Also, if you need to
know what version of the software
you’re running, this screen will tell
you. Finally, the MAC Address of the
DVR is also found here, if required.


