14
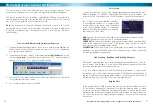
The main display windows showing
1.
channels 1 and 3
. The highlighted
portion of the image is the channel
identifi cation tag which in this case
is set to the default value of “CHx”
where “x” is the number of the
channel in question.
The display windows showing
2.
channels 2 and 4
. These are labeled
as their counterparts 1 and 3.
The
3.
current time and date
are
displayed at the top of the screen.
This will be the date stamp applied
to all recordings. If this is incorrect,
you’ll need to set the time and date
in the DVR to their correct values
(see page 41).
2
1
3
Starting the DVR
Once the DVR has been connected to
power, switch it on by using the power
switch on the side panel. The DVR takes
approximately 45 seconds to boot up,
during which time the image to the right
will be displayed.
The default mode of the DVR is live-viewing mode. This is the mode which monitors
the images coming from your cameras in real-time, and allows you to confi gure
your recording and channel options. The DVR automatically starts in live-viewing
mode, with quad-view enabled, as shown below.
55
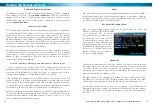
10. Here, you’ll need to enter the relevant information for connecting to your DVR. These
are:
Your
•
username
and
password
. Specifi cally, these are the ones entered
in the Setting up the DVR for Mobile Access above.
Server address
•
. If your ISP provides static IP addresses, then the server
address you’ll need is your public IP address.
The
•
port
that the DVR has been confi gured to use for mobile access.
Again, this is the port that you selected in the Mobile Device setup on
the DVR.
Choose a channel
•
from 1 through 4 – as mobile devices have limited
bandwidth, the DVR4-5600 will only stream one channel at a time.
To choose another channel, reconnect. As the software is designed to
function with multiple DVR systems, it will display up to 16 channels,
only four of which will interface with the DVR4-5600.
11. Then, click
Connect
.
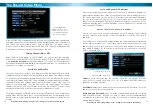
12. Standard playback controls and PTZ features (if applicable) are located across the bottom of
the playback window.
Accessing the DVR4-5600 from a Mobile device running Windows Mobile
You’ll need the mini-CD which came with the DVR4-5600, as that contains the software
you’ll need to install on the
Microsoft Windows Mobile
®
based mobile.
Insert the mini-CD into your computer.
1.
Attach your mobile device to your computer. Depending on your specifi c mobile device,
2.
it may be connected via USB, Bluetooth, FireWire or other method. If you’re unsure,
consult your mobile device manufacturer’s documentation.
Locate the fi le on the mini-CD called
3.
AMPLAYERSETUP-ENGLISH.CAB
. It is located in the
folder called
MobileActiceX\Windows
.
Copy
4.
AMPLAYERSETUP-ENGLISH.CAB
to the
PROGRAMS
folder on your mobile
device.
Disconnect the mobile device from your computer. Remember to use the
5.
Safely Remove
Hardware
option, if applicable.
Using your mobile device, execute the
6.
AMPLAYERSETUP-ENGLISH.CAB
fi le. Follow the
prompts to complete the installation.
Once installation is complete, open the
7.
Start Menu
.
Run the program called
8.
QQeye
.
Click the button labeled
9.
Setting
located near the top of the main interface.
Left:
The main viewing interface of
QQEye
. The viewing controls
are located across the bottom
of the screen.
Right:
The
Settings
screen, where
you can enter the address
and user information for
your DVR.


