5-20
S
UPER
S
ERVER 6017R-TDLF User's Manual
5-10 Onboard Indicators
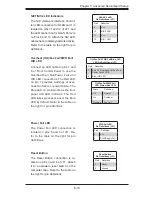
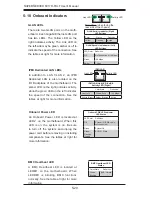
GLAN LEDs
There are two GLAN ports on the moth-
erboard. Each Gigabit Ethernet LAN port
has two LEDs. The Yellow LED on the
right indicates activity. The Link LED on
the left side may be green, amber or off to
indicate the speed of the connection. See
the tables at right for more information.
Activity LED
GLAN Speed/Link Indicator (Left)
LED Settings
LED Color Defi nition
Off
No Connection or 10 Mbps
Green
100 Mbps
Amber
1 Gbps
Link LED
GLAN Activity Indicator (Right)
LED Settings
Color Status Defi nition
Yellow
Flashing
Active
Rear View
(when facing the
rear side of the chassis)
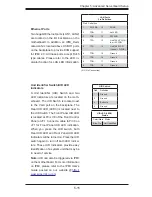
IPMI Dedicated LAN LEDs
In addition to LAN 1/LAN 2, an IPMI
Dedicated LAN is also located on the
I/O Backplane of the motherboard. The
amber LED on the right indicates activity,
while the green LED on the left indicates
the speed of the connection. See the
tables at right for more information.
Link LED
Activity LED
IPMI LAN
IPMI LAN Link LED (Left) &
Activity LED (Right)
Color/State Defi nition
Link (Left)
Green: Solid
100 Mbps
Activity (Right)
Amber: Blinking
Active
Onboard Power LED
An Onboard Power LED is located at
LED2 on the motherboard. When this
LED is on, the system is on. Be sure
to turn off the system and unplug the
power cord before removing or installing
components. See the tables at right for
more information.
Onboard PWR LED Indicator
LED States
LED Color Defi nition
Off
System Off (PWR cable
not connected)
Green
System On
Green:
Flashing
Quickly
ACPI S1 State
BMC Heartbeat LED
A BMC Heartbeat LED is located at
LEDM1 on the motherboard. When
LEDDM1 is blinking, BMC functions
normally. See the table at right for more
information.
BMC Heartbeat LED
States
Color/State Defi nition
Green:
Blinking
BMC: Normal
Содержание SUPERSERVER 6017R-TDLF
Страница 1: ...SUPERSERVER 6017R TDLF SUPER USER S MANUAL 1 0...
Страница 5: ...v Preface Notes...
Страница 14: ...1 6 SUPERSERVER 6017R TDLF User s Manual Notes...
Страница 20: ...2 6 SUPERSERVER 6017R TDLF User s Manual Figure 2 3 Installing the Outer Rails to the Server Rack 1 2 1 3 1 3...
Страница 26: ...3 4 SUPERSERVER 6017R TDLF User s Manual Notes...
Страница 46: ...4 20 SUPERSERVER 6017R TDLF User s Manual Notes...
Страница 72: ...5 26 SUPERSERVER 6017R TDLF User s Manual Notes...
Страница 82: ...6 10 SUPERSERVER 6017R TDLF Manual Figure 6 7 Removing Replacing the Power Supply...
Страница 114: ...A 2 SUPERSERVER 6017R TDLF User s Manual Notes...
Страница 118: ...B 4 SUPERSERVER 6017R TDLF User s Manual Notes...


