


5-13
Chapter 5: Chassis Setup and Maintenance
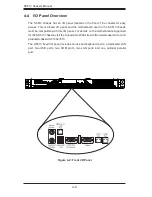
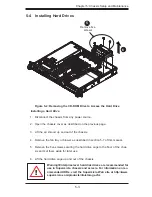
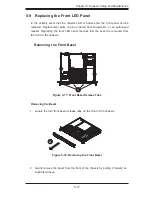
System Fan Tray Replacement
Removing the System Fan Tray
Power-down the system and remove the chassis from any power source.
1.
Disconnect each fan from the motherboard.
2.
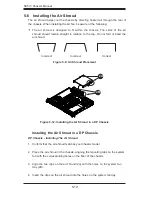
Carefully lift the air shroud's tabs out of the mounting holes on each side of
3.
the system fan tray.
Remove the three screws securing the system fan tray to the floor of the
4.
chassis, setting aside the screws and rubber grommets for later use.
Lift the system fan tray up and out of the chassis.
5.
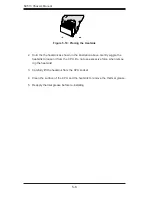
Replacing Individual System Fans
Fans can be replaced individually without removing the system fan tray. There is
no need to power down the system when replacing a system fan.
Replacing System Fans
If necessary, open the chassis while the power is running to determine which
1.
fan has failed. (Never run the server for an extended period of time with the
chassis open.)
Remove the failed fan's power cord from the serverboard.
2.
Lift the failed fan completely from the chassis.
3.
Place the new fan into the vacant space. Make sure the arrows on the top of
4.
the fan (indicating air direction) point in the same direction as the arrows on
the other fan(s).
Confirm that the fan is working properly and replace the chassis cover..
5.
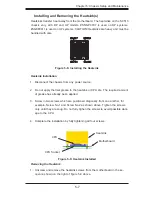
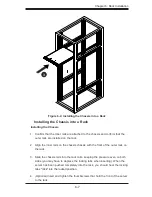
Installing the System Fan Tray
Align the three mounting tabs on the system fan tray with the mounting holes
1.
on the floor of the chassis, placing the rubber grommets previously set aside
between the chassis and the system fan tray.
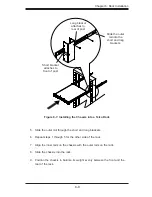
Secure the system fan tray to the floor of the chassis using the screws pro
-
2.
vided.
Содержание Supero SC513 Series
Страница 8: ...SC513 Chassis Manual viii Notes ...
Страница 50: ...SC513 Chassis Manual 6 10 Notes ...
Страница 54: ...SC513 Chassis Manual A 4 Notes ...
Страница 57: ...B 3 Appendix B SC512F Power Supply Specifications Notes ...


