Maintenance
38
Charging and Venting
Charging or venting is required whenever the equalization pressure of the system is outside the
range as stated in the Specifications. See Specifications for equalization pressures at different
ambient temperatures.
See also the section Gas Cleanup.
Venting is required if leaking self-sealing couplings need to be disassembled for repairs.
PRESERVE YOUR WARRANTY.
Specifications require the use of 99.995%
pure helium gas. Using a lesser quality of helium can damage the system and
void the warranty.
AVOID CONTAMINATION.
Follow the charging and venting procedures to
prevent reversed flow of system gas. Do not charge through the supply coupling.
Do not vent through the return coupling. Reversed flow can contaminate the
system with compressor oil.
Charging Procedure
Tools required: Adapter fitting P/N 266395C or 255919B2
(2) Open-end wrenches 9/16"
Open end wrenches 1”, 1 1/8”, 1 3/16”
Helium gas cylinder with pressure regulator and charge line
Swagelok fittings listed in step 4
1.
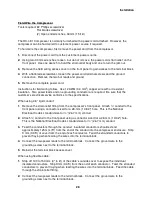
Stop the compressor. With two wrenches, remove the gas line or the gas manifold
assembly from the return gas Aeroquip coupling on the compressor.
2.
The adapter fitting is charged with helium gas; do not vent. Be sure the valve on the
adapter fitting is closed. With two wrenches, attach the adapter fitting to the compressor’s
return gas Aeroquip coupling.
3.
Remove the dust plug, Swagelok P/N B-400-P (SCAI P/N 17505), from the adapter fitting.
4.
Connect a 1/4" O. D. charge line to the pressure regulator of a helium gas cylinder
containing 99.995% pure helium with a dew point less than -50° C (-58° F) at 2070 kPa
(300 psig).
Use brass S
wagelok nut and ferrules
(P/N’s B-402-1, B-403-1
and
B-404-1; SCAI
P/N’s 12301, 12302 and 12303, respectively.) Adjust the pressure regulator to 35 kPa (5
psig).
5.
While connecting the charge line to the adapter fitting, thoroughly purge the charge line from
the regulator. Slightly open the adapter fitting’s valve and release a small volume of gas
from the compressor. While both the charge line and the charge/vent valve are venting,
connect them together. It is important to remove all air contaminants to prevent them from
entering the system.
Содержание HC-4E1
Страница 2: ......
Страница 8: ...4 This page is intentionally blank...
Страница 10: ...6 This page is intentionally blank...
Страница 12: ...8 This page is intentionally blank...
Страница 20: ...16 This page is intentionally blank...
Страница 26: ...22 This page is intentionally blank...
Страница 38: ...34 This page is intentionally blank...
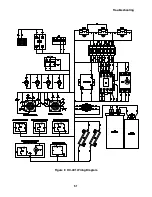
Страница 55: ...Troubleshooting 51 Figure 9 HC 4E1 Wiring Diagram...
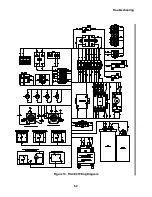
Страница 56: ...Troubleshooting 52 Figure 10 HC 4E2 Wiring Diagram...
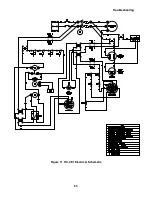
Страница 57: ...Troubleshooting 53 Figure 11 HC 4E1 Electrical Schematic...
Страница 58: ...Troubleshooting 54 Figure 12 HC 4E2 Electrical Schematic...
Страница 61: ...Parts 57 Figure 13 Parts Identification 18 21 19 13 14 20 16...

