
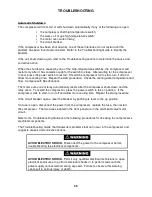
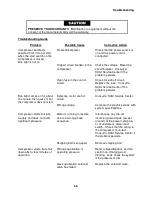
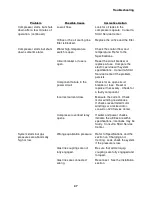


Maintenance
42
Leak Check
In addition to identifying suspected leaks, check the compressor for helium leaks each time
it has undergone any amount of disassembly. Use a helium mass spectrometer leak detector if
available. Follow its manufacturer’s instructions.
If a leak detector is not available, use a commercial leak detection solution. However, small
leaks may not be detected. Also, it is important to:
•
fully coat the joint being tested;
•
allow time for bubbles to form at a small leak;
•
look carefully for the smallest bubble formations.
After solution testing is completed, use water to wash all residues from joints and couplings.
In either method of testing, do not assume that one leak is the only one. Check all joints.
Leak detection by instruments can be misleading. Leaking gas can form patterns that indicate
leaks at sound joints. Large leaks or a high gas concentration can make isolation difficult.
Leaks occur most frequently at threaded joints. However, they can occur also at brazed and
welded joints.
The flat gasket in the face of the Aeroquip male coupling seals the joint. A leak at this gasket
seal can be detected only when a gas line is connected. A leak here can be caused by:
•
the coupling not fully tightened;
•
a worn, damaged, or missing gasket seal;
•
dirt on or under the gasket seal;
•
dirt on the female coupling’s mating surface;
•
damaged parts on either coupling which prevent proper mating or sealing.
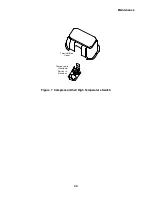
Leak Repair
Tools required: Open end wrenches 1", 1 1/8", 1 3/16"
#2 Phillips screwdriver
Leaks in flexible metal tubing cannot be repaired. Discard the damaged gas line and install
a new one.
Leaks at welded joints require special skills to repair. Consult a SCAI Service Center.
Replacing worn or damaged parts can repair leaks at the self-sealing couplings. Vent the
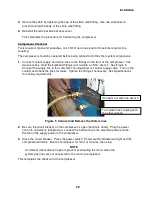
compressor before beginning to disassemble it.
Tightening the coupling frequently stops leaks at threaded joints. Continued leakage after
tightening requires coupling repair. Install new O-rings or Teflon tape as required.
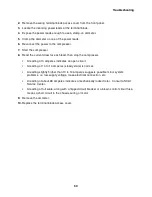
To repair a compressor coupling:
1.
Stop the compressor and disconnect the power to the compressor.
2.
Disconnect the gas line from the compressor coupling to be repaired.
Содержание HC-4E1
Страница 2: ......
Страница 8: ...4 This page is intentionally blank...
Страница 10: ...6 This page is intentionally blank...
Страница 12: ...8 This page is intentionally blank...
Страница 20: ...16 This page is intentionally blank...
Страница 26: ...22 This page is intentionally blank...
Страница 38: ...34 This page is intentionally blank...
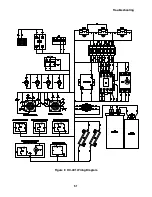
Страница 55: ...Troubleshooting 51 Figure 9 HC 4E1 Wiring Diagram...
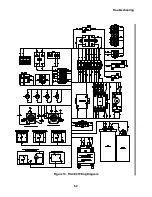
Страница 56: ...Troubleshooting 52 Figure 10 HC 4E2 Wiring Diagram...
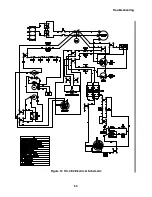
Страница 57: ...Troubleshooting 53 Figure 11 HC 4E1 Electrical Schematic...
Страница 58: ...Troubleshooting 54 Figure 12 HC 4E2 Electrical Schematic...
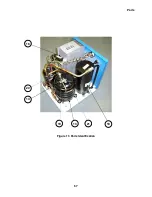
Страница 61: ...Parts 57 Figure 13 Parts Identification 18 21 19 13 14 20 16...


