Configuring Your digivu
Page - 21
Configuring your digivu via the digipostpro
To configure a digivu via your digipostpro, the digivu menu option
must be turned on in the configuration menu.
Connect your digivu to the digipostpro ensuring that the digipostpro
is powered. Once any upload has been completed, to enter the digivu
configuration menu, press OK. Only digivu’s V4 and upwards can be
configured via digipostpro.
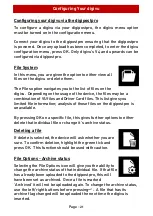
File System
In this menu, you are given the option to either view all
files on the digivu or delete them.
The Files option navigates you to the list of files on the
digivu. Depending on the usage of the device, the files may be a
combination of VU files and Driver Card files. This list gives you
limited file information; analysis of those files on the digipostpro is
unavailable.
By pressing OK on a specific file, this gives further options to either
delete that individual file or change it’s archive status.
Deleting a file
If delete is selected, the device will ask whether you are
sure. To confirm deletion, highlight the green tick and
press OK. This function should be used with caution.
File Options - Archive status
Selecting the File Options icon will give you the ability to
change the archive status of that individual file. If that file
has already been uploaded to the digipostpro, this will
have been set as archived. Once a file is marked
‘Archived’ it will not be uploaded again. To change the archive status,
use the left/right buttons before pressing
. A file that has its
archive flag changed will be uploaded the next time the digivu is
inserted.
Содержание digipostpro
Страница 2: ......

