ENGLISH
9
9
This manual is consistent with the date of manufacture of
your machine, you will find information on the technical
data of the machine acquired manual check for updates
of our machines on the website:
www.grupostayer.com
Specific safety instructions
-
Always use eye and ear protection.
Other personal
protective equipment such as dust mask, gloves, helmet
and apron should be worn when necessary. If in doubt,
wear the protective equipment.
-
Always be sure that the tool is switched off and
unplugged before carrying out any work on the tool.
-
Accessories must be rated for at least the speed
recommended on the tool warning label.
Wheels and
other accessories running over rated speed can fly apart
and cause injury.
-
Check the backing pad carefully for cracks, damage
or deformity before operation.
Replace cracked,
damaged or deformed pad immediately.
-
Check that the workpiece is properly supported.
- Hold the tool firmly.
- Keep hands away from rotating parts.
- Make sure abrasive disc or wool bonnet is not
contacting the workpiece before the switch is turned
on.
- When sanding metal surfaces, watch out for flying
sparks.
Hold the tool so that sparks fly away from you and
other persons or flammable materials.
-
Do not leave the tool running.
Operate the tool only
when hand-held.
-
Pay attention that the wheel continues to rotate after
the tool is switched off.
- Do not touch the workpiece immediately after
operation; it may be extremely hot and could burn
your skin.
- If working place is extremely hot and humid, or
badly polluted by conductive dust, use a short-circuit
breaker (30 mA) to assure operator safety.
- Do not use the tool on any materials containing
asbestos.
- Do not use water or grinding lubricant.
- Ventilate your work area adequately when you
perform sanding operations.
- Always use the correct dust mask/respirator for the
material and application you are working with.
- Ensure that ventilation openings are kept clear
when working in dusty conditions.
If it should become
necessary to clear dust, first disconnect the tool from
the main supply (use non metallic objects) and avoid
damaging internal parts.
Save these instructions
Commissioning Instructions
Thanks to the CONSTANT SPEED system, your machine
will keep the revolutions per minute (RPM) constant
between noload conditions and load.
Assembly
Installing loop handle (only LU 260 CE)
Always be sure that the tool is switched off and
unplugged before installing the loop handle.
Install the loop handle so that will fit into the matching hole
in the handle housing. Install the bolts and tighten them
with a hex wrench.
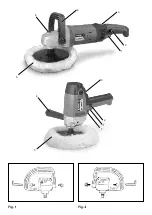
The loop handle can be installed in two different directions
as shown in Fig. 1 & 2, whichever is convenient for your
work.
Shaft lock (only LU 260 CE)
Press the shaft lock 6 to prevent spindle rotation when
installing or removing accessories.
Never press the shaft lock 6 when the spindle is
moving. The tool may be damaged.
Switch action
Before plugging in the tool, always check to see that
the switch trigger actuates properly and returns to the
‘‘OFF’’ position when released.
To start the tool, simply push the trigger 1. Release the
trigger 1 to stop.
For continuous operation, push the trigger 1 and then
push the lock button 2.
To stop the tool from the locked position, push the trigger
1 fully, then release it.
Speed regulation
The tool speed can be adjusted with the dial 3 to a given
number setting from 1 to 6.
The PL2500E has 2 gears available using button 7. Gear
I is fixed and keeps the tool at its minimum revolutions.
Gear II enables speed selector 3 and full tool power.
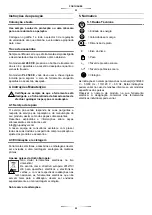
Illustrated description
1 ON / OFF switch
2 Engine lock button
3 Speed selector
4 Auxiliary handle
5 Self-adhesive plate
6 Axle lock button (LU 260 CE only)
7 Gear selector button (PL 2500 E only)
Operating instructions
Placement and testing
Always wear safety glasses or a face shield during
operation.
Push the trigger 1 and turn the speed adjusting dial 3 until
you obtain the appropriate speed for your work.
Содержание LU 260 CE
Страница 4: ...1 1 2 2 7 3 4 4 3 5 6 5...
Страница 29: ...29 29 1 2 RCD RCD 3 4...
Страница 30: ...30 30 www grupostayer com 30 mA LU 260 CE 4 1 2 LU 260 CE 6 6 OFF 1 1 1 2 1 3 1 6 PL2500E 2 7 I Gear II 3...
Страница 34: ...NOTAS 34...
Страница 35: ...NOTAS 35...


