background image


3-5 

Using the StarBoard

English 

StarBoard PX-DUO-50P/65P 


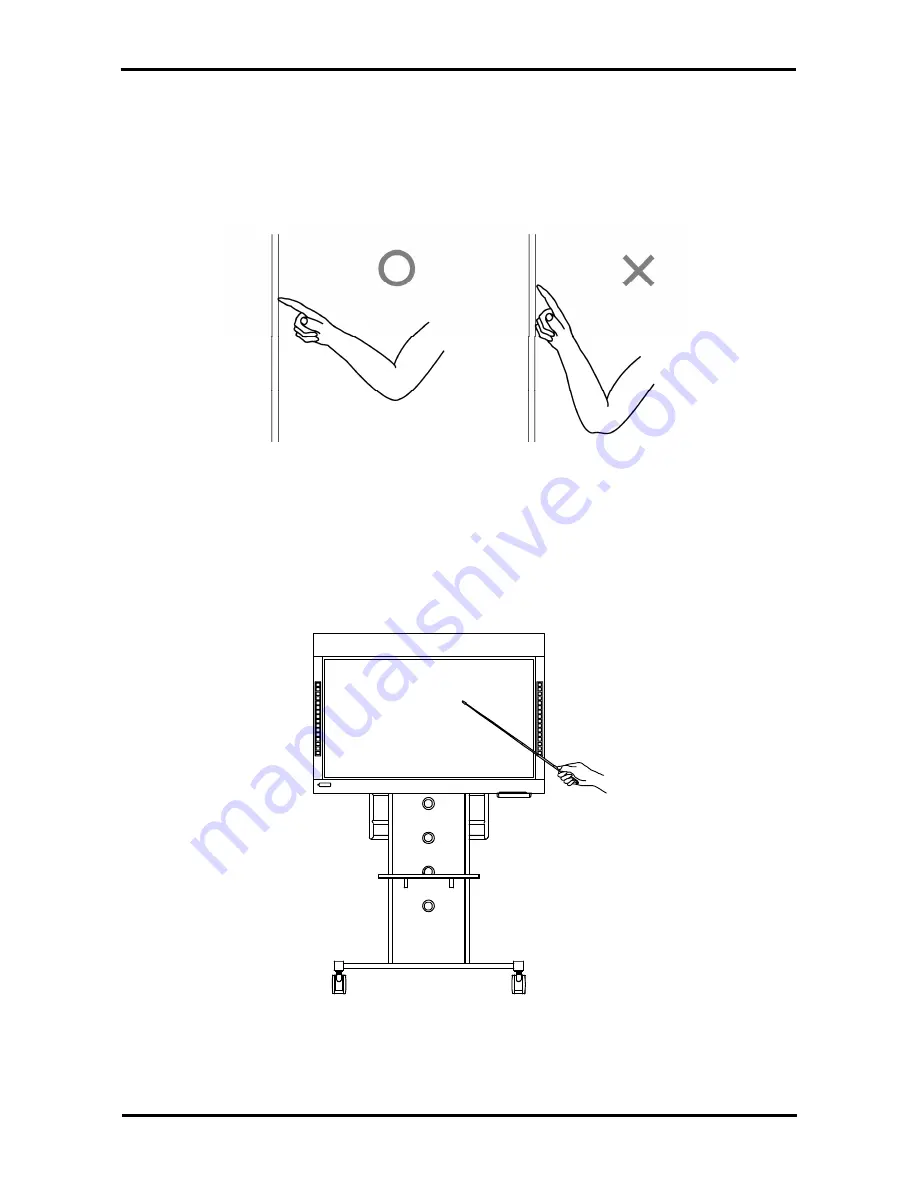
- Using your finger 
Extend your finger and touch the board. In the same way as the stylus pen, if you touch 
the board with anything other than your finger or you are too close to the board, it might 
cause an incorrect operation. 


3.2.2 PC Operations 

When performing PC operations by pointing or giving presentations without inputting 
characters, it is convenient to extend the stylus pen and use it as a pointer. 


Содержание PX-DUO-50P

Страница 1: ...ility for losses etc resulting from the operation of this product regardless of the preceding clauses Also in the event that this manual has pages out of order missing pages or other problems with the...

Страница 2: ...the product defects Moreover Hitachi Software Engineering Co Ltd retains the right to revise this user s guide and to modify the contents thereof without any obligation to notify anyone Product Assur...

Страница 3: ...ve a working knowledge of personal computers henceforth referred to as PC Please make sure that you understand the contents of this User s Guide and use the software correctly We hope that you make th...

Страница 4: ...This symbol will appear to raise the attention of the user to existing risks that may cause harm to people To avoid any chances of injuries or possibly death DO NOT IGNORE the safety instructions that...

Страница 5: ...reign object falls on top of or inside this product it may lead to personal injury or damage to the product NOTICE Do not use a USB cable other than the one supplied Use of a USB cable other than the...

Страница 6: ...m the PC and contact a support centre Continued operation without repair may result in emission of a strange odor or smoke 3 Precautions Regarding Handling WARNING Do not touch the main unit during th...

Страница 7: ...les This may expose short or sever the core wires possibly resulting in fire or electric shock 4 Precautions Regarding Moving the Product CAUTION Always use two or more people to move this product Thi...

Страница 8: ...ammable or corrosive gas CAUTION Improper assembly might cause the product to fall over or result in other accidents There is risk of injury if the product falls over Be sure to securely tighten the s...

Страница 9: ...e or power source If this product is set up near high voltage lines or power sources it might receive interference Do not set up in a location subject to direct sunlight or near a heater Failure to co...

Страница 10: ...nual it may lead to personal injury or damage to the product P 2 2 Be sure to perform earth work Be sure to properly connect the power cable earth If the earth is not connected electric shock or fire...

Страница 11: ...may result in damage to the stylus pen or personal injury P 3 6 Before cleaning StarBoard be sure to disconnect the power cable and the USB cable Electric shock or damage to the product will result P...

Страница 12: ...mes of Parts on the Back of the Product 1 6 1 3 3 Function Button 1 7 1 3 4 Electronic Pen 1 8 2 StarBoard Setup 2 1 2 1 Assembly and Setup Method 2 1 2 1 1 Assembling the Mobile Stand 2 1 2 1 2 Setti...

Страница 13: ...4 2 2 Sensor Adjustment Procedure 4 4 4 3 Regularly Auto Sensor Adjustment 4 6 4 3 1 Sensor Auto Adjustment Procedure 4 6 4 4 Product Specifications 4 8 4 4 1 PX DUO 50P 65P Digitiser Specifications 4...

Страница 14: ...StarBoard PX DUO 50P 65P English...

Страница 15: ...About the StarBoard StarBoard PX DUO 50P 65P English 1 About the StarBoard 1 1 Preparations before Use 1 2 Parts and Accessories Check 1 3 Name of Each Part...

Страница 16: ...reen appearing on the plasma display by using the Electronic pen or your finger as a mouse In addition dedicated software lets you write characters and figures on the screen and these characters and f...

Страница 17: ...ll mounting unit and the plasma display This User s Guide describes setup using the mobile stand After unpacking make sure that all of the following parts and accessories are present 1 2 1 PX DUO 50P...

Страница 18: ...onic pen 1 5 AAA alkaline Battery 1 6 Spare pen tip 2 7 Starboard Software x x DVD ROM 1 1 8 StarBoard Software x x Installation Guide 1 1 9 PX DUO 50P 65P User s Guide this manual 1 10 Warranty sheet...

Страница 19: ...rd using the mobile stand or the wall mounting unit specified by Hitachi above This User s Guide describes setup using the mobile stand For details on required components see 4 7 Required components O...

Страница 20: ...r is turned on Power on with the remote control The POWER lamp lights green 2 The Digitiser detects the position of the electronic pen or your finger and receives the electronic pen button and switch...

Страница 21: ...2 Names of Parts on the Back of the Product Plasma display signal connector Refer to the Plasma display Operating Instructions Power button USB cable Refer to P 2 5 of this manual Plasma display power...

Страница 22: ...time right click 1 2 Select Solid Pen red Hides displays the StarBoard Software Toolbar Select Solid Pen blue Adds a new blank page Select Solid Pen green Show previous page Select Fluorescent Marker...

Страница 23: ...replacing the battery Refer to page 2 7 in this User s Guide for details 2 Pen tip switch This is assigned the left click function Refer to page 3 8 in this User s Guide for details 3 Side buttons Op...

Страница 24: ...StarBoard PX DUO 50P 65P English...

Страница 25: ...StarBoard Setup StarBoard PX DUO 50P 65P English 2 StarBoard Setup 2 1 Assembly and Setup Method 2 2 Inserting Batteries into the Electronic Pen 2 3 StarBoard Software Setup...

Страница 26: ...s an optical device so avoid setup in locations exposed to direct sunlight or near sources of intense light Malfunction might result When two StarBoards are set up next to each other or when multiple...

Страница 27: ...tand and the plasma display assembled in the previous sections WARNING Please follow the stand s manual when you setup the plasma display When not following stand s manual it may lead to personal inju...

Страница 28: ...the Digitiser clamp A using the Digitiser lock screws 3 Secure the Digitiser clamp B using the Digitiser lock screws Place the rubber cushion on inside bottom 4 Secure the Pen tray using the Digitiser...

Страница 29: ...after turning off the power Connecting cables without turning off the power may lead to damage to equipment Do not unplug and re plug in the USB cable Unplugging and re plugging the USB cable after tu...

Страница 30: ...to the RGB connector of the Plasma display and then tighten the screws Connect the other end of the RGB cable to the RGB connector of the PC and then tighten the screws How to connect the cables refer...

Страница 31: ...and then tighten the screws Connect the other end of the RGB cable to the RGB connector of the PC and then tighten the screws How to connect the cables refer to the Plasma Display Operation Manual 2...

Страница 32: ...x x Installation Guide or StarBoard Software User s Guide CAUTION Be sure to install batteries correctly Do not install batteries with positive and negative terminals reversed or use batteries other...

Страница 33: ...Using the StarBoard StarBoard PX DUO 50P 65P English 3 Using the StarBoard 3 1 Using the StarBoard 3 2 How to Use Touch Mode 3 3 How to Use the Electronic Pen...

Страница 34: ...Startup was not checked in the software installation procedure the StarBoard Software will not start up even after Windows starts In this case manually start up the StarBoard Software Select Start Pro...

Страница 35: ...ction there may be some other problem For details refer to 4 Appendix 4 1 Troubleshooting on page 4 2 of this User s Guide If the cursor location deviates from the pen tip perform calibration In the S...

Страница 36: ...by the Pen Finger button located on the Digitiser The function buttons on the left and right sides cannot be operated at the same time When the Pen mode icon in below appears on the Tasktray you can...

Страница 37: ...body kept sufficiently away so that your palm and elbow do not touch the board If your hand or elbow touches the board or you are within 1 cm of the board it might cause an incorrect operation NOTICE...

Страница 38: ...as the stylus pen if you touch the board with anything other than your finger or you are too close to the board it might cause an incorrect operation 3 2 2 PC Operations When performing PC operations...

Страница 39: ...fully with the stylus pen bend it or apply an excessive load to it Failure to comply may result in damage to the stylus pen or personal injury NOTICE Keep the stylus pen in the pen tray when not in us...

Страница 40: ...the pen tip to retract into the electronic pen 2 A miniature transmitter is embedded in the tip of the electronic pen If you hold the transmitter area of the electronic pen while drawing characters o...

Страница 41: ...away from the board two times in the same spot Drag Push the pen tip onto the board with sufficient force and without releasing it away from the board move it from one point to another 3 3 3 Customisi...

Страница 42: ...StarBoard PX DUO 50P 65P English...

Страница 43: ...bleshooting 4 2 Adjust the sensor for Windows 4 3 Regularly Auto Sensor Adjustment 4 4 Product Specifications 4 5 Proper Care and Cleaning 4 6 Replaceable Parts Limited Operating Life parts 4 7 Requir...

Страница 44: ...y Set so the Plasma Display and monitor are both selected or that just the monitor is selected For details on selection refer the PC manual and other documentation PC screen does not display on the Pl...

Страница 45: ...ser s Guide The StarBoard does not recognise input Other than the above Contact a support centre Is something blocking light from reaching the board surface or reflective tape Remove the blockage Is t...

Страница 46: ...es normally change the location in which it is installed or change the lighting fixtures Restart Windows and StarBoard Software Contact a support centre The electronic pen does not work Other than the...

Страница 47: ...reflective tape Check that the reflective tape is not dirty If the problem is not corrected despite making the above checks perform adjustments according to the steps given in item 4 2 2 Sensor Adjus...

Страница 48: ...StarBoard PX DUO 50P 65P English 2 Camera Adjustment Wizard Start window appears Press All Adjust 3 Press Finish This completes sensor adjustment After making adjustments check that input can be perfo...

Страница 49: ...Procedure 1 Confirmation message of auto sensor adjustment will be displayed after 7days passed from first connect of StarBoard to PC If you press OK auto sensor adjustment program will execute If you...

Страница 50: ...3 Following window will be displayed when sensor auto adjustment finished Press OK This is all of auto sensor adjustment Confirm the normal input after adjustment In case of adjustment error following...

Страница 51: ...ne battery Size 149 mm 17 mm Weight Approx 20 g not including batteries Standards etc VCCI Class B FCC Class B CE 1 Using infrared and compact cameras this product captures the image shadow of a pen o...

Страница 52: ...compound to a soft cloth and wipe Never use a solvent such as thinner Use a soft cloth so that the surface of the reflective tape does not become scratched 3 Cleaning the electronic pen To clean the e...

Страница 53: ...TH 65PF12 Mobile Stand Hayami Industry Co Ltd PH 960 Mobile Stand Kyoei Shoji Co Ltd APS L1500 Wall mounting unit Panasonic TY WK65PV7 Always use a setup unit specified by Hitachi When using the wall...

Страница 54: ...ng the warranty period there will be a repair charge in the following cases 1 If the registration card accompanying the warranty is not returned to our company 2 If the warranty is not presented 3 If...

Страница 55: ...he customer sends the product to our company without RMA Return Merchandise Authorization number it might not be covered by warranty 6 As a rule the customer is responsible for shipping charges requir...

Отзывы: