5-28
4-3-4. AUDIO R/P HEAD (ACE HEAD) HEIGHT
ADJUSTMENT, AZIMUTH ADJUSTMENT
AND HORIZONTAL POSITION ADJUST-
MENT
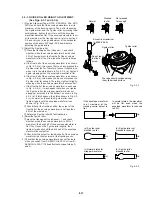
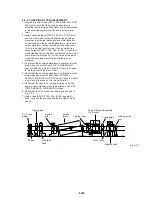
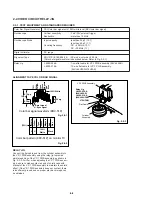
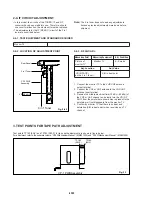
(l) Azimuth adjustment (See Fig. 4-3-5)
1) Play the alignment tape (NTSC: KRV-52NE, PAL: KRV-
52PL) and observe the waveform of the audio output,
using an oscilloscope.
2) Loosen the height adjustment screw in the counter-
clockwise direction and decrease the amplitude of the
audio output waveform. In this state, tighten the screw
in the clockwise direcion and maximize the amplitude.
Slightly tighten the screw further in the clockwise
direction and decrease the amplitude, and then loosen
it slowly in the counterclockwise direcion until the
amplitude starts to reach the maximum.
3) Set the amplitude of the audio output waveform to
maximum by rotating the azimuth adjustment screw.
4) Make sure that the tape edge is running between the
top of the audio head and the bottom of the control
head.
Gaps A and B should be roughly equal.
NOTE: Rotate the adjustment screw with a slotted screw-
driver. Do not apply excessive force vertically. As the
height adjustment screw also adjusts tilt, rotate it slowly.
Do not rotate it excessively. And apart from the this screw,
and height adjustment screw, the screws is precisely
adjusted before shipment from the factory, and should not
be tampered with. Tampering with these screws can lead
to scratching of the tape and other problems.
Azimuth adjustment screw
Audio R/P head assembly
(ACE Head)
Height adjustment
screw
This screws is precisely
adjusted and should not be
tampered with.
Tape
Control head
Audio head
A
B
A=B
Fig. 4-3-5
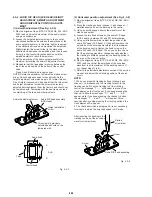
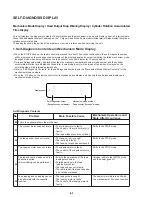
(2) Horizontal position adjustment (See Fig. 4-3-6)
1) Play the alignment tape (NTSC: KRV-52NE, PAL: KRV-
52PL).
2) Press the tracking buttons (c and channel – )
simultaneously and set the tracking to the centre.
3) Using an oscilloscope, observe the waveform of the
video head output.
4) Loosen the two fixed screws on the audio R/P head
(ACE head) by between 20
°
and 30
°
anticlockwise.
5) Using a slotted screwdriver, adjust the position of the
audio R/P head (ACE head). At the position where the
amplitude of the envelope waveform is at its maximum
at the tracking centre, tighten the fixed screw on the
audio R/P head (ACE head). When you do this, check
that the envelope waveform changes equally whether
the tracking is shifted by pressing the tracking button in
the plus or the minus direction.
6) Play the alignment tape (NTSC: KRV-52NE, PAL: KRV-
52PL) and check that the amplitude of the envelope
waveform is at its maximum at the tracking centre. If
not, repeat steps 1) to 6).
7) Refer to the electrical adjustments section of the service
manual, and adjust the switching position of the servo
circuit.
NOTE:
1. When you press the tracking buttons ( and
channel – ) simultaneously, the tracking is reset to the
tracking centre. When the tracking is at the tracking
centre, the message “T - : - “ will appear in place of the
clock display on the front panel. If you keep pressing the
channel– button the messages “T- : “ and “T - - : “ will
appear, while if you keep pressing the c button,
the messages “T : - ” and “T : - - “ will appear. Three
seconds after you stop pressing the tracking buttons, the
clock displav will re-appear.
2. The check described in paragraph 6) is not necessary
for models in which the only tape speed is SP mode.
Audio R/P head assembly
Scew
Screw
Slotted
screwdriver
After resetting the tracking to the
tracking centre, set the envelope
waveform to maximum.
Fig. 4-3-6
Содержание SLV-L45AR
Страница 6: ...1 2 ...
Страница 7: ...1 3 ...
Страница 8: ...1 4 ...
Страница 9: ...1 5 ...
Страница 10: ...1 6 ...
Страница 11: ...1 7 ...
Страница 12: ...1 8 E ...
Страница 17: ...3 2 MECHANISM CONNECTION DIAGRAM ...
Страница 18: ...3 3 3 4 SLV L45AR L65HFAR L75HFAR OVERALL WIRING DIAGRAM SLV L45AR ...
Страница 19: ...SLV L45AR L65HFAR L75HFAR OVERALL WIRING DIAGRAM SLV L65HFAR L75HFAR 3 5 3 6 ...
Страница 20: ...3 7 3 8 SLV L45AR L65HFAR L75HFAR SYSTEM CONTROL SERVO CIRCUIT DIAGRAM SLV L45AR ...
Страница 21: ...3 9 3 10 SLV L45AR L65HFAR L75HFAR SYSTEM CONTROL SERVO CIRCUIT DIAGRAM SLV L65HFAR L75HFAR ...
Страница 22: ...3 11 3 12 SLV L45AR L65HFAR L75HFAR VIDEO CIRCUIT DIAGRAM SLV L45AR AUDIO CIRCUIT DIAGRAM SLV L45AR ...
Страница 25: ...SLV L45AR L65HFAR L75HFAR 4 3 4 4 CP 1 BOARD VA A VIDEO AUDIO TUNER CIRCUIT DIAGRAM SLV L45AR ...
Страница 26: ...SLV L45AR L65HFAR L75HFAR 4 5 4 6 CP 1 BOARD VA A VIDEO AUDIO TUNER CIRCUIT DIAGRAM SLV L65HFAR L75HFAR ...
Страница 27: ...SLV L45AR L65HFAR L75HFAR 4 7 4 8 VIDEO CIRCUIT WAVEFORMS VP 1 BOARD VIDEO PRE AMP CIRCUIT DIAGRAM SLV L45AR ...
Страница 32: ...SLV L45AR L65HFAR L75HFAR 4 17 4 18 CP 1 BOARD SY A SYSTEM CONTROL SERVO CIRCUIT DIAGRAM SLV L45AR ...
Страница 33: ...4 19 4 20 CP 1 BOARD SY A SYSTEM CONTROL SERVO CIRCUIT DIAGRAM SLV L65HFAR L75HFAR ...

