64
6-6 . AGING MODE
(• Perform as necessary)
6-6-1. The aging can be performed to the set in the test
mode.
The aging can be continued by the set number of times or until an
error occurs.
In the aging, the following operations are repeated.
Table turn
t
Disc chucking
t
Disc detect
t
Servo on
t
Auto
adjustment
t
TOC reading
t
Play of first track for 5 second
t
Play
of last track for 5 second
t
Play of first track for 5 second
t
Disc
unchucking
Setting Method:
1. After setting the test mode, rotate the
[ AMS ]
dial to
select “94. SET AGING” and press the
[ AMS ]
dial
to enter.
2. When “AGING TIMES” is displayed, rotate the
[ AMS ]
dial to set the number of aging times. (For the number of times,
every 10 times can be set. Setting 0 (zero) eliminates the count
limitation where the aging is repeated until an error occurs)
Note:
Do not perform unmanned overnight aging..
3. Press the
[ AMS ]
dial, and “AGING START” will be
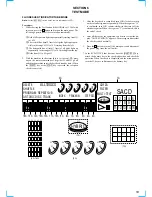
displayed instantaneously, then “DISC IN & JOG ON” will be
displayed and the tray will come out automatically.
4. Place a disc (CD or the SACD SL disc) on the tray. In the case
of SCD-C333ES, the multiple discs can be placed. Even when
the discs (CD or the SACD SL disc) of different types are
mixed, the aging test can be performed. Use the
[DISC SKIP]
key when placing a disc. When discs are placed in positions,
turn the
[ AMS ]
dial.
5. The aging test starts.
6. At the completion of aging by the set number of times, the
tray will come out automatically and the check will stop.
Typical time required for aging About 1 hour/100 times
“AGING SUCCESS!” will be displayed if no error occurred
in the aging, or the error will be displayed if an error occurred.
(Refer to the following error list)
6-6-2. Aging Mode of the Panel Door Independently
1. Start up the unit in the normal operation mode.
2. While press the
[STOP]
key, turn the
[ AMS ]
dial and
then press the
[CONTINUE]
key. (The program does not ad-
vance if these keys are not pressed in the above sequence.)
3. The panel door repeats opening and closing.
4. The messages “AP-B 000000” (during open)
t
“AP-C
000000” (during close) are repeated on the FL display. Num-
ber of times of open/close are displayed in decimal number in
“000000” with OPEN/CLOSE as a set.
5. Press the
[STOP]
key to terminate the aging mode and to re-
turn to the normal mode.
6-7. SHIPPING MODE
The repaired set must be initialized, and for this purpose the set
should be set to the shipping mode.
Setting Method:
1. After setting the test mode, rotate the
[ AMS ]
dial to
select “8d Set Up Init” and press the
[ AMS ]
dial to
enter.
2. “8D 000000000 00” will be displayed, and if the scroll starts
in the left direction, the set initialization has completed
3. Press the
[POWER]
button to turn the power off.
Note:
Take care not to leave the test disc in the set.
The following setups are established in the SHIPPING MODE
1. Initialization of EEPROM (IC903)
• PLAY MODE
ALL DISCS, CONTINUE
• COMMAND MODE
CD1
• LAYER SELECT
SACD
• DIGITAL FILTER
STD
• Resetting the accumulated hours meter.
2. Initialization of SRAM (IC908) (Erasing data of DISC MEMO)
3. Chucking at the DISC1 position.
l
L
l
L
l
L
l
L
l
L
l
L
l
L
l
L
Error List
An error occurring during the check in the aging mode of the test mode is displayed automatically (scroll display) immediately when the
error occurred.
< How to view the error history >
1. Select “95 DISP ERROR” with the
[ AMS ]
key, and press the
[ AMS ]
key once.
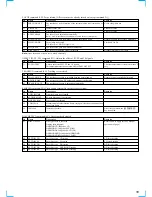
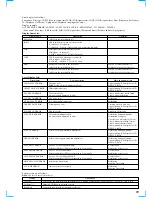
2. The error that has occurred lastly in the set and the signal status (H = 1, L = 0) at that time are displayed on the FL display by scrolling.
(Types of the errors and the signal status that can be checked, are the same as the error display of the aging mode.)
3. Press the
[ AMS ]
key once again to show the error history repeatedly.
4. When the error history is displayed with scrolling once, the mode returns to the normal test mode.
l
L
l
L
l
L
Содержание SCD-C333ES - Super Audio Cd Changer
Страница 18: ...SCD C333ES 18 18 4 2 SCHEMATIC DIAGRAM RF SECTION Refer to page 40 for Waveforms ...
Страница 22: ...SCD C333ES 22 22 4 6 SCHEMATIC DIAGRAM MAIN SECTION 1 5 Refer to page 49 for IC Pin Function PIN FUNCTION ...
Страница 28: ...SCD C333ES 28 28 4 12 SCHEMATIC DIAGRAM AUDIO SECTION 2 3 ...
Страница 29: ...SCD C333ES 29 29 4 13 SCHEMATIC DIAGRAM AUDIO SECTION 3 3 ...
Страница 31: ...SCD C333ES 31 31 4 15 PRINTED WIRING BOARD AUDIO SECTION SIDE B Refer to page 12 for Circuit Board Location ...
Страница 32: ...SCD C333ES 32 32 4 16 SCHEMATIC DIAGRAM DISPLAY SECTION Refer to page 45 for IC Block Diagrams ...
Страница 34: ...SCD C333ES 34 34 4 18 SCHEMATIC DIAGRAM HP SECTION ...
Страница 36: ...SCD C333ES 36 36 4 20 SCHEMATIC DIAGRAM SENSOR SECTION Refer to page 45 for IC Block Diagram ...
Страница 38: ...SCD C333ES 38 38 4 22 SCHEMATIC DIAGRAM POWER SECTION ...


