1-11
46
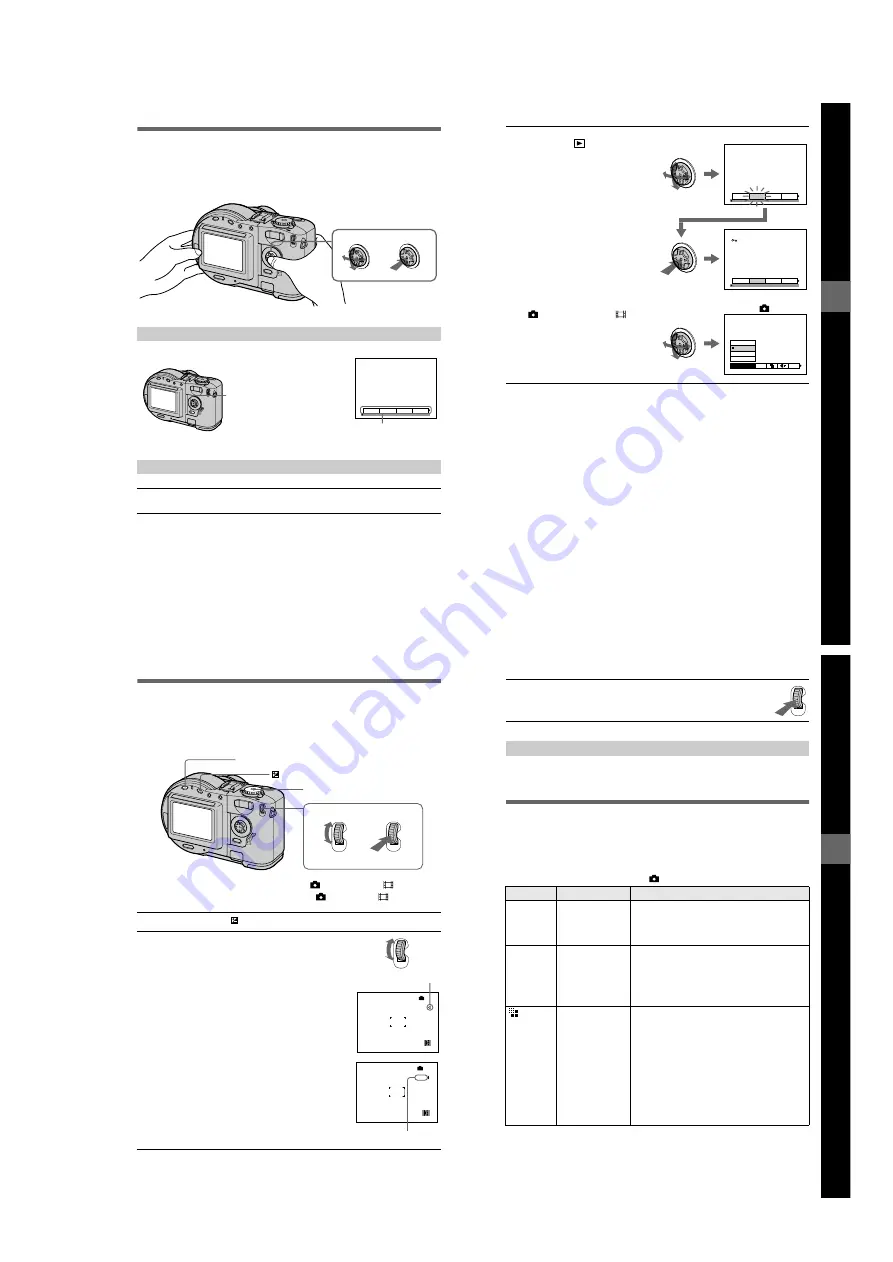
How to use the control button
When the menu or setup screen is displayed, the control button is used to select the
buttons, images and menu items displayed on the LCD screen of your camera and
modify the settings. The operation methods that are frequently used for “Advanced
operations” are described below.
Turning on/off the operation buttons (menu) on the LCD screen
Setting up the items in the setup or menu
1
Set the mode dial to SET UP so that the setup screen appears, or
press MENU so that the menu appears.
OK
DELETE PROTECT PRINT
SLIDE
Press MENU to display/clear the
menu on the LCD screen.
Menu
Be
fo
re
perf
ormi
ng
a
d
v
a
nc
ed
o
p
era
tions
47
2
When the mode dial is set to
SET UP or
:
1
Press
v
/
V
/
b
/
B
on the control
button to select the item or
setting you want to set up.
The selected setting turns
yellow.
2
Press the center
z
to enter the
item.
When the mode dial is set to
, S, A, M, SCN, or
:
Press
v
/
V
/
b
/
B
on the control
button to select the setting of the
item.
The selected setting turns yellow,
and the setup is complete.
WHITE BAL
OUT DOOR
IN DOOR
AUTO
ONE PUSH
MODE
ISO
OK
DELETE PROTECT PRINT
SLIDE
OK
DELETE PROTECT PRINT
SLIDE
Example: SET UP
Example:
48
How to use the jog dial
The functions which are used frequently are set up using the jog dial and the
following direct buttons. The jog dial is used to change the value in manual
adjustments.
∗
This button is available when the mode dial is set to
, S, A, M, SCN, or
.
∗∗
This button is available when the mode dial is set to
, S, A, SCN, or
.
1
Press FOCUS or
, or set the mode dial to S, A, or M.
2
Turn the jog dial to select the item or value
number you want to adjust.
•
When the indication
b
at the right end on the LCD
screen is in yellow, you can select the item. In such
cases, go to step
3
.
•
When the value number at the right end on the
LCD screen is in yellow, you can adjust the value.
(When you press FOCUS, the
9
mark appears on
value number position.)
When you adjust only the value, the adjustment is
complete.
FOCUS*
**
Mode dial (S, A, M)
449
0.8m
+2.0EV
F5.6
60
M
Yellow
449
0.6m
+2.0EV
F5.6
60
M
Yellow
Be
fo
re
perf
ormi
ng
a
d
v
a
nc
ed
o
p
era
tions
49
When viewing an image in single-image mode (page 72), you can easily view the
next/previous image by turning the jog dial.
Menu settings
Menu items that can be modified differ depending on the positions of the mode dial.
The LCD screen shows only the items you can operate at the moment. Initial settings
are indicated with
x
.
When the mode dial is set to
/S/A/M/SCN
3
Press the jog dial.
The value number turns to yellow. To adjust the value, repeat step
2
.
Viewing the next/previous image using the jog dial during playback
Item
Setting
Description
WB
(WHITE
BAL)
ONE PUSH
x
AUTO
IN DOOR
OUT DOOR
Sets the white balance (page 68).
ISO
400
200
100
x
AUTO
Selects the ISO film speed. When recording
under dark situations or recording a fast-moving
subject, use a high-number setting. When you
record high-quality images, use a low-number
setting (except when the mode dial is set to
SCN).
(IMAGE
SIZE)
MVC-CD200
x
1600×1200
1600 (3:2)
1024×768
640×480
MVC-CD300
x
2048×1536
2048 (3:2)
1600×1200
1280×960
640×480
Selects the image size when recording still
images (page 53).
Содержание MVC-CD200
Страница 67: ...MVC CD200 CD300 4 65 RGB DRIVE TIMING GENERATOR BACK LIGHT PK 58 EXPOSURE SPOT METER ...
Страница 131: ...Sony EMCS Co Kohda TEC MVC CD200 CD300 162 9 929 900 31 2001E1600 1 2001 5 Published by PV Customer Center ...
Страница 132: ...Revision History Ver 1 0 Date 2001 05 History Official Release Contents S M Rev issued 992990031 pdf Reverse ...


