background image

Pre

par

at

ion

Assigning the IP Address to the Camera

8

6

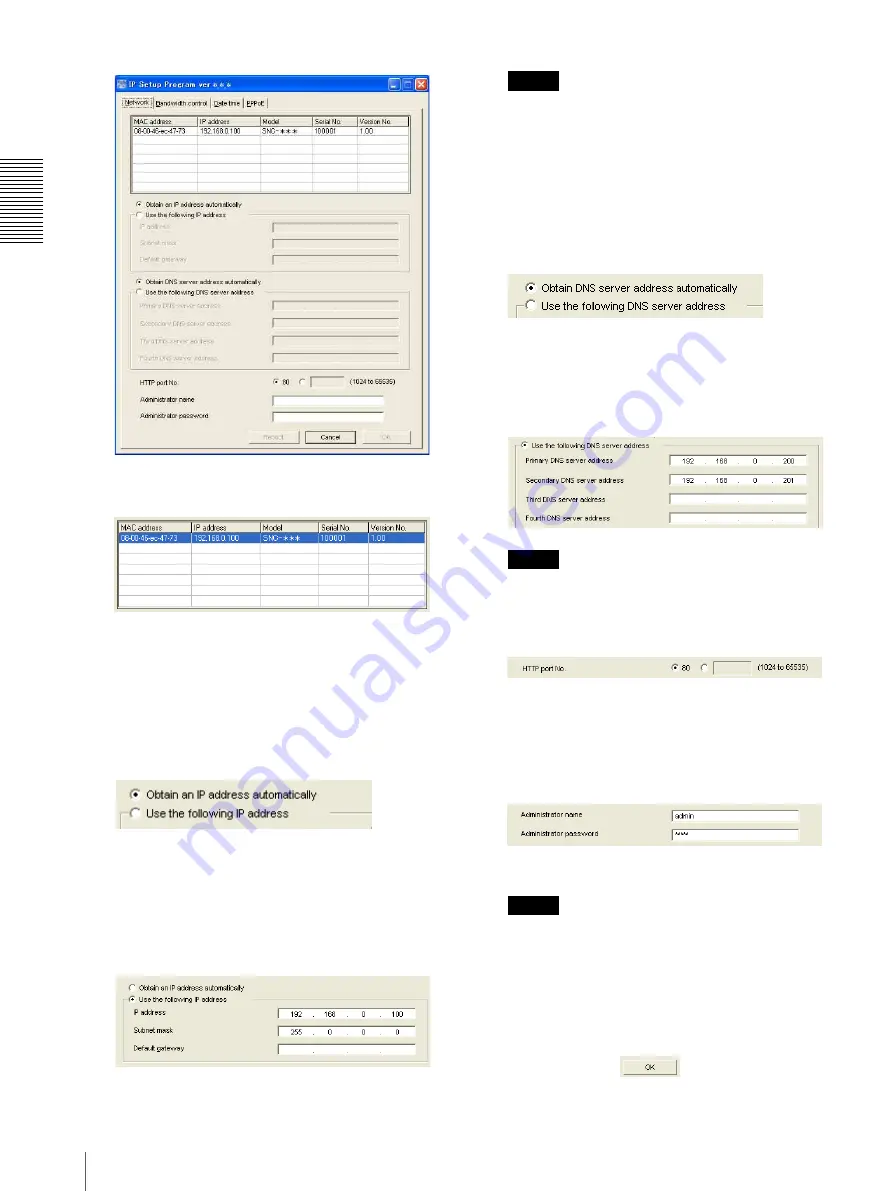
Click on the camera in the list to which you want to 
assign a new IP address.

The network settings for the selected camera are 
displayed.

7

Set the IP address.

To obtain the IP address automatically from a 
DHCP server:

Select 

Obtain an IP address automatically

.

The IP address, Subnet mask and Default gateway 
are assigned automatically.

To specify the IP address manually:

Select 

Use the following IP address

, and type the 

IP address, Subnet mask and Default gateway in the 
relevant boxes.

Note

When you select 

Obtain an IP address 

automatically

, make sure that the DHCP server is 

operating on the network.

8

Set the DNS server address.

To obtain the DNS server addresses 
automatically:

Select 

Obtain DNS server address automatically

.

To specify the DNS server addresses manually:

Select 

Use the following DNS server address

, and 

type the Primary DNS server address and 
Secondary DNS server address in the relevant 
boxes.

Note

The Third DNS server address and Fourth DNS 
server address are invalid for this camera.

9

Set the HTTP port No.

Normally, select 

80

 for the HTTP port No. To use 

another port number, type the port number between 
1024 and 65535 in the text box.

10

Type the Administrator name and Administrator 
password.

The factory settings of both items are “admin.”

Note

You cannot change the Administrator name and 
Administrator password in this step. To change 
these items, see “Setting the User — User setting 
Menu” on page 37.

11

Confirm that all items are correctly set, then click 

OK

.

Содержание IPELA SNC-DF40N

Страница 1: ...3 869 488 12 1 Network Camera 2004 Sony Corporation SNC DF40N DF40P User s Guide Software Version 1 1 ...

Страница 2: ...istrator Menu 26 Configuring the System System setting menu 27 System Tab 27 Date time Tab 28 Initialize Tab 29 System log Tab 29 Access log tab 29 Setting the Camera Image and Audio Camera setting Menu 30 Common Tab 30 Picture Tab 31 MPEG4 Tab 32 JPEG Tab 33 Reset Tab 33 Configuring the Network Network setting Menu 34 Network Tab 34 PPPoE Tab Setting of PPPoE Connection 35 Dynamic IP address noti...

Страница 3: ... Rebooting the Camera 56 Using the SNC audio upload tool Transmitting Audio to Camera 56 Installing the SNC audio upload tool 56 Connecting the Camera to the Computer 57 Using the SNC audio upload tool 57 Using the SNC video player Playing Video Audio File Recorded on Camera 62 Download the SNC video player 62 Using the SNC video player 62 Using the Custom Homepage Installer 63 Uploading the homep...

Страница 4: ... Setup Program for easy network setting You should keep in mind that the images or audio you are monitoring may be protected by privacy and other legal rights and the responsibility for making sure you are complying with applicable laws is yours alone Access to the images and audio is protected only by a user name and the password you set up No further authentication is provided nor should you pre...

Страница 5: ...crosystems Inc in the United States and other countries Intel and Pentium are registered trademarks of Intel Corporation or its subsidiaries in the United States and other countries Super HAD CCD is a registered trademark of Sony Corporation IP66 is a protection grade provided under JIS and IEC IPELA and are trademarks of Sony Corporation All other company and product names are trademarks or regis...

Страница 6: ...e ones which appear as you operate the application software Printing the User s Guide Depending on your system certain displays or illustrations in the User s Guide when printed out may differ from those as portrayed on your screen Installation Manual printed matter The supplied Installation Manual describes the names and functions of parts and controls of the Network Camera connecting examples an...

Страница 7: ...tting see Configuring Windows Firewall in When using Windows XP Service Pack 2 on page 10 or Configuring Windows Firewall in When using Windows Vista on page 12 Assigning an IP address using the IP Setup Program 1 Insert the CD ROM in your CD ROM drive A cover page appears automatically in your Web browser If it does not appear automatically in the Web browser double click on the index htm file on...

Страница 8: ... DNS server address To obtain the DNS server addresses automatically Select Obtain DNS server address automatically To specify the DNS server addresses manually Select Use the following DNS server address and type the Primary DNS server address and Secondary DNS server address in the relevant boxes Note The Third DNS server address and Fourth DNS server address are invalid for this camera 9 Set th...

Страница 9: ...Installing software A warning message regarding the active contents may appear when you install software such as IP Setup Program from CD ROM In this case operate as follows Example In case of IP Setup Program If message Internet Explorer appears click Yes If message File Download Security Warning appears click Run Note If you select Save in the File Download Security Warning dialog you will not b...

Страница 10: ...Setup Program or SNC audio upload tool may not operate correctly depending on the configuration of Windows Firewall No cameras are shown in the list even if they are detected In this case confirm the Windows Firewall configuration as follows Example In case of IP Setup Program 1 Select Control Panel from the Start menu of Windows 2 Select Security Center of the working field 3 Select Windows Firew...

Страница 11: ...ontents may appear when you install software such as IP Setup Program from CD ROM In this case operate as follows Example In case of IP Setup Program If pop up AutoPlay appears when a CD ROM is inserted into the CD ROM drive click Install or run program Note If you click Open folder to view files Web browser will not open automatically In this case double click the index htm file in the CD ROM If ...

Страница 12: ...ormation bar appears click on the bar and select Install ActiveX Control If message User Account Control Windows needs your permission to continue appear click Continue If Internet Explorer Security Warning appears click Install The installation of ActiveX Control starts When installation is completed the main viewer or the Motion detection setting menu appears Configuring Windows Firewall The IP ...

Страница 13: ...ogram Accessing the Camera Using the Web Browser When the IP address has been assigned to the camera check that you can actually access the camera using the Web browser installed in your computer Use Internet Explorer as the Web browser 1 Start the Web browser on the computer and type the IP address of the camera in the URL box The welcome page is displayed 2 Click Enter The main viewer is display...

Страница 14: ...Medium for Internet Explorer To display the welcome page and the main viewer correctly To operate the welcome page and the main viewer correctly set the security level of the Internet Explorer to Medium or lower as follows 1 Select Tools from the menu bar for Internet Explorer then select Internet Options and click the Security tab 2 Click the Internet icon when using the camera via the Internet o...

Страница 15: ...n place Exposure mode page 31 Set the format of the image sent from the camera MPEG 4 or JPEG Video mode page 30 Select the brightness of the image sent from the camera Bright page 32 Select the quality of the image sent from the camera MPEG4 Tab page 32 JPEG Tab page 33 Select the size of the image sent from the camera Image size page 30 Select weather the audio from the camera microphone is sent...

Страница 16: ...user can use the following functions z Usable function Not usable function 1 This function is usable with the Java applet viewer 2 This function is not usable with the Java applet viewer The access rights of the administrator and the user can be set in Setting the User User setting Menu on the Administrator menu on page 37 Function Administrator User Full Light View Monitor a live image z z z z Wa...

Страница 17: ...page when the video mode is JPEG 3 Select the viewer language Click English or Japanese at the bottom of the welcome page 4 Click Enter The main viewer appears With the ActiveX viewer With the Java applet viewer Control the camera from the main viewer Note If the Welcome page does not activate correctly the security level of the Internet Explorer may be set to Medium or higher See To display the w...

Страница 18: ...operates only when Java is installed and Java Sun is enabled If it does not operate correctly check whether the effective Java version has been installed successfully and Java Sun is enabled Effective version Java Plug in Ver 1 6 0_01 To check the Java version Select Tools from the menu bar of Internet Explorer then select Internet Options and click the Advanced mode tab Check whether the version ...

Страница 19: ...deo mode page 30 is set to JPEG Selects the frame rate to transmit images View size Selects the view size to be displayed page 21 Digital zoom Click to change the size of the digital zoom page 21 Capture Click to capture a still image shot by the camera and to store it in the computer See Capturing a Monitor Image on page 21 Trigger Displayed only when the camera Viewer mode page 37 is set to Full...

Страница 20: ... Image The image shot by the camera is shown here Date and time is displayed at the top of the window Controlling the Monitor Image You can monitor the camera image on the monitor window of the main viewer Monitoring the camera image 1 Log in to the home page to display the main viewer You can see how to log in on page 17 Logging in as a User 2 Select the frame rate only when the camera Video mode...

Страница 21: ...age is expanded by about 1 5 times with the clicked point at the center The digital zoom icon changes to 3 To cancel zooming in click icon Capturing a Monitor Image You can capture a monitoring image as a still image and save it in the computer Capturing a monitor image 1 Monitor the camera image in the monitor window 2 Click Capture icon The still image of the moment you click is captured and the...

Страница 22: ...can send a captured still image with an attached mail or to the FTP server To use this function you need to make the e Mail SMTP and FTP client active and set the address properly in the Trigger setting menu on the Administrator menu page 49 Sending a Monitor Image via e Mail 1 Monitor the image on the monitor window 2 Select e Mail from the Trigger list box 3 Click Trigger icon The still image of...

Страница 23: ...Trigger list box 3 Click Trigger icon The still image of the moment you click is captured and the image file is recorded in the built in memory of the camera Controlling Alarm output You can control the Alarm output On short circuit and Off open To use this function you need to make Alarm output active in the Trigger setting menu on the Administrator menu page 50 1 Monitor the image on the monitor...

Страница 24: ... is the protocol used for reading a usual Web page In an environment capable of reading Web page you can watch or listen to the video audio by selecting TCP port UDP Unicast When UDP Unicast is selected as the communication port RTP Real time Transport Protocol is adopted for video audio communication As RTP is the protocol for running video audio data video audio can be played smoother than when ...

Страница 25: ...o log in on page 17 Logging in as a User 2 Select the viewer language on the welcome page Click English or Japanese at the bottom of the welcome page 3 Click Setting in the welcome page The authentication dialog appears Enter the user name and password for Administrator The user name admin and password admin are set at the factory for the Administrator Administrator menu appears The following step...

Страница 26: ...nu for setting the user name and the password to log in Setting the User User setting Menu on page 37 Security Displays the security setting menu for specifying the computer allowed to connect to the camera Setting the Security Security setting Menu on page 38 e Mail SMTP Displays the e Mail SMTP setting menu for sending an e Mail Sending an Image via mail e Mail SMTP setting Menu on page 39 FTP c...

Страница 27: ... the principal settings of the software The System setting menu is composed of five tabs which are System Date time Initialization System Log and Access Log System Tab Title bar name Type a name to display on the title bar up to 32 characters The characters typed here are displayed on the title bar of the Web browser Welcome text Type a text to show on the welcome page with up to 1 024 characters ...

Страница 28: ...t the day and time Keep current setting Select if you do not need to set the date and time Synchronize with PC Select if synchronizing the camera s date and time with those of the computer Manual setting Select if you want to set the camera s date and time manually Select the lower 2 digits of year month date hour minutes and seconds from each drop down list Synchronize with NTP Select if synchron...

Страница 29: ...ions on the Web browser to specify the folder and save the setting data of the camera The file name preset at the factory is snc df40 cfg Restore setting Loads the stored setting data of the camera Click Browse and select the file in which the setting data is stored Then click OK and the camera is adjusted according to the loaded data and restarted Note With Restore setting some items in the Netwo...

Страница 30: ...icast audio port number properly Multicast address Type the multicast address used on the Multicast streaming Multicast video port number Specify the video transmission port number used for the Multicast streaming Multicast audio port number Specify the audio transmission port number used for the Multicast streaming Image size You can select the image size sent from the network camera 640 480 VGA ...

Страница 31: ...6 32kbps G 726 24kbps or G 726 16kbps can be selected Note When the bit rate is set to other than G 711 64bps the audio is not output in case of you are using Java applet viewer Speaker output Set whether you output the audio sent from the computer connected with the audio input connector to the speaker active speaker for example of the camera connected via line output connectors using SNC audio u...

Страница 32: ... small value is selected The value among 5 to 5 can be set Saturation Select the saturation in 7 steps from 3 to 3 Selecting 3 gives the image with the highest saturation Sharpness Select the sharpness in 7 steps from 3 to 3 Selecting 3 gives the image with the highest sharpness Contrast Select the contrast in 7 steps from 3 to 3 Selecting 3 gives the image with the highest contrast Note The brigh...

Страница 33: ...ge is automatically adjusted Note The maximum transmission rate will be the values set in Frame rate and Bit rate OK Cancel See Buttons common to every setting menu on page 26 JPEG Tab Frame rate Set the maximum frame rate of JPEG image that can be monitored on the computer The selectable frame rates are the following SNC DF40N 5 6 8 10 15 20 25 30 fps SNC DF40P 5 6 8 10 15 20 25 fps fps is a unit...

Страница 34: ...n be set only when Obtain an IP address automatically DHCP is selected Note When you select Obtain DNS server address automatically make sure that DHCP server is active on the network Use the following DNS server address Select this when you set the fixed address as the IP address of DNS server Primary DNS server Type the IP address of the primary DNS server Secondary DNS server Type the IP addres...

Страница 35: ... to 32 characters Re type password To confirm the password re type the password typed in the password box Obtain DNS server address automatically Select to obtain the address of DNS server automatically Use the following DNS server address Select to set the fixed address as the IP address of DNS server Primary DNS server Type the IP address of the primary DNS server Secondary DNS server Type the I...

Страница 36: ... log stored in the HTTP server or start an external CGI program URL Specify the URL to send HTTP request using up to 256 characters The URL is normally written as follows http ip_address port path parameter ip_address Type the IP address or host name of the host to which you want to connect port Specify the port number to which you want to connect If you want to use the well known port number 80 y...

Страница 37: ...er allowed to log in to FTP server or not Check the box if allowed to log in to FTP server Viewer mode If the user is authenticated when the main viewer is displayed you can select the viewer mode displayed after authentication Full You can operate all functions in this mode Light You can operate the functions other than the trigger button on the main viewer TCP UDP switching button on the main vi...

Страница 38: ... the IP addresses and subnet mask values you want to allow or deny access to the camera You can specify up to 10 IP addresses and subnet mask values For a subnet mask type 8 to 32 Select Allow or Deny from the drop down list on the right for each IP address subnet mask Tip The subnet mask value represents the bit number from the left of the network address For example the subnet mask value for 255...

Страница 39: ...u send an e mail None Select if no authentication is required when an e Mail is sent SMTP authentication Select if authentication is required when an e Mail is sent POP before SMTP Select if POP before SMTP authentication is required when an e Mail is sent POP server name It is necessary when the POP before SMTP is selected in Authentication Type the POP receiving mail server name up to 64 charact...

Страница 40: ...s second 2 digits and consecutive number 2 digits thus 14 digit number is added to the file name Sequence number A consecutive number of 10 digits between 0000000001 and 4294967295 and two fixed digits 00 is added to the Image file name Tip A consecutive number added to Date time and Sequence number is used to identify each of multiple files created with one alarm event Sequence number clear Click...

Страница 41: ...s minute 2 digits and second 2 digits and consecutive number 2 digits thus 14 digit number is added to the file name Sequence number A consecutive number of 10 digits between 0000000001 and 4294967295 and two fixed digits 00 is added to the Image file name Sequence number clear Click Clear and the suffix of the sequence number returns to 1 Interval Type the interval at which you want to send a mai...

Страница 42: ...y the FTP client function FTP server name Type the FTP server name to upload still images up to 64 characters or the IP address of the FTP server User name Type the user name for the FTP server Password Type the password for the FTP server Re type password To confirm the password type the same characters as you typed in the Password box Passive mode Set whether you use the passive mode of FTP serv...

Страница 43: ...is effective in the schedule setting in the other section Click Schedule and the setting menu for the Effective period is displayed Setting the Schedule Schedule setting Menu on page 51 Alarm buffer Select Use alarm buffer when you forward the image audio of before and after the alarm detection pre alarm post alarm If you do not select it only the image of the moment of the alarm detection is forw...

Страница 44: ...etting Menu When you click Image memory on the Advanced mode menu the Image memory setting menu appears By using the image memory function you can record the image and audio file which has been shot being linked with the external sensor input or with the built in motion detection function to the built in memory about 8 MB of the camera The image file can also be recorded periodically You can also ...

Страница 45: ...user name and the password of the user who has the mail account This setting is necessary when SMTP server that sends a mail authenticates Administrator e Mail address Type the e Mail address of the recipient of the warning mail e Mail address of the camera Administrator up to 64 characters OK Cancel See Buttons common to every setting menu on page 26 Alarm recording Tab Setting the Image Memory F...

Страница 46: ...on is forwarded Click Alarm buffer to display the Alarm buffer setting menu For details see Setting the Alarm Buffer Alarm buffer setting Menu on page 51 OK Cancel See Buttons common to every setting menu on page 26 Periodical recording Tab Setting the Periodical recording mode You can set to record the image file to the built in memory periodically Periodical recording Select On when you want to ...

Страница 47: ...er created automatically The Date_No folder has a 9 digit name consisting of the last two digits of year 2 digits month 2 digits day 2 digits underscore and sequence number 2 digits A folder can contain video files of up to approximately 1 MB and a new folder will be created automatically if the size of the video files in the current folder exceeds the maximum size and recording will continue Abou...

Страница 48: ...ng folder When the recorded image or audio file is deleted the camera counts the free space of the built in memory again when logging off Setting the Alarm Output Alarm output setting Menu When you click Alarm output on the Administrator menu the Alarm output setting menu appears You can set in this menu to control the alarm out of I O port on the rear of the camera linked to the alarm detection a...

Страница 49: ...m is displayed when Mode is set to Timer Click Schedule and the setting menu for the effective period is displayed Setting the Schedule Schedule setting Menu on page 51 OK Cancel See Buttons common to every setting menu on page 26 Setting the Operations from the Viewer Page Trigger setting Menu Click Trigger on the Administrator menu to display the Trigger Setting menu In this menu you will select...

Страница 50: ...edures are the same as those of the FTP client setting menu page 42 Image memory Checking this box allows you to select Image memory from the trigger drop down list in the main viewer By selecting Image memory and clicking the Trigger icon a still image of the moment you click is captured and the image file is recorded in the built in memor When you click Image memory button the Trigger Image memo...

Страница 51: ... to all days In this case the Start time and End time of the other days than Mon Monday cannot be input OK Cancel See Buttons common to every setting menu on page 26 Setting the Alarm Buffer Alarm buffer setting Menu When you click Alarm buffer on the Administrator menu the Alarm buffer Setting menu appears You can set the Pre alarm image and audio the image and audio before the alarm detection an...

Страница 52: ...displayed when you click Motion detection in Alarm sending of e Mail SMTP setting menu Alarm sending of FTP client setting menu Alarm recording of Image memory setting menu and so on Notes The motion detection function can activate or be set only when the Video mode of the camera is set to MPEG4 and the Cropping is set Off Before actual use perform an operation test and confirm that the Motion det...

Страница 53: ...ction Adjust it referring to the level indicator of Motion detection To increase the sensitivity move the Sensitivity slider bar to the right To decrease move it to the left When you release the mouse the new setting is applied to the level of motion detection indicator 4 Set the Threshold level of Motion detection Adjust the Threshold slider bar in the same way of step 3 to set the level the came...

Страница 54: ...ring Windows Firewall in When using Windows Vista on page 12 Starting the Setup Program Select Program from Start menu of Windows then select Program IP Setup Program and IP Setup Program in sequence The IP Setup Program starts Network tab appears The IP Setup Program detects cameras connected to the local network and lists them on the Network tab window When you are using Windows Vista message Us...

Страница 55: ...e and time set on the computer is displayed in the PC current date time setting box Click OK on the right to set the camera s date and time to the displayed computer s date and time Note Due to network properties there may be a slight difference between the displayed computer s date and time and those set on the camera PPPoE Tab PPPoE is used to connect to an ISP Internet Service Provider via the ...

Страница 56: ...s section explains the setup and operations of the SNC audio upload tool The SNC audio upload tool supports the following audio data to be transmitted Note Only one user can transmit sound to the camera Meanwhile another user will not be able to transmit sound to the camera Installing the SNC audio upload tool 1 Insert the CD ROM in your CD ROM drive A cover page appears automatically in your Web ...

Страница 57: ...tab The Recording Control window opens 3 Check Select in the Microphone section On Windows Vista There are no settings regarding the microphone jack If recording cannot be made connect a microphone device to the computer and check that the recording device operates correctly as follows 1 Select Sound from Control Panel 2 Open the Recording tab and check that Windows has recognized the hardware cor...

Страница 58: ...s Firewall in When using Windows Vista on page 12 The SNC audio upload tool cannot detect the cameras that are connected to the local network after the program has started The SNC audio upload tool cannot detect the network cameras that are not equipped with the audio feature Camera select checkbox The check box is located on the left end of the row Select this check box to enable audio transmissi...

Страница 59: ...mmon tab of the Camera setting menu N start x stop Click N start to start audio transmission The transmission speed is displayed in the Bitrate box during transmission You can adjust the microphone volume and enable disable the muting if necessary To stop the audio transmission click x stop Notes Audio transmission stops if you switch the tab during the transmission Audio may be interrupted when t...

Страница 60: ...cording recording stops and you can review the recorded sound or upload the recording to the camera When you click it during playback playback stops and the progress bar display returns to the start position recording Click to start recording of the sound input to the computer microphone The maximum recording time is 30 seconds The codec specified in the Setting tab is used for the recording The r...

Страница 61: ...a DHCP is shown at the end of the IP address when the IP address is obtained with a DHCP server Model Displays the model name of the network camera Serial Displays the serial number of the network camera Progress Displays the progress of audio file transmission Status Displays the current status of the camera Ready The camera is ready for connection Inquiry The camera information is being asked fo...

Страница 62: ...play and Not to display of the file information Model name Model name of the camera with which the file is recorded IP address IP address of the camera with which the file is recorded Serial number Serial number of the camera with which the file is recorded Record event Type of event used for the recording Sensor input or Motion detection Date time Recording date and time Movie Video Codec Audio A...

Страница 63: ...re using Windows Vista pop up AutoPlay may appear For details Installing software in When using Windows Vista on page 11 2 Click the Start icon of Custom Homepage Installer The File Download dialog opens When you are using Windows XP Service Pack 2 or Windows Vista a message regarding the active contents may appear For details see Installing software in When using Windows XP Service Pack 2 on page...

Страница 64: ...an FTP proxy server Select Use FTP proxy server and type your settings in the Proxy server address and Proxy server port No boxes Note If you cannot establish communications with the camera using the proxy server being used connect the camera to the local network and run the installer without using the proxy server 9 Type the Administrator name and Administrator password of the camera to be upload...

Страница 65: ...e following line is displayed on the command prompt hold down Ctrl and press C The display stops You will normally receive a reply after about 5 repetitions of Request time out 4 Wait until the execution of PING finishes then input the following code Note If you do not receive a reply check the following Did you enter the ARP commands within 5 minutes after it was turned on If not turn off the cam...

Страница 66: ...is used to describe information on the location of this camera Nothing is set at the factory 4 describesthecaseof mib 2 system sysContact 0 This field is used to describe the information on administrator of this camera Nothing is set at the factory 5 describes the case of mib 2 system sysName 0 This field is used to describe administration node of this camera Nothing is set at the factory 6 descri...

Страница 67: ...trap ID communityName IpAddressString Set the host you want to send traps to ID describes the setting identification number 1 to 8 communityName describes the community name to send traps to and IpAddressString describes the IP address of the host to send traps to Example To specify the destination of traps as the private community and the ID number 1 trap 1 public 192 168 0 101 7 delcommunity ID ...

Страница 68: ...sure mode 31 F Factory default 29 factory settings 29 flash memory 28 format of date and time 28 Frame rate 19 20 frame rate 19 20 free space 44 FTP client 26 50 FTP client setting Menu 42 FTP server 26 42 FTP server setting Menu 48 H Home 19 Homepage Custom Tool 63 Host name 34 HTTP 36 HTTP request 36 I Image memory 23 26 image memory 23 26 Image memory setting Menu 44 Image size 30 image size 19...

Страница 69: ...7 28 special tags 36 subnet mask 34 System 26 27 system configuring 27 System log 29 T TCP 24 TCP UDP 19 24 time difference 28 Time zone 28 time zone 28 title 36 title bar 27 Title bar name 27 Trigger 19 22 26 49 trigger 19 22 26 49 Trigger setting Menu 49 U UDP Multicast 24 UDP Unicast 24 URL 27 User 16 26 37 user 16 26 37 User name 37 user name 37 user setting 37 User setting Menu 37 V View size...

Отзывы: