background image

5-4

Camera Settings

Compro IP55/60/70 Network Camera

IR Light Control (IP70 only)

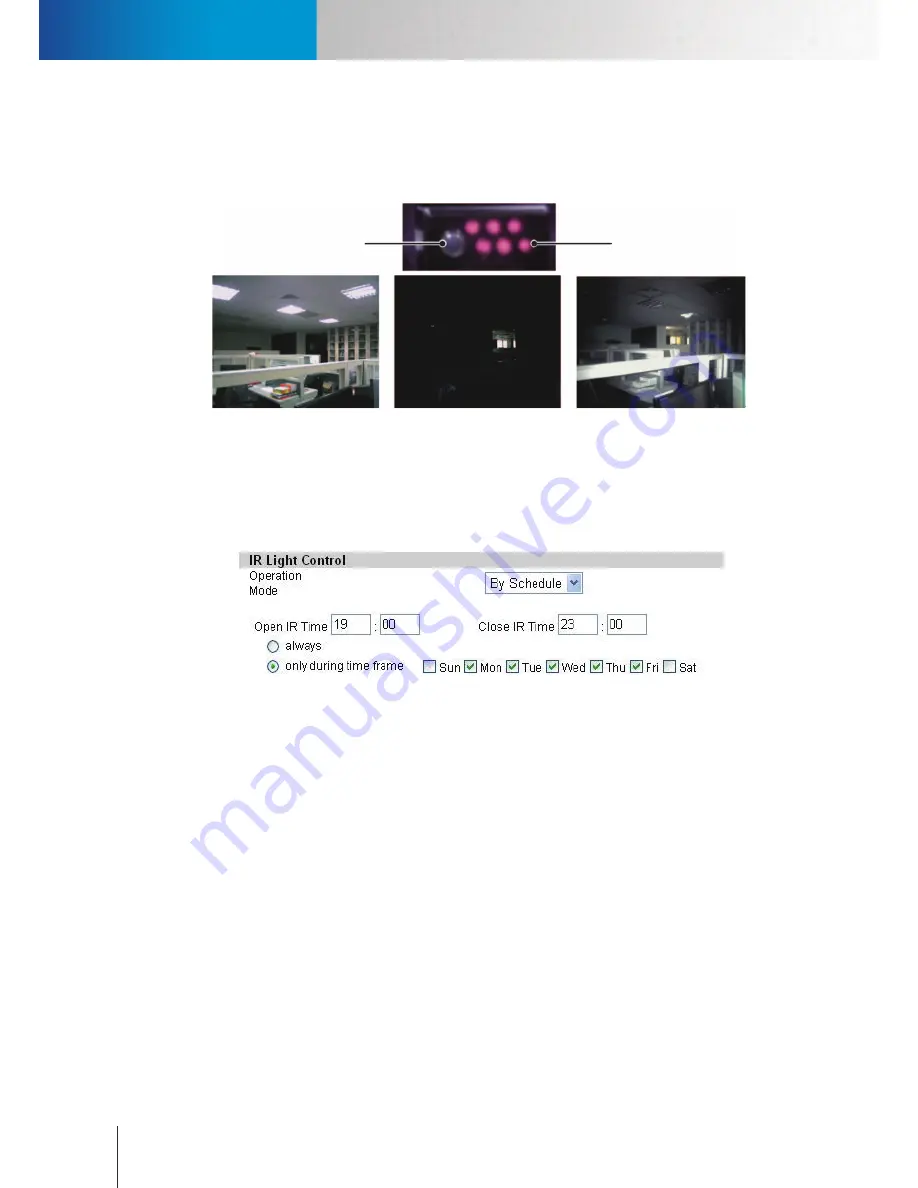
The IP70 network camera is equipped with a IR light sensor and 6 IR LEDs (inside casing ), which makes it 

capable of fitting different lighting situations and providing 24/7 monitoring.

Normal lighting

(Indoor lights on)

Without IR LEDs

(Indoor lights off)

With IR LEDs

(Indoor lights off)

Figure 5-4. Effect of IR LEDs

The IR light sensor allows the camera to detect the lighting condition of the environment and to turn on/

off the IR LEDs accordingly; you can configure the IR light operation mode to be [Auto], [Always On], [Always 

Off], or [By Schedule].

Figure 5-5. IR light control

For scheduling on/off time of the IR LEDs, you can directly input the desired open and close time, and set the 

repeat option to be [always] or [only during time fram]. (In this example above, the system will leave the IR 

LEDs on between 19:00 to 23:00 from Monday to Friday.)

Embed Text and Image

You can embed text and/or image on 4 different locations on the live screen. (Upper Left, Upper Right, Lower 
Left, Lower Right). To embed image, click on the Upload Image link and choose a suitable image. (Limited to 
JPEG/BMP, 100x30 pixels, 128KB) To remove an embedded image, press the Clear button.

IR LEDs (Inside)

IR Light Sensor

Содержание IP55

Страница 1: ...Network Camera IP55 IP60 IP70 Model No V151 101203 ...

Страница 2: ...on as it is found smoking or smelt unusual Please do not place the IP Camera around the heat sources such as television or microwave oven Trademark Compro Technology and Compro VideoMate are the registered trademarks of Compro Technology Inc All other company and product names mentioned in this document are registered trademarks of the respective companies Restriction No part of this document may ...

Страница 3: ...alling ComproView 2 12 Chapter 3 Accessing Camera 3 1 Viewing Streamed Video 3 1 Accessing via PC Web Browser 3 2 Accessing via iPhone Smartphone 3 5 Accessing via 3GPP Mobile Phone 3 6 Accessing via Seedonk IM Client 3 7 Chapter 4 Live View 4 1 Page Layout 4 1 Icons on Live View Page 4 2 Top Panel 4 2 Left Panel 4 2 Others 4 2 Enable Digital Zoom 4 3 Voice Communication 4 4 Chapter 5 Configuratio...

Страница 4: ...ile Management 7 2 Reset All Settings to Default 7 2 Firmware Update 7 2 Chapter 8 Troubleshooting 8 1 Initial Hardware Software Setup 8 1 Installation 8 1 iWizard 8 1 Hardware wiring check 8 2 Reset to the Factory Default Settings 8 3 Trouble with the ActiveX Client 8 4 No user interface in the browser 8 4 Remote Viewing via Internet Explorer 8 6 DDNS Setup 8 7 Symptoms Causes and Solutions 8 9 C...

Страница 5: ... Contents Please check the package contents on your hand If anything is missing please don t hesitate to contact your local distributor Figure 1 1 Parts list 1 Network Camera 2 RJ 45 LAN Cable 3 Power Adaptor 4 Quick Start Guide 5 Installation CD 6 Mounting Screw x 3 Screw Mount x 3 ...

Страница 6: ...or 15 frames under 1280 x 1024 Smart motion detection Two way audio with built in MIC and speaker Support UPnP universal plug and play Support 10 100 802 3 Ethernet 802 11b g n WLAN on applicable model Optional wireless adaptor Digital I O for External Sensor and Alarm 2 In 1 Out Supports local storage MicroSD SDHC Snapshot Easy to Install with IP camera Wizard Remote Monitoring on 3GPP mobile pho...

Страница 7: ...EG compression Triple Codec Supports dual streams simultaneously Support 10x digital zoom Video resolution is up to 1280 x 1024 pixels Image frame rate is up to 30 frames under 640x480 or 15 frames under 1280 x 1024 Smart motion detection Two way audio with built in MIC and speaker Supports UPnP universal plug and play Supports 10 100 802 3 Ethernet 802 11b g n WLAN on applicable model Optional wi...

Страница 8: ...iagram I O Module I O Input Sensor I O Output Alarm Wireless Module Video Analytics 32 CH ComproView iPhone 16 CH WebVUer 3rd party NAS 3GPP microSD SDHC Local Storage Audio Input Audio Output Internet Figure 1 2 Application diagram Application Diagram ...

Страница 9: ... 1 3 Front and rear view of IP55 IP60 1 Lens 2 Microphone 3 Speaker 4 LED status indicator 5 Wireless adaptor connector USB type 6 Audio Output 7 Reset Button 8 MicroSD card slot on the side 9 Microphone Input 10 Power connector 11 Ethernet Port 12 I O port 2 in 1 out Camera Layout ...

Страница 10: ...ront and rear view of IP70 1 Light sensor 2 Lens 3 IR Lamp x 6 inside 4 Microphone 5 Speaker 6 LED status indicator 7 USB Wireless adaptor connector 8 Audio Output 9 Reset Button 10 MicroSD card slot on the side 11 Microphone Input 12 Power connector 13 Ethernet Port 14 I O port 2 in 1 out Camera Layout ...

Страница 11: ...etwork both blue red LED flashing at an interval of 0 5 second 4 Camera established connection blue LED constantly on Red LED off 5 Camera failed to connect flashing red LED Blue LED off Red LED Blue LED Indication On On System booting up Off On Successfully established network connection On Off Performing hardware test Off Off Powered off Blinking every 0 5 sec Off Failed to connect to network fa...

Страница 12: ...ut port is normally used to trigger external audio or visual indicators e g sirens or strobe lights etc Pin Name Specifications Note 1 4 Digital Input Ports 1 2 Max 5VDC 60mA Floating TTL 5 7 Digital Output Port M a x 2 4 V D C 1 A o r Max 125VAC 1A You can only use either the Normally Open NO or Normally Closed NC at any given time Table 1 2 Buttons in recording history Figure 1 6 Front and rear ...

Страница 13: ...n camera Use the bundled RJ 45 LAN cable to connect the Ethernet port of the IP camera to the Ethernet port of your hub router Wireless adaptor Optional accessory If you have purchased the Compro USB wireless adaptor for wireless connection please plug it into the USB port of IP camera for wireless reception Power Attach the power adaptor to the camera s power connector and connect the power plug ...

Страница 14: ... be interfered should there be other 2 4GHz devices working in the vicinity e g microwave oven digital cordless camera etc You may experience slow frame rate or drops of connection in such situation we suggest you try moving the IP camera away from the area or turning off other appliances Since wireless cameras can cause interferences on transmission you may encounter erratic behaviors when there ...

Страница 15: ...mera stand when delivered from Compro If you need to disassemble and assemble the stand please refer to the pictures below Disassembly Please use a flat blade screwdriver to disassemble Figure 2 2 Disassembly of camera stand Assembly Figure 2 3 Assembly of camera stand Disassembling and Assembling the Camera Stand ...

Страница 16: ...le seen on the wide end of the bracket base and then pressing the screwdriver downward Figure 2 4 Detaching mounting plate Step 2 Place the side of the mounting plate that has protruding screw holes against the mounting surface Screw the mounting plate into the mounting holes on the mounting surface And secure the bracket to the mounting plate by clicking the plate into its position as shown in th...

Страница 17: ...ing plate that has been screwed on the mounting surface by inserting a flat blade screwdriver into the rectangular hole seen on the wide end of the plastic bracket base and then pressing the screwdriver downward Step 2 Use a Phillips screwdriver to unscrew the metal mounting plate from the mounting surface OK 2 1 Caution Do not pull a mounted camera off the mounting surface by force as doing so ma...

Страница 18: ...your desktop and it will start to search the available cameras on your network Figure 2 6 iWizard 2 16 CH WebVUer This provides Live View and controls via Internet Explorer ActiveX The WebVUer also supports multi channel management allowing you to monitor up to16 cameras simultaneously Figure 2 7 16 CH WebVUer 3 ComproView A professional PC based surveillance software that supports up to 32 simult...

Страница 19: ...ble cameras on your local network Click on a camera from connected camera list and wait until the live video and camera information are displayed on the right side You can double check the device name and the MAC ID which are printed on the serial number sticker at the back of IP camera and on the package Then click Next Figure 2 9 Camera selection 2 Meanwhile if you see the Windows Security Alert...

Страница 20: ...e to use iDDNS service Figure 2 13 Seedonk setup Notice Seedonk video streams are encrypted end to end and most of the streams are sent through direct channels and don t pass through Seedonk server which helps protect user privacy 6 Select the configuration of your IP address to obtain IP address automatically DHCP mode or manually enter IP address information Then choose whether to allow iWizard ...

Страница 21: ...ate encryption method automatically You need to input the correct passphrase and then select a suitable IP address configuration in order to continue with setup For Wireless connection only Figure 2 16 Wireless connection setup 9 Skip this part if you enabled Seedonk P2P service If you didn t enable Seedonk P2P service earlier you can set up iDDNS service here To do so click Yes and input your des...

Страница 22: ...your IP camera your IP camera s address will be http xxx entered by you iddns org 2001 10 Skip this part if you didn t enable Seedonk P2P service You will be asked to log in to your Seedonk account when you come to Seedonk setup in step 4 If you don t have a Seedonk account yet you can choose to create a Seedonk account and continue with account registration You need to read and accept the Seedonk...

Страница 23: ...rforms system diagnosis based on your network settings and alert you for inappropriate settings marked with a exclamation mark icon Figure 2 21 System diagnosis 14 The iWizard indicates the setup has been completed successfully You can click on the URL to view the live video now Click Yes if you wish you set up another camera from scratch Figure 2 22 Multi camera setup Running the iWizard installe...

Страница 24: ...r IP camera your IP camera s address will be http xxx entered by you iddns org 2001 Installing ComproView 1 After your iWizard setup completes you can choose to install the professional video management software ComproView by choose Install as illustrated below The ComproView Installation wizard in the installation CD will help you to step by step in the process Please follow the on screen instruc...

Страница 25: ... It supports Motion JPEG video viewing on your mobile devices anytime anywhere Live view only 3 View the live video stream from a single camera via 3GPP capable mobile phone over the internet This is the preferred way of accessing your camera when you are out of your house and have no access to a computer However due to some limitation of the technology only video stream is provided in this mode N...

Страница 26: ...lid user name and password for your IP camera and then press OK The default user name and password is admin Figure 3 2 Login dialog box Notice If you forget your user name and password you need to reset your camera to factory default settings see Troubleshooting chapter 4 After valid user name and password are entered Internet Explorer will display a message to warn user about the installation of ...

Страница 27: ...to install the USActiveX cab and ComproClientActivex cab on your system Figure 3 5 Security Warning 1 Figure 3 6 Security Warning 2 7 After ActiveX installation completes the Windows Security Alert dialog appears Please click Unblock to unblock it from firewall Figure 3 7 Unblocking application Accessing via PC Web Browser ...

Страница 28: ...hind a firewall you will need to enable ports 80 and 554 default ports used by camera in your firewall and link them to the internal IP address of the camera Should you have more than one IP cameras please increase the value of the above ports by 1 e g the second camera will have ports 81 and 555 Please refer to the manual of your router or firewall Accessing via PC Web Browser ...

Страница 29: ...ouch BlackBerry Android WM and major brand mobile phones To access your camera via mobile web browser follow the steps below 1 Use a PC to log on to the camera and go to Setup Video Settings and check the Enable 2nd Stream include 3GPP box to enable the stream 2 video 2 For the Stream 2 set the Codec as Motion JPEG 3 Launch the web browser on your iPhone Smartphone and enter IP address mjpeg html ...

Страница 30: ...able DDNS function and obtain a valid Dynamic DNS DDNS address as detailed in earlier sections of this manual 3 Ensure that an active internet connection is available for both the IP camera and the intended mobile phone Having taken above actions to view the live image enter the following address into the address field of your mobile web browser or streaming software rtsp ipcamera ip medias2 the i...

Страница 31: ... application and follow on screen instruction to complete its installation Figure 3 10 Installing Seedonk IM To access your camera using Seedonk IM client double click on the Seedonk icon on your windows desktop and then enter the user name and password of your Seedonk account to log in to the service If you do not have a Seedonk account go to http www seedonk com cxs register do from register and...

Страница 32: ...ge of your network camera may appear darker than expected due to insufficient environmental lighting When this happens simply move your camera to a different location where lighting condition is better or turn on the back light compensation if there are lights shining behind the objects in the scene Accessing via Seedonk IM Client ...

Страница 33: ...ideo recording voice communication I O and snapshot 2 Video stream selection You can switch between Stream 1 and Stream 2 stream 2 in setup page must be enabled 3 Video mode selection Let you switch video display between single multi and auto scan mode 4 Top control panel Let you adjust displayed video and mic and speaker 5 Live video window Live video stream 6 Channel selection Select a channel f...

Страница 34: ...the built in speaker Left Panel Icons seen on the left control panel Click the Snapshot button to take a snapshot of live screen This Communicate button allows you to speak into your PC microphone and broadcast through camera s speaker See Voice Communication section for details Press this button to trigger the alarm and siren connected to the Digital Out port of your camera Records live video by ...

Страница 35: ...n the digital zoom control window will pop up 2 Check Enable Digital Zoom option and set desired zoom ratio by dragging the adjustment bar Then set the area to be enlarged by dragging the black square shown on preview window Click on the X button shown above or press Esc key to save the changes and or close the preview window Figure 4 2 Digital zoom window Enable Digital Zoom ...

Страница 36: ...tup will be shown and right click on the button and select Setting to choose input device and input source Figure 4 3 Communication setting After setting the input device please click and hold the communicate button which will turn black to talk through microphone Notice When using the voice communcation feature you may experiece various degrees of delay between transmission from the computer and ...

Страница 37: ...op right location in the live view screen Then the setup page as shown in the picture below will be displayed You can configure the detailed settings of your IP camera here Figure 5 1 Main setup page You also can go back to live view screen by choosing LiveView from the top menu The top menu also allows you to go to the Event Viewer and Maintenance of the camera The main setup menu on the left con...

Страница 38: ... video and the stream setting for the 2nd stream will be displayed For available video modes for stream 1 and 2 refer to the appendix section of this manual Active Bandwidth Management When network congestion occurs Compro network camera can intelligently force down current user defined video bit rate and bring it back when healthy bandwidth level becomes available This avoids video quality deteri...

Страница 39: ...Lamp and Incandescent Lamp Flickerless Here controls the flickerless mode 60 default or 50 Hz Exposure Control This allows you to control the exposure time of the camera Default Auto mode You can manually set the shutter speed within the range of 1 5s to 1 16000s to meet your lighting conditions Low Light Behavior Here it allows the camera to get better and clearer picture when under low light con...

Страница 40: ...ou can configure the IR light operation mode to be Auto Always On Always Off or By Schedule Figure 5 5 IR light control For scheduling on off time of the IR LEDs you can directly input the desired open and close time and set the repeat option to be always or only during time fram In this example above the system will leave the IR LEDs on between 19 00 to 23 00 from Monday to Friday Embed Text and ...

Страница 41: ...rs The viewers are only allowed to view live video and can t change any of the camera settings On the flip side the administrators have the rights to make any changes Figure 5 7 Users Setting Modify Remove Click here to Modify or Remove an existing viewer Add Click here to add new viewer or administrator Allow anonymous login Click here to allow anonymous viewer login without requiring user name a...

Страница 42: ...E with which you need to provide valid user name and password Wireless If you have installed the Compro wireless adaptor on your IP camera you can set up the wireless connection in this page To connect wirelessly please check the Use Wireless First box to give priority to wireless connection when LAN network is also connected And then provide the necessary information on IP address to obtain IP ad...

Страница 43: ...pplications To perform network bandwidth test 1 In Setup Network click on Network Bandwidth located on the left menu to start 2 Wait for Internet Explorer to prompt for the installation of Java plug in Then click on the text to accept 3 Camera begins detecting connection speed 4 Once speed diagnostics is done camera will advise current user on network speed See below example The message indicates ...

Страница 44: ...p DDNS Click here to enable the DDNS Dynamic Domain Name Service service if you are using floating IP and want to link to your IP camera using an URL Compro iDDNS service is recommended here for use Or if you already have an account with DynDNS or no ip you can also input its domain name here for easier access to your IP camera UPnP Check here to enable disable the UPnP feature on your IP camera i...

Страница 45: ...ports standard SMTP on SSL protected webmail platforms such as Hotmail Windows Live and Google Mail Gmail To use this function in Event Server Setup Email Event Server Setup enter their SMTP address and SSL port respectively Then enter your user name and password and the E mail subject as you wish As of August 2010 SMTP and SSL settings for Hotmail and Gmail are as follows Platform SMTP SSL Hotmai...

Страница 46: ... under Login New Customer Product Selection choose Clicktall Central API and proceed to obtain an API ID according to its online instructions 3 Choose Next to save the setting 4 Customize the SMS message content if wanted Choose Next 5 To receive a test message click on Send me a SMS message to the SMS Gateway Or choose Finish to save the configuration 6 To enable SMS notification go to Setup Even...

Страница 47: ...vity level S1 Lowest S2 Low S3 Medium S4 High S5 Highest from their drop down list Press Save button for the settings to take effect Figure 5 11 Motion detection If you don t want to keep a set region please select the region number and click Delete to delete it I O Status Here displays the status of your I O port for your reference Audio Detection Configure the sensitivity level in audio detectio...

Страница 48: ...o allow forced recording to SD card during network failure Table 5 4 SD card setup 3 NAS Setup Domain Name IP Address Network of Samba based NAS Network Attached Storage Directory Storage path User Name Password User authentication data set for NAS Check NAS Status Status verification Table 5 5 NAS setup 4 NFS Setup IP Address Network address of NFS Network File Server Directory Storage path Table...

Страница 49: ...hown below Figure 5 12 Recordng history To play a video clip first select a video clip on the list red square shown above and press Playback File format AVI Function Key Description Playback Download Protect Unprotect Select All Deselect Delete Click to download then playback Click to download the video clip on your PC Selected clip s will never be erased File management Table 5 7 Management of re...

Страница 50: ...lti Camera Here you can add modify or delete additional IP cameras on your camera list and later switch between camera channels listed here on LiveView screen When you add a new IP camera you need to input the required information into the IP address username and password field port numbers may be required if they have been different After pressing the Save button you will see the status of the ca...

Страница 51: ...sfully triggered by motion I O schedule or audio detection Click on any type of event trigger to view its history Or click on the image link if any to view the snapshot taken at the occurrence of a pre defined event Figure 6 1 Event Viewer Event Viewer Chapter 6 Event Viewer ...

Страница 52: ...6 2 Compro IP55 60 70 Network Camera ...

Страница 53: ...us settings of your IP camera Figure 7 1 System information Log Here you can check the system log of your network camera Figure 7 2 System log Maintenance You can reboot your IP camera change UI language manage user profile reset to factory default settings or update the firmware of IP camera please download the latest firmware from Compro s website first Figure 7 3 Maintenance page Information Lo...

Страница 54: ...lick on Import to proceed 3 Camera will start to reboot which will take approximately 60 seconds to complete User must not interrupt browser action during the process as doing so may cause problems to the system Warning you may only cross import profile among identical camera models Reset All Settings to Default This will reset IP camera to its factory default settings producing the same result as...

Страница 55: ...u ve successfully connected the power connector and network port of the IP camera please ensure that you have the latest software firmware available on our website www comprousa com Once the ComproView has been installed you can use the included iWizard which can be found under Start Program Files ComproView Figure 8 1 Compro program folder The iWizard will automatically scan for all of the availa...

Страница 56: ...indicator has been turned off Table 8 1 LED status 2 Please check if your computer has a successful connection to the network Computer is connected Computer is not connected Table 8 2 Windows network connection 3 If you are using the wireless network please ensure that a the IP camera is connected to the correct wireless access point b you ve correctly set the encryption type and key for the conne...

Страница 57: ...ection and obtaining IP from the available local DHCP server To reset the camera refer to the steps below 1 Press and hold the reset button located rear panel for about 10 seconds when successful you shall see the Status Indicator go off 2 After about 5 more seconds the Status Indicator comes on again It means that the IP camera has been successfully restored to the factory default settings 3 Plea...

Страница 58: ...t developed by Compro currently only runs on Microsoft Internet Explorer 6 or greater It does not function on other web browsers for the time being No user interface in the browser This could be related to three possible causes 1 ActiveX was not installed Please install the ActiveX component by following the instruction on the screen This component must be installed Otherwise you will not have acc...

Страница 59: ...y setting Please ensure that your security setting in Internet Explorer allows the installation of ActiveX component by adding the IP address of the camera to the list of trusted sites in Internet Explorer Figure 8 8 Browser security setting If you ve done all of the above but are still unable to obtain video audio on the browser please delete all of the files under OS Drive Program Files Compro E...

Страница 60: ... s image quality setting stays within the bandwidth limit of your local network You can check the camera s image quality setting in Setup à Video If your quality setting exceeds your upload bandwidth limit you will experience stuttering video or black and blank screen Figure 8 10 Detailed network setup 2 Check the ports used by the camera in Setup à Network and note down the HTTP and RTSP server p...

Страница 61: ...0 16 81 DDNS Setup DDNS allows you to link camera s IP address to a hostname with which you can access your camera on the Internet If your camera system obtains IP address via DHCP mode you need to enable DDNS feature under network setting and apply for a DDNS Dynamic DNS so the hostname can be obtained from Compro s free iDDNS service or by login on to the website of some service providers such a...

Страница 62: ...cess your IP camera on a web browser If your local LAN network and router sit behind a firewall you have to set a HTTP port allowing inbound access For example if you set the http port 2001 for your IP camera your IP camera address will be http xxx your preferred address iddns org 2001 If you see the orange exclamation mark next to the HTTP or RTSP port field after system diagnosis completes it me...

Страница 63: ...P address on your network disconnect other cameras first If you re not sure whether your camera is on the same subnet with your PC reconnect your camera to your PC directly configure the IP address of your PC as 192 168 0 X and run iWizard again to reconfigure its subnet address to match that of your PC Then reconnect it back to the router and run iWizard again The PC is not connected to the LAN n...

Страница 64: ... retrieve the IP information by the DNS server which translates entered hostname into the camera s IP address Though the information is updated every few minutes determined by the value of TTL Time to Live occasionally the DNS information changes e g your camera acquires new IP but the old information is still stored in the cache resulting in connection failure When this happens try waiting a few ...

Страница 65: ...nected to your router can also access the Internet If not consult your ISP router manufacturer for correct Internet setting If your router can connect to the Internet but your camera connected to your router cannot check whether the IP subnet mask and gateway is correctly set on your camera HTTP RTSP port error HTTP port is used for transmitting web pages commands over the Internet RTSP port is us...

Страница 66: ...d bandwidth then try to lower the bit rate setting in Setup Video 2 Run a network speed diagnostics on WebVUer to determine the bandwidth level of the currently connected network To do so log in to your camera using WebVuer and go to Setup Network Network Bandwidth When the speed diagnostics is done the WebVUer will advise you of the appropriate setting Consider the following action to ensure suff...

Страница 67: ...hen press the Format button If it still doesn t function properly try storing still snapshots onto the SD card Failure in storing snapshots often suggests problem with the memory card The microSD card is not supported by the device Your camera may not fully support all brands of high capacity memory cards Refer to the SD card compatibility list found in the appendix of this manual The speed class ...

Страница 68: ... an email for support please check the troubleshooting section in the user manual You may fill out the form http comprousa com en form htm or directly email to support comprousa com Compro Technology Inc www comprousa com Tel 886 2 2918 0169 Fax 886 2 2915 2389 4 F No 12 Alley 6 Lane 45 Pao Shin Road Hsintein City Taipei Taiwan ...

Страница 69: ...PEG 4 Part 2 Resolutions 160x120 320 x 240 640 x 480 1280 x 1024 Frame Rate Up to 30 frames at 640 x 480 Up to15 frames at 1280 x 1024 Video Streaming Dual H 264 MJPEG or MPEG 4 video streams Dual MJPEG and MPEG 4 video streams Image Settings Adjustable image size and quality AGC AWB AES Configurable brightness saturation and sharpness Audio Audio Communi cation Two way audio with built in MIC S N...

Страница 70: ...PC Laptop Nettop MID with IE ActiveX support Mobile phone iphone ipod PDA support in MJPEG mode Mobile Phone MJPEG Mode Viewing of camera image via phone browsers 3GPP Mode Viewing of camera image via 3G phones 3GPP Streaming General Operating Condition 5 C 40 C Power Supply DC 5V 2A System Require ments Computer with 1 7GHz processor and 512 MB memory or above Supported Operating Systems Windows ...

Страница 71: ...6k 128k 64kbps 3 1 5 1Mbps 512k 256k 128k 64kbps Stream 2 Resolution VGA 640x480 Not available in 3GPP mode QVGA 320x240 QQVGA 160x120 Codec MPEG 4 MPEG 4 MPEG 4 Frame rate Turbo Picture mode 15 10 7 5 5 Motion Adaptive mode 30 25 20 15 10 7 5 5 Turbo Picture mode 15 10 7 5 5 Motion Adaptive mode 30 25 20 15 10 7 5 5 Turbo Picture mode 15 10 7 5 5 Motion Adaptive mode 30 25 20 15 10 7 5 5 Quality ...

Страница 72: ...Mbps 512k 256k 128k 64kbps Stream 2 Resolution VGA 640x480 Not available in 3GPP mode QVGA 320x240 QQVGA 160x120 Codec MPEG 4 H 264 MPEG 4 H 264 MPEG 4 H 264 Frame rate Turbo Picture mode 15 10 7 5 5 Motion Adaptive mode 30 25 20 15 10 7 5 5 Turbo Picture mode 15 10 7 5 5 Motion Adaptive mode 30 25 20 15 10 7 5 5 Turbo Picture mode 15 10 7 5 5 Motion Adaptive mode 30 25 20 15 10 7 5 5 Quality MPEG...

Страница 73: ...30 25 20 15 10 7 5 5 Turbo Picture mode 15 10 7 5 5 Motion Adaptive mode 30 25 20 15 10 7 5 5 Turbo Picture mode 15 10 7 5 5 Motion Adaptive mode 30 25 20 15 10 7 5 5 Quality MPEG 4 H 264 3 1 5 1Mbps 512k 256k 128kbps Motion JPEG Highest Higher High Medium Low Lower Lowest MPEG 4 H 264 3 1 5 1Mbps 512k 256k 128k 64kbps Motion JPEG Highest Higher High Medium Low Lower Lowest MPEG 4 H 264 3 1 5 1Mbp...

Страница 74: ... 2 10 Figure 2 19 Review changes 2 10 Figure 2 20 Saving changes 2 11 Figure 2 21 System diagnostics 2 11 Figure 2 22 Setup completes 2 11 Figure 2 23 ComproView setup in iWizard 2 12 Figure 3 1 Ways of accessing camera 3 1 Figure 3 2 Login dialog box 3 2 Figure 3 3 Installing Compro ActiveX 3 2 Figure 3 4 Installing Compro ActiveX 3 2 Figure 3 5 Security Warning 1 3 3 Figure 3 6 Security Warning ...

Страница 75: ... 8 Browser security setting 8 5 Figure 8 9 Remote viewing via browser 8 6 Figure 8 10 Detailed network setup 8 6 Figure 8 11 Port forwarding 8 7 Figure 8 12 DDNS setup in iWizard 8 8 Table 1 1 LED status 1 7 Table 1 2 Buttons in recording history 1 8 Table 5 1 Webmail setting 5 9 Table 5 2 SMS server setting 5 10 Table 5 3 Choice of storage destination 5 12 Table 5 4 SD card setup 5 12 Table 5 5 N...

Страница 76: ......

Страница 77: ...re 2 13 Password configuration 2 8 Figure 2 14 Camera configuration 2 8 Figure 2 15 IP configuration 2 9 Figure 2 16 Wireless access point selection 2 9 Figure 2 17 Wireless network setting 2 9 Figure 2 18 iDDNS configuration 2 10 Figure 2 19 Review changes 2 10 Figure 2 20 Saving changes 2 11 Figure 2 21 System diagnostics 2 11 Figure 2 22 Setup completes 2 11 Figure 2 23 ComproView setup in iWiz...

Страница 78: ...re 8 1 Compro program folder 8 1 Figure 8 2 Camera selection 8 1 Figure 8 3 Reset button 8 3 Figure 8 4 ActiveX warning 8 4 Figure 8 5 ActiveX installation 8 4 Figure 8 6 ActiveX installation 8 4 Figure 8 7 Add on management 8 5 Figure 8 8 Browser security setting 8 5 Figure 8 9 Remote viewing via browser 8 6 Figure 8 10 Detailed network setup 8 6 Figure 8 11 Port forwarding 8 7 Figure 8 12 DDNS s...

Отзывы: