1-5
Playback
Chapter
2 Pla
ybac
k
and Recording
22
(GB)
Chapter 2
Playback and Recording
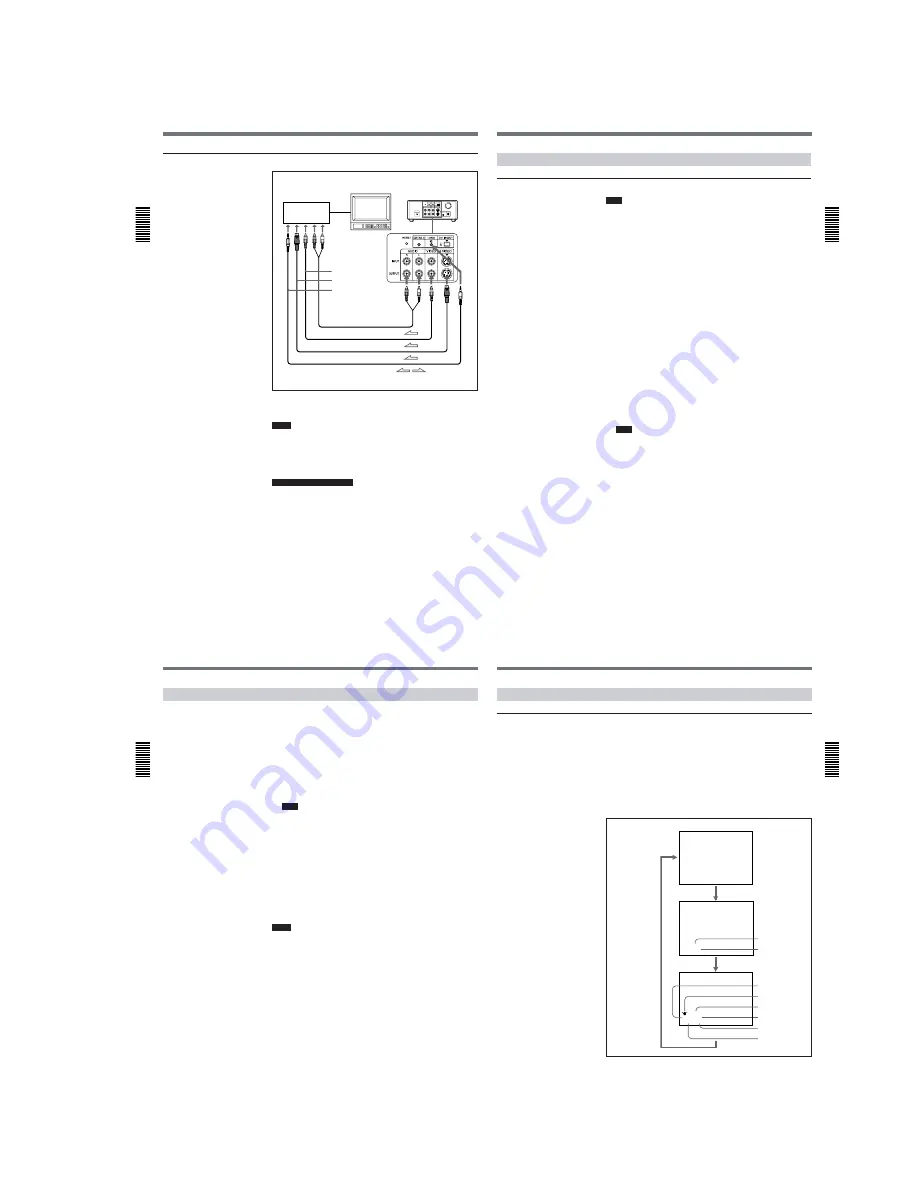
To video equipment without a DV jack
Connect either an S-video cable or a video cable as the cable for video
signals.
Notes
• When you connect the output jacks of the recorder to the input jacks of
this unit, select the input correctly with an input select switch on the
recorder to prevent a humming noise or distortion of the picture.
• Distorted signals (e.g., when played back at a speed other than normal)
will not be recorded properly.
Notes for a LANC connection
• The LANC connection transmits signals such as control signals, time
code, time counter data, and status data.
• Jacks labeled CONTROL L have the same function as LANC jacks.
Jacks labeled REMOTE may also have the same function.
• Set the LANC switch on the recorder to M. A device which does not have
M / S switch cannot be used to control this unit.
Recorder
Player
Other VCR
Monitor
DSR-11
to the S-video
input connector
to the video input jack
to the audio input
jacks
to the LANC jack
Audio cable (not supplied)
Video cable (not supplied)
S-video cable (not supplied)
LANC cable (not supplied)
l
: Signal flow
Chapter 2
Pla
ybac
k
and Recording
Chapter 2
Playback and Recording
23
(GB)
Settings for Playback
Preparation on the player (this unit)
Note
Various text data are superimposed and output from the VIDEO jack or
the S VIDEO connector on the OUTPUT jacks. If you want to record
video signals without text data, carry out the following operations.
• Set TITLE DISP and LABEL DISP on the CM SET menu to OFF.
• Depending on the displayed items, press the MENU, DATA CODE,
DISPLAY or SEARCH SELECT button on the Remote Commander to
clear the text data on the monitor screen.
For details on text data, see “Displaying data recorded on a tape” on page 25
(GB) and “Displaying various data” on page 26 (GB).
For details on the CM SET menu, see “CM SET menu” on page 46 (GB).
1
Power on the video monitor, then set the monitor’s input switch
according to the signals input from the recorder.
2
Set up the recorder.
For details, refer to the instruction manual of the recorder.
3
Power on this unit by pressing the ON/STANDBY switch on this unit.
4
When you play back a tape recorded in 4-channel mode (Fs32k),
adjust the balance between channel 1/2 and channel 3/4 with AUDIO
MIX on the AUDIO SET menu.
For details on the AUDIO SET menu, see “AUDIO SET menu” on page 44
(GB).
Note
The AUDIO MIX on the AUDIO SET menu (audio balance
adjustment) does not function on the source audio output through the
DV IN/OUT connector.
Playback
Chapter
2 Pla
ybac
k
and Recording
24
(GB)
Chapter 2
Playback and Recording
Playback Procedure
This section describes the procedures used to play back a tape and send
signals to another VCR. For details on the procedures required when using
a computer as a recorder, refer to the instruction manual of your computer
or the user’s manuals of the software installed in it.
1
After checking the tape for slack and confirming that the
q
indicator
is off, hold the cassette so that the tape window is facing upward, then
insert it into this unit.
For details on checking the tape for slack, see “Notes on Video Cassettes ” on
page 15 (GB).
Note
Do not insert the cassette forcibly. The unit may be damaged.
The cassette is automatically loaded into the unit.
2
Press the PLAY button.
This unit starts playback.
To stop playback
Press the STOP button on the unit.
To pause playback
Press the PAUSE button on the unit.
Notes
• When this unit is playing back a part of the tape where the recording
format has been changed between the DVCAM format and the DV
format, the picture and sound may be distorted.
• This unit cannot play back a tape recorded in the LP mode of the
consumer DV format.
Chapter 2
Pla
ybac
k
and Recording
Chapter 2
Playback and Recording
25
(GB)
Playback Functions
Displaying data recorded on a tape
If you record on a tape using a Sony digital camcorder (DSR-200/200P,
200A/200AP, PD100/PD100P, PD100A/PD100AP, PD150/PD150P, 250/
250P, etc.), data codes (the shutter speed, SteadyShot, program AE mode,
white balance, iris, gain, date and time) can be recorded on the tape. You
can check these data items during playback on this unit.
Press the DATA CODE button on the Remote Commander during
playback.
Each time you press the DATA CODE button, the display changes as
follows.
2000 12 25
19 : 20 : 30
MANUAL
10000 ATW
F 1.6 0 dB
Shutter speed
SteadyShot
Program AE
White balance
Gain
Iris
No indicator
Recording
date/time
Camera data
Date
Time
(Continued)


