


Version 1.0.15
42
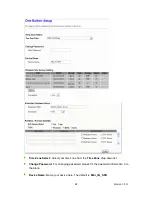
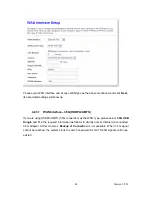
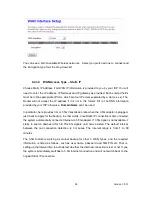
Pre-Shared Key Format:
The keys can be entered in ASCII, 8~63 ASCII characters,
for example, “0123456789ABCD….” or Hex, 64 bytes hexadecimal digits (0~9, a~f,
and A~F). Select the item from drop -down list you wish to use and enter your
Pre-Shared Key.
After checking each above and choose the suitable item by demand, click
Finished
to
proceed.
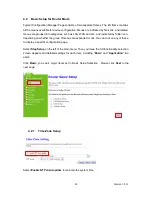
4.2.4
Basic Setup Complete
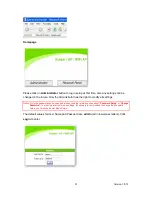
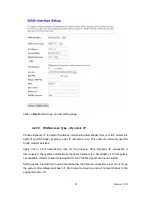
The Basic Setup has been completed successfully when you see this screen.
The system will be rebooted automatically and go to the product’s diagram homepage. You
may connect to Internet via wired or wireless at this moment according to above settings.
4.3
Application Setup full function table list
Click
Application Setup,
you see 6 major items set in Application Setup Selection: Folder
Management Setup, User Account Management Setup, FTP Server Setup, Printer Server
Setup, Web Camera Setup and Samba Server Setup.
Содержание 3G11nMRW
Страница 1: ...Version 1 0 15 1 3G11nMRW 3 5G plus 11n Mobile Server Router User Manual ...
Страница 15: ...Version 1 0 15 15 Step 2 Click on Properties Step 3 Double click on Internet Protocol TCP IP ...
Страница 19: ...Version 1 0 15 19 If it can t work it will show Request timed out ...
Страница 67: ...Version 1 0 15 67 ...
Страница 121: ...Version 1 0 15 121 Step 3 Click on Next button Step 4 Select Local printer attached to this computer and click Next ...
Страница 158: ...Version 1 0 15 158 3 While scanning is successful the information of the wireless card appears in the windows below ...
Страница 160: ...Version 1 0 15 160 4 When you can see the IP information below the connection is established ...
Страница 173: ...Version 1 0 15 173 Step 3 Click on Next button Step 4 Select Local printer attached to this computer and click Next ...
Страница 191: ...Version 1 0 15 191 6 6 Logout Click Logout on the bottom menu to exit and go back to GUI login home page ...
Страница 208: ...Version 1 0 15 208 4 When you can see the IP information below the connection is established ...
Страница 241: ...Version 1 0 15 241 Step 2 Fill in the form as required and then click on Create Account button ...
Страница 244: ...Version 1 0 15 244 Step 9 Your hostname has been created when you see the followi ng page ...