


Version 1.0.15
196
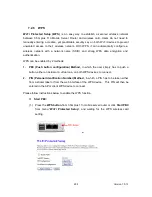
(3.)
SSID:
please enter different SSID in each class.
(4.)
Data Rate:
please select the data transmission rate.
(5.)
Access:
defined the access type.
a. LAN+WAN:
the client can access to the Internet and connect to 3.5G Mobile
router’s GUI to setup.
b. WAN:
the client can only access to the Intern et.
(6.)
Active Client List:
display the properties of the client which is connecting
successfully.
(7.)
Apply Changes:
Please click
Apply Changes
to initiate or click
Reset
to clear all
the input data.
4.
Network Type
:
Please select “
Infrastructure
” or “
Ad hoc
.” The default is “
Infrastructure
.” The selection is
disabled when wireless mode is selected to AP.
5.
SSID
:
Please input your wireless network name. Default is “3.5G_ Mobile_Router”.
6.
Channel Width
Please select “
20MHZ
” or “
40MHZ
” channel width to change the transmi ssion channels.
7.
ControlSideband
Setting the Sideband "
Upper
" or "
lower.
”
8.
Channel Number
Please select your wireless network channel. There are Auto, 2~11.
9.
Broadcast SSID
Enable or disable the SSID broadcast function. Disable this feature can provide more security
of your WLAN.
10. Data Rate
Rate at which data can be communicated (bps); auto, 1M, 2M, 5.5M, 11M, 6M, 9M, 12M, 18M,
24M, 36M, 48M or 54M to be selected from the drop -down list.
11. Associated Clients
Содержание 3G11nMRW
Страница 1: ...Version 1 0 15 1 3G11nMRW 3 5G plus 11n Mobile Server Router User Manual ...
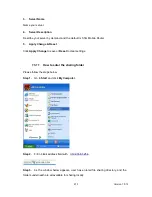
Страница 15: ...Version 1 0 15 15 Step 2 Click on Properties Step 3 Double click on Internet Protocol TCP IP ...
Страница 19: ...Version 1 0 15 19 If it can t work it will show Request timed out ...
Страница 67: ...Version 1 0 15 67 ...
Страница 121: ...Version 1 0 15 121 Step 3 Click on Next button Step 4 Select Local printer attached to this computer and click Next ...
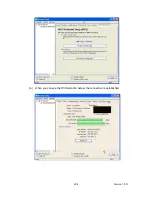
Страница 158: ...Version 1 0 15 158 3 While scanning is successful the information of the wireless card appears in the windows below ...
Страница 160: ...Version 1 0 15 160 4 When you can see the IP information below the connection is established ...
Страница 173: ...Version 1 0 15 173 Step 3 Click on Next button Step 4 Select Local printer attached to this computer and click Next ...
Страница 191: ...Version 1 0 15 191 6 6 Logout Click Logout on the bottom menu to exit and go back to GUI login home page ...
Страница 208: ...Version 1 0 15 208 4 When you can see the IP information below the connection is established ...
Страница 241: ...Version 1 0 15 241 Step 2 Fill in the form as required and then click on Create Account button ...
Страница 244: ...Version 1 0 15 244 Step 9 Your hostname has been created when you see the followi ng page ...