18
10.2
Brake caliper. Checking, maintenance
Before setting up the caliper, loosen the brake cable as much as
possible as specified in
10.1 on page 17.
To adjust the brake caliper, remove the cover using a cross
screwdriver�
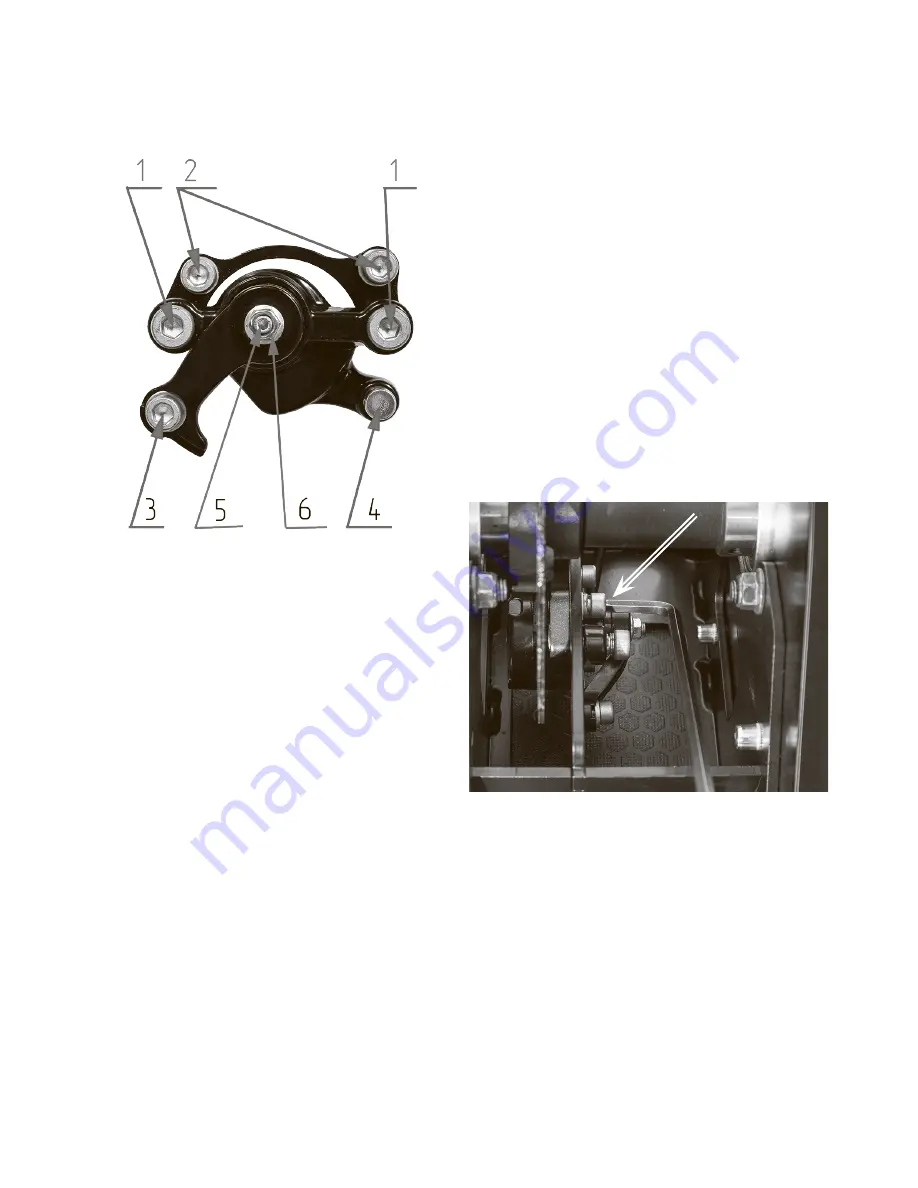
Caliper parts
1�
Bolts to adjust the position of the caliper (parallelism
of the brake pads in respect of the brake disc)
2�
Bolts of fastening the caliper
3�
Bolt of fastening the brake cable
4�
Stop of the tube guide cable of the brake
5�
Bolt to adjust the distance between the pads
6�
Lock nut of the adjusting bolt
10.2.1
Adjusting the brake caliper
Fully loosen the tension of the brake cable on the lever, as
described in�
10.1 on page 17.
Ensure ease of pushing and return to the starting position of the
lever and the parking brake cable.
At the complicated movement of the parking brake lever, lubricate
or replace the cable.
If the parking brake lever is in the initial position, and the cable
slacks, adjust the tension of the cable on the parking brake
caliper. Loosen the bolt 3 and pull the cable to remove slacking.
Do not create tension of the cable.
Tighten the bolt and check the operation of the parking brake
lever�
By rotating the bolts 1, adjust the position of the caliper relative
to the brake disc. The fixed brake pad should be parallel to the
brake disc plane. Adjust the minimal possible distance between
the fixed brake pads and the brake disc. Allowed is the brake
pad’s touching the disc, if its rotation is not obstructed.
Loosen the lock nut 5. Tighten the screw 6 until the movable
brake pad’s touching the brake disc. When holding the bolt 6
tighten the locknut 5. Check the brake disk rotation. Allowed is
the brake pads’ touching the disc, if its rotation is not obstructed.
Check the free travel of the parking brake lever. If necessary,
adjust the tension of the cable as described in.
10.1 on page
17
10.2.2 Removal and installation of the brake caliper
By using the INBUS allen wrench or another hex slot, unscrew
the bolts 2.


