background image


IMPORTANT SAFETY INSTRUCTIONS 


PREPARATION  

(Continued From Previous Page) 
5.  Practice operation of machine with BLADES OFF 

to learn controls and develop skills.  

6.  Check the area to be mowed and remove all 

objects such as toys, wire, rocks, limbs and other 
objects that could cause injury if thrown by blades 
or interfere with mowing. 

7.  Keep people and pets out of mowing area. 

Immediately, STOP blades, STOP engine, and 
STOP machine if anyone enters the area. 

8.  Check shields, deflectors, switches, blade controls 

and other safety devices frequently for proper 
operation and location. 

9.  Make sure all safety decals are clearly legible. 

Replace if damaged. 

10. Protect yourself when mowing and wear safety 

glasses, long pants and substantial footwear. 

11.  Know how to STOP blades and engine quickly in 

preparation for emergencies. 

12. Use extra care when loading or unloading the 

machine into a trailer or truck. 

13. Check grass catcher components frequently for 

signs of wear or deterioration and replace as 
needed to prevent injury from thrown objects 
going through weak or worn spots. 


OPERATION  

1.  Mount and dismount machine from left side.  
2.  Start engine from operator's seat, if possible. Make 

sure blades are OFF and parking brake is set.  

3.  DO NOT leave machine with engine running.  Stop 

engine. Stop blades. Set brake. Remove key.  

4.  DO NOT operate machine unless properly seated 

with feet on feet rests or pedal(s). 

5.  STOP BLADES and ENGINE and make sure blades 

have stopped before removing grass catcher or 
unclogging mower to prevent loss of fingers or 
hand.  

6.  Blades must be OFF except when cutting grass. 

Set blades in highest position when mowing over 
rough ground.  

7.  Keep hands and feet away from rotating blades 

underneath deck. DO NOT place foot on ground 
while BLADES are ON or machine is in motion.  

8.  DO NOT operate machine without entire grass 

catcher or guards in place. DO NOT point 
discharge at people, passing cars, windows or 
doors.  

9.  Slow down before turning.  
10. Watch out for traffic when near or crossing 

roadways.  

11. 

STOP engine immediately after striking an 
obstruction. Inspect machine and repair damage 
before resuming operation.  


OPERATION  

(Continued From Previous Column) 
12.  Mow only in daylight or with good artificial light.  
13. Move motion control levers SLOWLY to maintain 

control during speed and directional changes.  

14. Exercise CAUTION when pulling loads. DO NOT 

pull loads greater than 300 pounds. Avoid jack 
knifing. DO NOT turn sharply. 

15.  DO NOT operate engine in enclosed areas. Engine 

exhaust gases contain carbon monoxide, a deadly 
poison. 


MAINTENANCE  

1.  DO NOT store machine or fuel container inside 

where fumes may reach an open flame, spark or 
pilot light such as in a water heater, furnace, 
clothes dryer or other gas appliance. Allow 
engine to cool before storing machine in an 
enclosure. Store fuel container out of the reach 
of children in a well ventilated, unoccupied 
building.  

2.  Keep engine free of grass, leaves or excess 

grease to reduce fire hazard and engine 
overheating.  

3.  When draining fuel tank, drain fuel into an 

approved container outdoors and away from 
open flame.  

4. Check brakes frequently; adjust, repair or 

replace as needed. 

5.  Keep all bolts, nuts and screws properly tight. 

Check that all cotter pins are in proper position.  

6. Always provide adequate ventilation when 

running engine. Engine exhaust gases contain 
carbon monoxide, an odorless and deadly 
poison.  

7.  Disconnect negative (black) cable from battery 

before performing maintenance or service. 
Cranking engine could cause injury.  

8.  DO NOT work under machine without safety 

blocks.  

9.  Service engine and make adjustments only 

when engine is stopped. Remove spark plug 
wire(s) from spark plug(s) and secure wire(s) 
away from spark plug(s).  

10. 

DO NOT change engine governor speed 
settings or overspeed engine.  

11. Lubricate machine at intervals specified in 

manual to prevent controls from binding.  

12. Mower blades are sharp and can cut. Wrap the 

blades or wear heavy leather gloves and use 
CAUTION when handling them.  

13. DO NOT test for spark by grounding spark plug 

next to spark plug hole; spark plug could ignite 
gas exiting engine. 

14. 

Have machine serviced by an authorized 
SNAPPER dealer at least once a year and have 
the dealer install any new safety devices.  

15. Use only genuine SNAPPER replacement parts 

to assure that original standards are 
maintained. 

Содержание EZF2100DKU, EZF2300GKU, EZF520

Страница 1: ...3 Engine Horse Power G Gasoline Fuel Engine F Out Front Mower MOWER UNIT Z Zero Turning Hydro Drive 52 Mower Cutting Width 00 Series Designation M Mower Deck F Out Front Mower 61 Mower Cutting Width T...

Страница 2: ...other attachments these affect the handling and the stability of the machine 1 DO NOT operate machine on slopes exceeding 15 degrees 27 grade 2 Exercise EXTREME CAUTION on slopes above 10 degrees 18 g...

Страница 3: ...ction Inspect machine and repair damage before resuming operation OPERATION Continued From Previous Column 12 Mow only in daylight or with good artificial light 13 Move motion control levers SLOWLY to...

Страница 4: ...NTS AND REPAIR 19 25 Neutral Position Adjustments 19 Mower Deck Adjustment Levelness 19 20 Parking Brake Adjustment 20 Engine Adjustments Repair 20 Mower Blade Replacement 20 21 Blade Sharpening 21 Mo...

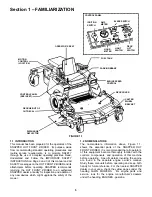
Страница 5: ...re information above Figure 1 1 shows the essential parts of the SNAPPER OUT FRONT Z RIDER It is recommended that all operator s of this equipment become thoroughly familiar with the controls componen...

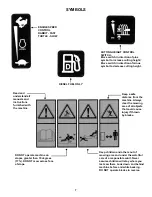
Страница 6: ...Pull switch up ON to engage blade Push switch down OFF to disengage blade IMPORTANT Mower Blade Control Switch must be in OFF disengaged position to start engine SYMBOLS Hearing protection required du...

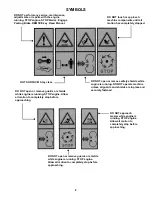
Страница 7: ...ear the mowing area of all objects that could cause injury if thrown by blades Read and understand all manuals and instructions furnished with the machine DO NOT operate machine on slopes greater than...

Страница 8: ...e is running STOP engine Allow all motion to completely stop before approaching SYMBOLS DO NOT perform any service maintenance adjustments or repairs with the engine running STOP engine STOP blades En...

Страница 9: ...fuel to tank of the Out Front Z Rider outside where fumes can safely dissipate Make sure fuel filler cap is tight Refer to engine owner s manual for fuel specifications 2 1 7 COLD ENGINE ONLY Check e...

Страница 10: ...maximum Moving the joystick farther from the neutral position will cause the speed of motion to increase To turn move the joystick towards the side you want to turn to DO NOT make sudden changes in s...

Страница 11: ...ne speed control to the Rabbit or fast position 2 Pull the blade switch out into the ON position to engage the mower blades 3 Release the parking brake 4 Move joystick carefully in the desired directi...

Страница 12: ...ight of cut release switch See Figure 2 10 Observe the height of cut decal located on the upper right top side of the deck to place deck at the correct height of cut See Figure 2 10 NOTE The engine do...

Страница 13: ...running adjust engine speed control to Rabbit or Fast position 2 Release parking brake 3 Move joystick lever carefully and slowly into desired speed position A small movement of the joystick can cause...

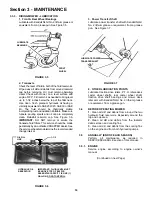
Страница 14: ...1 FIGURE 3 1 3 After all the oil has drained reinstall oil drain plug and tighten securely See Figure 3 1 Wipe up any oil that may have spilled Dispose of drained oil properly 4 Fill engine crankcase...

Страница 15: ...wer Deck Levelness Check mower deck for proper levelness Adjust as required Refer to Section MOWER DECK ADJUSTMENT LEVELNESS 4 Cleaning Mower Deck a Remove key from ignition switch b Remove spark plug...

Страница 16: ...ermine the recommended change interval FIGURE 3 6 3 Power Transfer Shaft Lubricate power transfer shaft with Kendall NLGI No 2 lithium grease or equivalent from a grease gun See Figure 3 7 FIGURE 3 7...

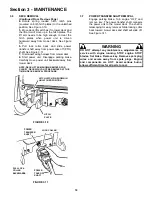
Страница 17: ...briefly with air vent plug loosened to purge all air from system FIGURE 3 8 3 6 DECK REMOVAL Move machine to an area where the mower deck is to be disconnected Turn engine OFF but leave key switch in...

Страница 18: ...from mower deck FIGURE 3 10 FIGURE 3 11 3 7 POWER TRANSFER SHAFT REMOVAL Engage parking brake Turn engine OFF and remove key The power transfer shaft connects the power unit to the mower deck The shaf...

Страница 19: ...nto the cross shaft arms and reconnect Tighten securely 9 Reconnect park brake rod 10 Start engine Release park brake Wheels should not be rotating if adjusted properly Repeat adjustment if necessary...

Страница 20: ...r blades running Stop blades Stop engine Set brake Remove key Remove spark plug wires from spark plugs and gas only secure wires away from spark plugs Engine and components are HOT Avoid serious burns...

Страница 21: ...e is in good condition sharpen at 22 to 28 degrees DO NOT sharpen beyond existing cutting edge See Figure 4 7 4 Check blade balance after sharpening If necessary correct blade balance by grinding the...

Страница 22: ...be necessary to use a pry bar to pull idler pulley back to install belt See Figure 4 8 2 Reinstall belt cover FIGURE 4 8 4 6 3 ENGINE BELT REMOVAL 1 Remove radiator screen 2 Remove nut and bolt that s...

Страница 23: ...hly corrosive liquid Wear eye protection Wash affected areas immediately after having eye or skin contact with electrolyte acid Battery acid is corrosive Rinse empty acid containers with water and mut...

Страница 24: ...measures the specific gravity of each cell The specific gravity tells the degree of charge generally a specific gravity of about 1 265 to 1 280 indicates full charge A reading of 1 230 to 1 260 indica...

Страница 25: ...The bearing is sealed shielded on one side only The bottom bearing must be installed with the sealed shielded side DOWN 7 Insert spindle shaft up through the bottom bearing Slide spacer down over spin...

Страница 26: ...Excessive load on engine 1 Lessen load 2 Engine air pre cleaner or air cleaner dirty 2 Clean or replace filters 3 Engine oil level low 3 Fill with engine oil to proper level 4 Fuel injection nozzle c...

Страница 27: ...el 6 Excessive deck pitch front to rear 6 Adjust front to rear level 7 Cutting blade s dull or damaged 7 Sharpen cutting edges or replace blade s 8 Blade belt slipping 8 Replace blade belt 9 Check ele...

Страница 28: ...r Blades Check For Wear Damage Replacement Pages 14 20 21 X Mower Deck Clean Outside Underside of Debris Accumulation Page 15 X Lubrication Points Grease or Oil Pages 15 16 X X Hydrostatic Trans Oil C...

Страница 29: ...from the original purchase date SNAPPER will not be responsible for any installation cost incurred The battery warranty only covers original equipment batteries and does not cover damage to the batter...

Страница 30: ...30 NOTES...

Страница 31: ...31 NOTES...

Страница 32: ...and Follow all warnings and instructions in this manual the engine manual and on the machine engine and attachments If you have any questions about your Snapper product contact your local authorized...

Отзывы: